Table of Contents
Advertisement
Quick Links
Quick Start for the HOBO® MX CO
IMPORTANT: The CO
sensor within this logger can experience measurement drift during storage and shipment. Start the logger as described below and
2
perform a manual calibration as described in Step 4. Note that improper manual calibration can cause incorrect sensor readings.
1
Install the batteries in the logger. Use a Phillips-head screwdriver to open the battery cover on the back of the logger and insert four AA batteries
observing polarity. Screw the cover back in place.
• Download HOBOconnect® to a phone or tablet from the App Store® or Google Play™ or download HOBOconnect to a Windows® computer from
2
www.onsetcomp.com/products/software/hoboconnect.
• Download HOBOware® to a computer from www.onsetcomp.com/products/software/hoboware.
3
To configure the logger with HOBOconnect:
a. Open the app. Enable Bluetooth® in your device settings if prompted.
b. Tap Devices in the app. Tap the logger tile in the app to connect to the logger. If the logger does not appear, make sure it is within range of your
phone, tablet, or computer.
c. Tap Configure & Start to set up the logger.
d. Choose your logger settings. Tap the CO
manually calibrating the logger immediately after logging begins. Enter the altitude if the logger will be deployed above or below 305 meters
(1,000 feet).
e. Tap Start to save the settings to the logger.
The logger begins logging data based on the settings you select in the app. Press the start button on the logger if you set it up to start logging with a
button push.
To configure the logger with HOBOware:
a. Connect the logger to the computer with a USB cable. From the Device menu in HOBOware, select Launch.
b. Choose your logger settings. Click the CO
calibration immediately after logging begins is recommended for best accuracy. Enter the altitude if the logger will be deployed above or below
305 meters (1,000 feet). Click Save.
c. Click the Start button when finished. Note that the Start button text changes based on your Start Logging selection.
22467-J MAN-MX1102A-QSG
Quick Start for the HOBO® MX CO
IMPORTANT: The CO
sensor within this logger can experience measurement drift during storage and shipment. Start the logger as described below and
2
perform a manual calibration as described in Step 4. Note that improper manual calibration can cause incorrect sensor readings.
1
Install the batteries in the logger. Use a Phillips-head screwdriver to open the battery cover on the back of the logger and insert four AA batteries
observing polarity. Screw the cover back in place.
• Download HOBOconnect® to a phone or tablet from the App Store® or Google Play™ or download HOBOconnect to a Windows® computer from
2
www.onsetcomp.com/products/software/hoboconnect.
• Download HOBOware® to a computer from www.onsetcomp.com/products/software/hoboware.
3
To configure the logger with HOBOconnect:
a. Open the app. Enable Bluetooth® in your device settings if prompted.
b. Tap Devices in the app. Tap the logger in the app to connect to it. If the logger does not appear, make sure it is within range of your phone, tablet,
or computer.
c. Tap Configure & Start to set up the logger.
d. Choose your logger settings. Tap the CO
manually calibrating the logger immediately after logging begins. Enter the altitude if the logger will be deployed above or below 305 meters
(1,000 feet).
e. Tap Start to save the settings to the logger.
The logger will begin logging data based on the settings you selected in the app. Press the start button on the logger if you set it up to start logging
with a button push.
To configure the logger with HOBOware:
a. Connect the logger to the computer with a USB cable. From the Device menu in HOBOware, select Launch.
b. Choose your logger settings. Click the CO
calibration immediately after logging begins is recommended for best accuracy. Enter the altitude if the logger will be deployed above or below
305 meters (1,000 feet). Click Save.
c. Click the Start button when finished. Note that the Start button text changes based on your Start Logging selection.
22467-J MAN-MX1102A-QSG
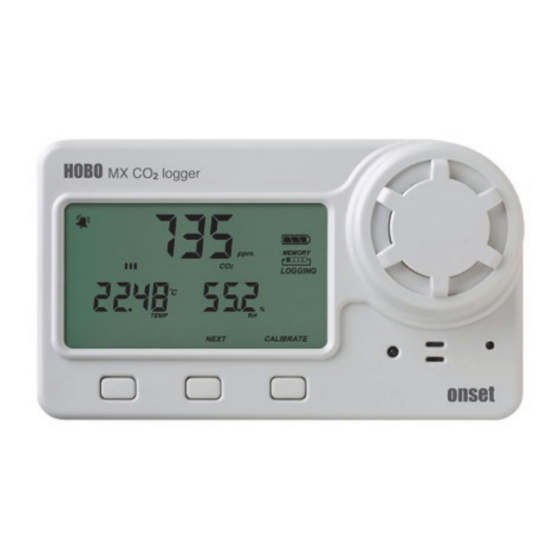
Logger (MX1102A)
2
Sensor Altitude Settings and select both manual and auto calibration. For best accuracy, we recommend
2
Settings button and select manual and auto calibration (both are selected by default). Manual
2
Logger (MX1102A)
2
Sensor Altitude Settings and select both manual and auto calibration. For best accuracy, we recommend
2
Settings button and select manual and auto calibration (both are selected by default). Manual
2
Advertisement
Table of Contents

Subscribe to Our Youtube Channel
Related Manuals for Hobo MX1102A


Summary of Contents for Hobo MX1102A
- Page 1 Quick Start for the HOBO® MX CO Logger (MX1102A) IMPORTANT: The CO sensor within this logger can experience measurement drift during storage and shipment. Start the logger as described below and perform a manual calibration as described in Step 4. Note that improper manual calibration can cause incorrect sensor readings.
- Page 2 To offload data from the logger with HOBOware, select Readout from the Device menu. Save the data when prompted and plot as desired. For detailed specifications and information about this logger, refer to the HOBO® MX CO2 Logger (MX1102A) Manual at www.onsetcomp.com/resources/documentation/22504-mx1102a-manual or scan the code at left.
Need help?
Do you have a question about the MX1102A and is the answer not in the manual?
Questions and answers