Table of Contents
Advertisement
Quick Links
User manual
SteriHero
Steam sterilizer
from software version 2.1.0
EN
Dear customer,
We thank you for your confidence demonstrated by the purchase of this MELAG product. As an owner-run and operated
family concern founded in 1951, we have a long history of successful specialization in hygiene products for practice-
based use. Our focus on innovation, quality and the highest standards of operational reliability has established MELAG
as the world's leading manufacturer in the instrument reprocessing and hygiene field.
You, our customer are justified in your demand for the best products, quality and reliability. Providing
hygiene"
and
"Quality – made in
management system is subject to close monitoring: one instrument to this end is our annual multi-day audit conducted in
accordance with EN ISO 13485. This guarantees that all MELAG products are manufactured and tested in accordance
with strict quality criteria.
The MELAG management and team.
®
Vet
Germany", we guarantee that these demands will be met. Our certified quality
"competence in
Advertisement
Table of Contents

Related Manuals for MELAG SteriHero Vet


Summary of Contents for MELAG SteriHero Vet
- Page 1 2.1.0 Dear customer, We thank you for your confidence demonstrated by the purchase of this MELAG product. As an owner-run and operated family concern founded in 1951, we have a long history of successful specialization in hygiene products for practice- based use.
-
Page 3: Table Of Contents
Contents Contents 1 General guidelines ................................ 5 Symbols used .................................. 5 Formatting rules................................... 5 Disposal .................................... 5 2 Safety..................................... 6 3 Performance specifications .............................. 8 Intended use .................................. 8 Sterilization procedure ................................. 8 Type of the feed water supply.............................. 8 Program runs .................................. 9 Safety equipment................................ 10 Performance characteristics of sterilization programs ....................... 10 4 Description of the device.............................. 11 Scope of delivery ................................ 11 Views of the device................................ 12... - Page 4 Contents 8 Important information for routine operation........................ 38 9 Sterilization .................................. 39 Preparing the load ................................ 39 Loading the steam sterilizer............................... 40 Selecting the program................................ 42 Starting the program ................................ 43 Manual program abort ............................... 45 Ending the program prematurely ............................ 47 Program is ended ................................ 47 Removing the sterile material ............................ 49 Storing sterile material ............................... 49 10 Logging ..................................... 50 Batch documentation ................................. 50...
-
Page 5: General Guidelines
Make sure that you always have access to digital or printed version of the user manual. Should the manual no longer be legible, is damaged or has been lost, you can download a new copy from MELAG download centre at www.melag.com. -
Page 6: Safety
Power cable and power plug Only the power cable included in the scope of delivery may be connected to the device. The power cable may only be replaced by an original spare part from MELAG. Comply with all legal requirements and locally-specified connection conditions. - Page 7 Maintain the specified servicing intervals. Only original MELAG spare parts may be used. Repair Never open the device housing. Incorrect opening and repair can compromise electrical safety and pose a danger to the user. The device may only be opened by an...
-
Page 8: Performance Specifications
3 Performance specifications Intended use The SteriHero Vet steam sterilizer is intended for use in veterinary medicine. The steam sterilizer is designed as a small steam sterilizer according to 13060. It uses the fractionated vacuum process to guarantee effective steam ... -
Page 9: Program Runs
3 Performance specifications Program runs A reprocessing program runs in three main phases: the air removal and heating up phase, the sterilization phase and the drying phase. After program start, you can follow the program run on the display. It shows the chamber temperature and pressure as well as the time until the end of drying. -
Page 10: Safety Equipment
3 Performance specifications Safety equipment Internal process monitoring An independent process evaluation system (safety controller) is integrated in the electronics of the steam sterilizer. It compares the process parameters (such as temperature, time and pressure) during a program run. It monitors the parameters in terms of their threshold values during control and regulation and guarantees a safe and successful program run. -
Page 11: Description Of The Device
▪ Manufacturer's inspection report and declaration of conformity ▪ Warranty certificate ▪ Record of installation and setup ▪ Tray lifter ▪ MELAG USB flash drive ▪ Drain hose ▪ Power cable ▪ 4 side wall cover caps ▪ Tool for opening the emergency door manually... -
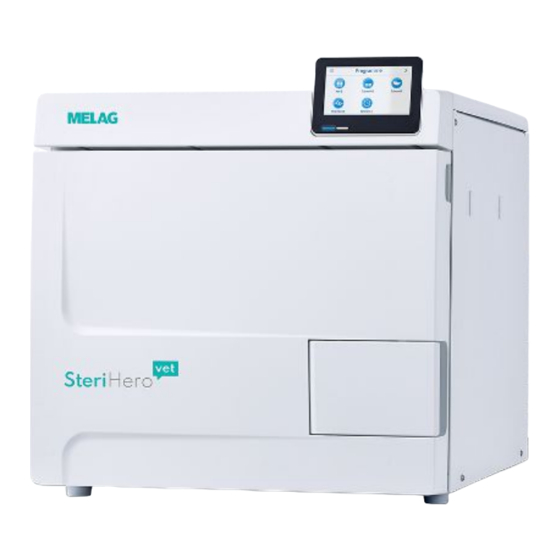
Page 12: Views Of The Device
4 Description of the device Views of the device Front Cover, feed water side Touch display with USB connection on the right Door (swings open to the left) Door handle Front device foot (adjustable) Rear panel USB connection Ethernet connection Power cable connection Emergency overflow (for feed water supply, internal storage tank) -
Page 13: Symbols On The Device
4 Description of the device View of the interior Round blank Sterilization chamber Spring clip for fixing mounts Tank cover Power switch Mount for the water treatment unit for MELAdem Overheat protection reset button Dust/device filter Drain valve for emptying the wastewater tank Drain valve for emptying the feed water tank... - Page 14 4 Description of the device Working overpressure in sterilization chamber Operating temperature in sterilization chamber Warning symbols This symbol indicates that the marked area becomes hot during operation. Contact with it during or shortly after operation can pose the danger of burns. Front of the device Drain valve of the internal storage tank: 1 = Wastewater side...
-
Page 15: Touch Display
4 Description of the device Touch display The user interface consists of a colour 4.3-inch touch display. On the right-hand side of the display, there is a USB port for data export (e.g. log output) and data import (e.g. software update). The representation in the areas is dynamic and changes depending on the status of the device. - Page 16 4 Description of the device Button Name Description DEVICE STATUS Open device data (e.g. serial number) WARNING Warning message present Maximise warning view MALFUNCTION Malfunction message present Maximise malfunction message view Symbol Description User role administrator User role service technician User role practice employee USB stick connected Door locked...
- Page 17 4 Description of the device Main area In the main area, the device is controlled via buttons for program selection and for activating/deactivating functions. The program status is displayed while a program is running. Messages and/or user instructions are displayed depending on the status of the device. Button Name Description...
-
Page 18: Load Mount
4 Description of the device Load mount Note the following depending on the use of the accessories: A spring clip (pos. a) is located on the rear panel of the sterilization chamber to fix the mount. When using an A Plus mount, slide the mount (pos. b) into the sterilization chamber to its fullest extent, until the mount snaps into the spring clip audibly and noticeably. -
Page 19: Installation Requirements
Failure to comply with the setup conditions can result in injuries and/or damage to the steam sterilizer. The steam sterilizer should only be setup, installed and commissioned by persons authorised by MELAG. The steam sterilizer is not suitable for operation in explosive atmospheres. -
Page 20: Space Requirements
5 Installation requirements Space requirements Dimensions Width 47 cm Height 50 cm Depth, total 64 cm Clearance between the device feet 45 cm Clearance from rear device foot up to the rear panel 5 cm Min. clearance to the side 5 cm Min. clearance to the side of the door hinge 10 cm Min. -
Page 21: Mains Connection
5 Installation requirements Additional space requirement for the feed water supply If the device is operated with a water treatment unit or storage tank, additional space is required. It is necessary to guarantee free access to the hoses and cables of the device leading to the water treatment unit. Space requirements MELAdem 40 MELAdem 47... -
Page 22: Water Connection
2-6 bar pressure Water stop For insurance reasons, MELAG recommends the installation of a water stop with a cut-off valve (e.g. from MELAG), as the MELAdem 40/MELAdem 47 are under constant hydraulic pressure from the domestic water supply. PLEASE NOTE Fit the outlet hose at a constant decline without kinks or sagging. -
Page 23: System And Network Safety
FAT32 file system and software-update container NOTICE When performing a device software update, use only the update data authorized by MELAG for the corresponding device type. Operating the device with memory media To prevent data loss, only use memory media to save the log data with the following characteristics: Functional capability (without malware etc.) -
Page 24: Setup And Installation
WARNING Improper installation may lead to a short-circuit, fire, water damage or electrical shock. This could result in serious injury. Only have the device set up, installed and commissioned by people authorised by MELAG. Removing from the packaging CAUTION Danger of injury from incorrect carrying. -
Page 25: Feed Water Supply
A water treatment unit is directly connected to the drinking water supply. The respective system is selected in accordance with the number of sterilization runs per day and the type of the load. Every MELAG steam sterilizer can be fitted with a water treatment unit. -
Page 26: Installation Examples
6 Setup and installation Installation examples On the following pages, you will find examples of the recommended installation types for the feed water supply. PLEASE NOTE For detailed information on the cold water connection of the water treatment unit, see the user manual of the unit. - Page 27 When using an automatic water supply via the connection kit feed water (art. no. ME09040, not included in scope of delivery), MELAG always recommends automatic water disposal via the connection kit wastewater (art. no. ME09041, not included in scope of delivery). Install the connection kits according to separate instructions.
- Page 28 6 Setup and installation Pos. Description Art. no. contained in Emergency overflow included on the device side Free outlet AB (integrated in the tank/behind the rear panel) included on the device side Cold water adapter 3/4" to 1/4" (direct connection water hose) ME09037 not included in scope of delivery...
- Page 29 When using an automatic water supply via the connection kit feed water (art. no. ME09040, not included in scope of delivery), MELAG always recommends automatic water disposal via the connection kit wastewater (art. no. ME09041, not included in scope of delivery). Install the connection kits according to separate instructions.
- Page 30 6 Setup and installation Pos. Description Art. no. contained in Emergency overflow included on the device side Connection kit, feed water ME09040 not included in scope of delivery Solenoid valve, external water inflow ME80057 ME09040 Inflow fitting, feed water ME80068 ME09040 Seal, pressure release fitting ME21247...
-
Page 31: Aligning The Device
6 Setup and installation Aligning the device For a fault-free operation, set up the device horizontally by using a spirit level so that the residual water/condensate can drain out of the sterilization chamber. Remove the cover of the feed water tank. Remove the tank cover from the device. -
Page 32: Connecting The Mains Cable And Removing Accessories
6 Setup and installation Connecting the mains cable and removing accessories NOTICE Before switching on for the first time, the device must have acclimatised to the required ambient temperature (5-40 °C). Connect the power cable (pos. b) to the back of the steam sterilizer and fold down the safety latch (pos. -
Page 33: Test Runs
Record of installation and setup The record of installation is to be completed by the responsible stockist and a copy sent to MELAG as proof of the correct setup, installation and initial commissioning. This is a constituent part of any guarantee claim. -
Page 34: First Steps
7 First steps 7 First steps Switching on the device The following must be fulfilled or present: ü The device is connected to the power supply. ü The feed water supply is secure. The steam sterilizer requires min. 1.25 l of feed water for the first filling of the steam sterilizer. - Page 35 7 First steps Opening the door After switching on the device The following must be fulfilled or present: ü The device is switched on and booted up. ü An audible click is heard. Pull the door handle carefully and not forcibly. PLEASE NOTE: The door is to be left open only whilst loading and unloading the device.
- Page 36 7 First steps Manual door emergency-opening CAUTION Danger of scalding from hot steam! Hot steam egress from the sterilization chamber is possible e.g. if it is necessary to open the door after the end of a program. This could result in scalding. Should steam be issued from the rear of the device after its deactivation, wait until the procedure has finished.
- Page 37 7 First steps Using the tool supplied, pull the ring under the closure plug slightly upwards and, at the same time, carefully open the door. Place the ring back in its original position. Replace the closure plug. Hook the tank cover onto the rear of the device and pull the tank cover forward until it clicks into place.
-
Page 38: Important Information For Routine Operation
The use of another test system in accordance with EN 867-5 possible. The number of the available test systems means that MELAG is not able to provide technical support when using a different system. PLEASE NOTE Document the results of the tests. -
Page 39: Sterilization
9 Sterilization 9 Sterilization Preparing the load Always clean and disinfect properly before sterilization. Only in this way is it possible to guarantee the subsequent sterilization of the load. The materials used, cleaning agents and reprocessing procedure are of decisive significance. ... -
Page 40: Loading The Steam Sterilizer
Use aluminium sterile containers. Aluminium retains and conducts heat and thus accelerates drying. Closed sterile containers must be either perforated or have a valve on at least one side. MELAG sterile containers, e.g. MELAstore Box, fulfil the requirements for successful sterilization and drying. - Page 41 Ensure that the perforations are not covered when stacking the sterile containers. Tip: MELAG sterile containers fulfil the requirements of EN 868-8 for successful sterilization and drying. They have a perforated lid and base and are fitted with disposable paper filters.
-
Page 42: Selecting The Program
9 Sterilization Selecting the program All sterilization programs are displayed in the Programs menu. The following tables show you which program you use for which load and which service programs are also available to you. When selecting the sterilization program, proceed as follows: Select the sterilization program based on which products you want to sterilize. -
Page 43: Starting The Program
9 Sterilization Program Especially suitable for Maximum load Operating time Drying quantity ▪ Inactivation of prions Instruments: (e.g. Creutzfeldt- ▪ single 5 kg 37-48 min Jacob) wrapped Prion B ▪ Products with narrow ▪ Double 4 kg 37-47 min 134°C lumen wrapped 20 min... - Page 44 9 Sterilization Press START PROGRAM in the program view. Ê When the program starts, the device checks the amount of feed water and the conductivity. Program options Additional drying With correct loading, the program-specific drying times guarantee adequate drying of the sterile material.
-
Page 45: Manual Program Abort
9 Sterilization Program in progress After program start, you can follow the program run on the display. The following values are displayed during the program run: Program run display: a) Program parameter b) Program name c) Program phase d) Remaining run time (remaining program duration in minutes) e) Expected end of program Manual program abort You can abort the program at any time. - Page 46 9 Sterilization Confirm the security query with YES and wait until the program abort has been carried out. Ê The program will be classified as unsuccessful. The load was not sterilized. Both LEDs light up red. Press UNLOCK DOOR. To confirm an unsuccessful program run, follow the instruction on the display and press the corresponding button.
-
Page 47: Ending The Program Prematurely
9 Sterilization Ending the program prematurely You can end the program prematurely. If you abort the program before the end of the drying phase, the load is not completely dried and should be used immediately. The following must be fulfilled or present: ü... - Page 48 9 Sterilization Program not successful WARNING Danger of infection due to non-sterile load! If the safety LED (right LED) lights up red, the program was not completed successfully. The load was not sterilized. Check the display and the two LEDs at the end of each program. Read and follow the instructions on the display.
-
Page 49: Removing The Sterile Material
9 Sterilization Removing the sterile material CAUTION Danger of burns from hot loads. Use a tray lifter or heat protection gloves. CAUTION Unsterile instruments resulting from damaged or burst packaging. This endangers the health of your patients and practice team. Should the packaging be damaged or have burst after sterilization, wrap the load again and re-sterilize it. -
Page 50: Logging
If the program is continued, the oldest log is automatically overwritten. MELAG recommends immediately outputting logs automatically, see . Logs menu The Logs menu provides you with the following options: ▪... - Page 51 10 Logging Subsequent log output The following must be fulfilled or present: ü At least one output medium is connected and activated, see Log output [} page 61]. In the main menu, press Logs. Select the log type to view and output single or multiple logs of a log type.
-
Page 52: Output Media
10 Logging The result (successful/unsuccessful) is displayed after the log output. Press OK to confirm the result. Output media You are able to output and archive the logs of the completed programs on the following output media: Symbol Output medium Description USB stick Storage on a USB stick... -
Page 53: Function Checks
11 Function checks 11 Function checks Service programs Overview of service programs Program Use/function Vacuum test For measuring the leakage rate, test with a dry and cold device (without load) Vacuum test chamber: ▪ Measurement of the leakage rate in the chamber Vacuum test cooler: ▪... - Page 54 11 Function checks Press START PROGRAM. Wait until the vacuum test has finished. During the vacuum test, the evacuation pressure, the temperature and the expected end of the vacuum test are shown on the display. The sterilization chamber is ventilated after the end of the measuring time.
-
Page 55: Steam Penetration Test
11 Function checks Steam penetration test The Bowie & Dick test / Helix test serves the verification of the steam penetration of porous materials such as textiles. You can perform a routine function check for proof of steam penetration. Specialist stockists provide various test systems for the Bowie & Dick test/Helix test. Perform the test according to the test system manufacturer's specifications. -
Page 56: Settings
12 Settings 12 Settings Parameters such as language, date, drying etc. can be set in the submenus of the Settings menu. In the main menu, press Settings. Make settings in the corresponding submenus. Ê After saving, settings are immediately applied and the view changes from the respective submenu back to the Settings menu. -
Page 57: General Settings
12 Settings General settings General settings can be changed by any user. Language You can switch between the enabled languages in the Language submenu. Press Language in the Settings menu. Select the desired language using or Ê After a setting has been changed, the SAVE button is active. Confirm with SAVE. - Page 58 12 Settings Select the correct date in the calendar. Press (past) or (future) to select the month. TIP: Press and hold = 1-year increments Ê After a setting has been changed, the SAVE button is active. Press SAVE. Ê The view switches back to the Settings menu. Time The time of the device must be correctly set for proper batch documentation.
- Page 59 12 Settings Press SAVE. Ê The view switches back to the Settings menu. Display Individualise the display brightness. Press Display in the Settings menu. Press Press one of the buttons to change the brightness of the display. The display brightness can be adjusted in several steps. Set the display brighter Set the display darker The colour bar below the value display gives you an impression of...
- Page 60 12 Settings Audio You can activate (ON) or deactivate (OFF) the signal tones in the Audio submenu. The signal tones are activated by default. Press Audio in the Settings menu. Select the desired setting by pressing OFF/ON. Ê After a setting has been changed, the SAVE button is active. Press SAVE.
- Page 61 12 Settings Press SAVE to accept the counter status. Ê The view switches back to the Settings menu. Log output You can activate/deactivate the automatic output in the Log output submenu. Log output on a USB stick Press Log output in the Settings menu. Change the output type by pressing OFF/ON.
- Page 62 12 Settings Water Select the settings for water management in the Water submenu. Water supply and disposal is set to Manual by default. Manual: Water supply and disposal is via the internal storage tank. Automatic: The water is supplied via a connected water treatment unit (e.g. MELAdem 40/47). The wastewater is automatically disposed of via the wastewater funnel into the building’s wastewater installation.
- Page 63 12 Settings Press SAVE. Ê The view switches back to the Settings menu. Drying You have the option of permanently activating or deactivating additional drying in the Drying submenu. You have the option to change the preset drying mode once at the program start via Program options [} page 44].
-
Page 64: Administrative Settings
12 Settings Administrative settings To make administrative settings, such as changes in user administration, you must log in as an administrator or service technician. Logging on user role In the main menu, press Administration. Select the desired role, e.g. Administrator. Enter the associated PIN. Ê... - Page 65 After logging out, the main menu is displayed in the user role “Practice employee”. Changing the Admin PIN When the device is delivered, the admin PIN is set to 1000 by default. MELAG recommends that you change the admin PIN upon commissioning.
- Page 66 Check whether all required logs have been output to an output medium. Please observe the further information in the separate instruction “Information regarding software update and re-installation”. You can find the document in the download centre on our website at www.melag.com/ de/service/downloadcenter. The following must be fulfilled or present: ü...
-
Page 67: Maintenance
13 Maintenance 13 Maintenance PLEASE NOTE The maintenance work described below can be performed by the user as part of in-house maintenance. All maintenance activities beyond this must only be carried out by an authorized technician. Maintenance intervals Interval Measure Device component Every time the feed water tank... -
Page 68: Cleaning
Do not use any hard objects for cleaning such as a metal saucepan cleaner or a steel brush. Sterilization chamber, chamber sealing face, mount, trays To maintain the value of your device and to avoid persistent contamination and deposits, MELAG recommends weekly cleaning of the surfaces (e.g. with the Chamber Protect chamber cleaning set, art. no. ME01081). - Page 69 13 Maintenance Internal storage tanks Carry out regular inspection and cleaning of the internal storage tanks. Observe the Maintenance intervals [} page 67]. Emptying the feed water and wastewater tanks The following must be fulfilled or present: ü The device is switched off and has cooled down completely. ü...
- Page 70 13 Maintenance Cleaning the feed water and wastewater tanks CAUTION Danger of scalding from hot wastewater. While cleaning the wastewater tank, severe scalding may occur due to escaping steam/condensate as well as hot wastewater. Never clean the device during a program run. Empty the wastewater tank before cleaning.
-
Page 71: Replace Dust Filter
If necessary, clean the feed water tank and then the wastewater tank with a sponge and solvent-free, non-alkaline cleaning agent (e.g. washing-up liquid). MELAG recommends a final cleaning with feed water. Remove the tank filter (pos. a) from the feed water tank, rinse it first... -
Page 72: Maintenance
Maintenance must be performed in accordance with the pertinent maintenance instructions of the device. Carry out maintenance with an original maintenance set prepared by MELAG. Only original MELAG spare parts may be used. -
Page 73: Pause Times
14 Pause times 14 Pause times Duration of the operating pause Duration of the operating pause Measure Short pauses between two sterilization ▪ Keep the door closed to save energy. processes Pauses which last longer than an hour ▪ Switch off the device. Longer pauses e.g. - Page 74 14 Pause times On-site transport To transport the device within a room or floor, proceed as follows: Decommission the device, see Decommissioning [} page 73]. When using a water treatment unit, close the water feed and removal the hose connections at the rear of the device. Should you wish to leave the mount and trays or sterile containers in the sterilization chamber during transport, protect the surface of the round blank.
-
Page 75: Malfunctions
Troubleshooting online All messages with current descriptions can be found in the Troubleshooting portal on the MELAG website (https://www.melag.com/en/service/troubleshooting). Displaying and reading messages If there are several messages, the number is shown in the corresponding button in the header. -
Page 76: Warning And Malfunction Messages
Should you be unable to find the relevant event, or your efforts do not redress the problem, you can contact your nearest stockist or authorised MELAG customer service provider. Have the following information ready: ▪ The serial number of your device (see type plate or device status info) ▪... - Page 77 32046 repeatedly, contact the technical service. 32048 32471 When using a MELAG water treatment unit: When using a MELAG water treatment unit: a) Kink in the hose installation. a) Please check the hose installation to ensure that it is kink-free and adjust the routing accordingly if b) The water inflow tap is not open or the pressure necessary.
- Page 78 Please check the float switch as follows: When using a MELAG water treatment unit: 1. Please remove the tank cover and the cover of c) The feed water supply is set to Manual in the the feed water tank (at the left side).
- Page 79 15 Malfunctions Event Possible cause What you can do 37460 a) The wastewater tank (at the right side) is full. a) Please empty the wastewater tank (at the right side) via the coupling provided. b) The float switch in the wastewater tank (at the right side) is stuck.
-
Page 80: Technical Data
80 °C Volume (internal storage tank, wastewater 4.8 l side) Optional when using a water treatment unit. In the Prion-B program with porous full load. Optional: automatically via the one-way drain with the MELAG upgrade kit for the tank drain. -
Page 81: Technical Tables
16 Technical data Technical tables Feed water quality Minimum requirements to the feed water following 13060, Appendix C Substance/property Feed water Evaporation residue ≤ 10 mg/l Silicon oxide, SiO ≤ 1 mg/l Iron ≤ 0.2 mg/l Cadmium ≤ 0.005 mg/l Lead ≤ 0.05 mg/l Traces of heavy metal apart from iron, cadmium, ≤ 0.1 mg/l lead Chloride... - Page 82 16 Technical data Step Vet B Prion B Gentle B Quick B Quick S Program phase P [mbar Tolerance Tolerance P/T SH12 3031 60/-60 ◄ 2042 ◄ ◄ Pressure build-up Plateau SS11 3059 60/-60 ◄ 2062 ◄ ◄ Preparation Sterilization SS12 3166 60/-60...
-
Page 83: Accessories And Spare Parts
ME01075 40 indicator strips MELAcontrol Pro refill pack ME01076 Water treatment MELAdem 40 ion exchanger ME01049 MELAdem 47 reverse osmosis unit ME01047 For the documentation MELAG USB flash drive ME19901 Other Water stop ME01056 Chamber Protect chamber cleaning set ME01081... - Page 84 17 Accessories and spare parts Spare parts Category Article Art. no. Device Dust filter ME82260 Sterile filter ME22872 Tank filter ME25070 Power cable Pro/Prime (type E+F Schuko) ME22331 Mounting Slide clips for mounts Plus, 10 pcs. ME81235...
- Page 85 Certificate of Suitability Manufacturer: MELAG Medizintechnik GmbH & Co. KG Address: Geneststraße 6-10 10829 Berlin Country: Germany ® Product: SteriHero Type of device: Steam sterilizer (for veterinary medicine) Device type acc. to EN 13060: Type B We declare that the product specified above is suitable for the steam sterilization of ▪...
-
Page 86: Glossary
MELAG devices. Only they may carry out this work. DIN 58953 Standard – sterilization, sterile equipment supply... - Page 87 Glossary Feed water Single wrapping Feed water is required to produce steam for sterilization. Wrapped once e.g. instruments sealed in foil – in Guide values for water quality in accordance with EN 285 / opposition to: Multiple wrapping EN 13060 – Appendix C Soft sterilization packaging e.g.
- Page 88 MELAG Medizintechnik GmbH & Co. KG Geneststraße 6-10 10829 Berlin Germany Email: info@melag.com Web: www.melag.com Original instructions Responsible for content: MELAG Medizintechnik GmbH & Co. KG We reserve the right to technical alterations Your stockist...
Need help?
Do you have a question about the SteriHero Vet and is the answer not in the manual?
Questions and answers