Table of Contents
Advertisement
Quick Links
Advertisement
Table of Contents

Related Manuals for Chauvet Professional nexus Aq 5x5


Summary of Contents for Chauvet Professional nexus Aq 5x5
- Page 1 User Manual...
- Page 2 Edition Notes This User Manual covers the description, safety precautions, installation, programming, operation, and maintenance of the Nexus™ Aq 5x5. Chauvet released this edition of the Nexus™ Aq 5x5 User Manual in November 2014. CHAUVET® is a registered trademark of CHAUVET & Sons, LLC. (d/b/a CHAUVET® Trademarks or Chauvet).
-
Page 3: Table Of Contents
Table of Contents 1. Before You Begin..........................3 What Is Included ..........................3 Claims ..............................3 Manual Conventions ..........................3 Symbols ............................... 3 Safety Notes ............................4 Expected LED Lifespan ........................4 2. Introduction ............................5 Description ............................5 Features ............................... 5 Overview .............................. - Page 4 Reset To Factory Defaults ......................22 Setting Ethernet Settings ....................... 23 Kling-Net ............................. 23 Art-Net™ ............................. 23 Kling-Net Mapper ..........................24 Part 1: Confirm Network Connectivity .................... 24 The Connected Devices Window ....................24 Part 2: Test Network Connectivity ....................25 Part 3: Map The Products For ArKaos ...................
-
Page 5: Before You Begin
Before You Begin 1. Before You Begin · Nexus™ Aq 5x5 What Is · Neutrik® powerCON® power cord Included · #8 Allen key with handle · Warranty Card · Quick Reference Guide Carefully unpack the product immediately, and check the box to make sure all the parts are in Claims the package and are in good condition. -
Page 6: Safety Notes
Before You Begin Read all the following Safety Notes before working with this product. These notes include Safety Notes important information about the installation, usage, and maintenance of this product. This product contains no user-serviceable parts. Any reference to servicing in this User Manual will only apply to properly trained Chauvet certified technicians. -
Page 7: Introduction
Introduction 2. Introduction Nexus™ Aq 5x5 is a tour-ready RGBW blinder with a pixel mappable display of twenty-five Description 10 watt, quad-color LEDs. Each LED projects a narrow beam of light that creates sharp, colorful text and visual designs or bright, narrow beams of colored light. The Nexus™ Aq 5x5 operates in Standalone and Master/Slave modes and with the Art-Net™, Kling-Net, or DMX protocols. -
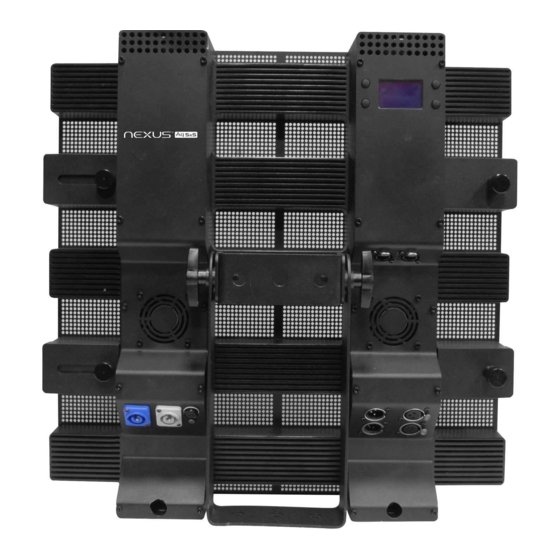
Page 8: Overview
Introduction Overview Female Coffin Locks x2 LEDs (x25) Mounting Bracket Male Locking Bolt Connectors x2 (Female on other side) Male Coffin Bracket Adjustment Knob Locks x2 Front View Side View Control Panel Neutrik® etherCON® I/O Male Locking Bolt Connectors x2 Female Locking Bolt Connectors x2 Power Sockets and... -
Page 9: Dimensions
Introduction Dimensions Pixel Layout Nexus™ Aq 5x5 User Manual Rev. 2... -
Page 10: Setup
Setup 3. Setup The Nexus™ Aq 5x5 has an auto-ranging power supply that works with an input voltage range AC Power of 100 to 240 VAC, 50/60 Hz. To determine the power requirements for the Nexus™ Aq 5x5, refer to the label on to the product or Technical Specifications in this manual. -
Page 11: Power Linking
Setup The Nexus™ Aq 5x5 supports power linking of up to: Power · 5 products at 120 V, Linking · 8 products at 208 V, or · 9 products at 230 V. A power cord is included but power-linking cables are not included. For power-linking cables, see the Chauvet website at www.chuavetlighting.com. -
Page 12: Dmx Linking
Setup DMX linking connects Nexus™ Aq 5x5 panels through their DMX In and Out ports. DMX Linking Nexus™ Aq 5x5 has both 3- and 5-pin DMX ports, so either 3- or 5-pin cables, or a combination of both, can be used. DMX linking is for DMX controllers and for Master/Slave control. -
Page 13: Dmx Mode
Setup In DMX mode, Nexus™ Aq 5x5 panels are controlled by a DMX controller, and the DMX DMX Mode address and DMX personality must be set through the control panel. The Nexus™ Aq 5x5 automatically senses its control source. When there is a DMX cable plugged in, the Nexus™... -
Page 14: Ethernet Connections
Setup Ethernet connections link Nexus™ Aq 5x5 to routers and each other through their Neutrik® Ethernet etherCON® ports. Ethernet connections are for running TCP/IP-based control systems, such Connections as Kling-Net and Art-Net™. All Neutrik® etherCON® ports can be either input or output ports, and panels can be linked to each other, but the start of each chain of panels must be a router port. -
Page 15: Setting Modes And Protocols
Setup The Nexus™ Aq 5x5 automatically senses whether control is coming from a DMX source, or a Setting Network source. When there is a Neutrik® etherCON® cable plug into it, the Nexus™ Aq 5x5 Modes And responds to a TCP/IP protocol, such as Art-Net™ or Kling-Net, depending on the setting in the control panel. -
Page 16: Mounting
Setup Before mounting the Nexus™ Aq 5x5, review the Safety Notes section. Read and follow the Mounting guidelines below for mounting the Nexus™ Aq 5x5. · When selecting a desired location and before installation, consider easy access to this product for operation, programming adjustments, and routine maintenance. ·... -
Page 17: Mounting Diagram With Mounting Clamp
Setup Mounting Clamp (such as CHAUVET® CLP-15) Into Bracket Up To 4 Panels In A Single Column Mounting Diagram Position The Bracket With Mounting At The Top Of The Clamp Panel #8 Allen Key With Handle Horizontal Panel Connection Bottom Of Panel Top Of Panel Nexus™... -
Page 18: Operation
Operation 4. Operation Control Panel Button Function <MENU/ESC> Scrolls through the main menu options or exits the current menu option <ENTER> Enters into the highlighted menu option or sets the currently selected value <UP> Navigates up through a list of menu options or values <DOWN>... -
Page 19: Menu Map
Operation Menu Map The Menu Map below applies only to Software Version 1.1 Main Level Programming Levels Description Auto 0–9 Selects auto programs and its speed Auto Show Speed 000–100 Fade Selects color fade and its speed Fixture Color Selects a preset color Static RGBW Green... - Page 20 Operation Main Level Programming Levels Description 10Ch 15Ch Sets DMX personality for DMX, Art-Net™ mode, and DMX Channel 75Ch Kling-Net mode 100Ch 105Ch 111Ch Master Sets Master mode Master/Slave Slave Sets Slave mode Sets red, green, and blue maximum values for white White Balance Green 125–255...
-
Page 21: Menu Operations
Operation Menu operations configure the Nexus™ Aq 5x5 for use, including setting the control mode, the Menu auto programs in a standalone mode, the DMX personality, and the Art-Net™ settings. The Operations menu operations are accessed via the control panel. See Control Panel. -
Page 22: Dimmer Mode
Operation Dimmer mode configures the rate of change in light intensity. There are 3 different dimmer Dimmer Mode modes with 1 being the slowest and 3 being the fastest. When Dimmer Mode is set to Off, the panel fades in direct proportion to the DMX values. To configure Dimmer mode, do the following: 1. -
Page 23: Dmx Channel
Operation DMX channel sets the DMX personality for use in all modes and protocols: DMX, Art-Net™, DMX Channel and Kling-Net. Each DMX personality has different capabilities. For more information, see Mode. To select a DMX personality, do the following: 1. Go to the DMX Channel main level. 2. -
Page 24: White Balance
Operation White balance sets the color temperature of the white produced when the DMX values of red, White Balance green, and blue are at 255. To set the color temperature for white balance, do the following: 1. Go to the White Balance main level. 2. -
Page 25: Setting Ethernet Settings
Operation The Nexus™ Aq 5x5 products run on Kling-Net or Art-Net. Setting Ethernet Settings The Kling-Net protocol requires no configuration through the Nexus™ Aq 5x5, except to set the panel to Kling-Net. All Ethernet configurations in the Kling-Net protocol are done automatically by Kling-Net-supported ArKaos software. -
Page 26: Kling-Net Mapper
Operation Kling-Net Mapper is part of the ArKaos software package and is used to inform the ArKaos Kling-Net software about the layout of the Nexus™ Aq 5x5 panels. This process is called mapping. Mapper Kling-Net Mapper and ArKaos software can run simultaneously allowing the operator to see immediately the effects of the mapping on the live presentation. -
Page 27: Part 2: Test Network Connectivity
Operation Part 2: Test 4. Select the Output dropdown icon from the tool bar at the top of the Kling-Net Mapper screen. One of the options will be Test Pattern. Network Connectivity 5. Select Test Pattern. The image to the right of the icon is a small screen, indicating that Test Pattern is the current mode. -
Page 28: Part 3: Map The Products For Arkaos
Operation Part 3: Map The 10. Make sure the Nexus™ Aq 5x5 products are all listed in the Connected Devices window and have flashed when tested. For more information, see Part1 Confirming Connectivity. Products For 11. Click on the first product in the list and drag it onto the mapping image in the center of the ArKaos screen. -
Page 29: Nexus Software Upgrade Instructions
Operation Nexus Software Upgrade Instructions The following steps refer to the Windows® 7 operating system environment. Step 1: 1. Connect the Nexus™ Aq 5x5 to the router. 2. Verify the computer is using the same network as the Nexus™ Aq 5x5 product. Step 2: 1. - Page 30 Operation Step 5: 1. Select the desired network the product is connected to. If you are running a hard-wired line from the PC to your router, then select Local Area Connection. The Local Area Connection Status dialog appears. 2. Click Properties. The Local Area Connection Properties dialog appears.
- Page 31 Operation Step 9: 1. Enter the following information: · Enter admin in the User Name box. · Enter admin in the Password box. 2. Click Log In. The Nexus™ Aq 5x5 firmware window appears. If the user name/password you entered is invalid, follow the Factory Reset procedure.
- Page 32 Operation Step 13: Once the software upgrade is complete, the IP setting on your PC needs to be changed back to the original settings. 1. Refer to Step 4 for navigation instructions on how to access the Internet Protocol Version 4 Properties (TCP/IPv4) dialog.
-
Page 33: Dmx Personalities
Operation DMX Personalities The Nexus™ Aq 5x5 has 11 DMX personalities: · 111-, 105-, 100-, and 75-channel personalities are designed for pixel mapping, either with or without all the other capabilities. These personalities use the most number of channels. · 75- and 3-channel personalities are designed with Auto Color. Auto Color automatically mixes and blends the white emitted by the LEDs into the RGB values from the controller to expand the range of color and enhance color rendering. -
Page 34: Virtual Gobo Wheel
Operation Virtual Gobo Wheel The Nexus™ Aq 5x5 has a Virtual Gobo Wheel (VGW) function in select DMX personalities. This function uses 8 different DMX channels in combination to attain a desired result. Follow the steps below to set-up VGW. 1. -
Page 35: Dmx Channel Assignments And Values
Operation DMX Channel Assignments And Values The channel assignment and values below are the information needed to create fixture profiles and to understand how to operate the Nexus™ Aq 5x5. 111-Channel 111Ch Channel Function Value Percent/Setting 000 ó 255 Red 1 0–100% 000 ó... - Page 36 Operation 111Ch Channel Function Value Percent/Setting 000 ó 255 White 9 0–100% 000 ó 255 Red 10 0–100% 000 ó 255 Green 10 0–100% 000 ó 255 Blue 10 0–100% 000 ó 255 White 10 0–100% 000 ó 255 Red 11 0–100% 000 ó...
- Page 37 Operation 111Ch Channel Function Value Percent/Setting 000 ó 255 White 19 0–100% 000 ó 255 Red 20 0–100% 000 ó 255 Green 20 0–100% 000 ó 255 Blue 20 0–100% 000 ó 255 White 20 0–100% 000 ó 255 Red 21 0–100% 000 ó...
- Page 38 Operation 111Ch Channel Function Value Percent/Setting 000 ó 010 No function Foreground 011 ó 255 Foreground color 000 ó 255 Foreground Dimmer 0–100% 000 ó 010 No function Background 011 ó 255 Background color 000 ó 255 Background Dimmer 0–100% No function 001 ó...
-
Page 39: 105-Channel
Operation 111Ch Channel Function Value Percent/Setting 000 ó 051 Preset dimmer speed from display menu 052 ó 101 Linear dimmer 102 ó 152 Dim Speed Mode Nonlinear dimming curve 1 (fastest) 153 ó 203 Nonlinear dimming curve 2 204 ó 255 Nonlinear dimming curve 3 (slowest) 105-Channel 105Ch... - Page 40 Operation 105Ch Channel Function Value Percent/Setting 000 ó 255 Green 9 0–100% 000 ó 255 Blue 9 0–100% 000 ó 255 White 9 0–100% 000 ó 255 Red 10 0–100% 000 ó 255 Green 10 0–100% 000 ó 255 Blue 10 0–100% 000 ó...
- Page 41 Operation 105Ch Channel Function Value Percent/Setting 000 ó 255 Green 19 0–100% 000 ó 255 Blue 19 0–100% 000 ó 255 White 19 0–100% 000 ó 255 Red 20 0–100% 000 ó 255 Green 20 0–100% 000 ó 255 Blue 20 0–100% 000 ó...
-
Page 42: 100-Channel
Operation 105Ch Channel Function Value Percent/Setting 000 ó 051 Preset dimmer speed from display menu 052 ó 101 Linear dimmer 102 ó 152 Dim Mode Nonlinear dimming curve 1 (fastest) 153 ó 203 Nonlinear dimming curve 2 204 ó 255 Nonlinear dimming curve 3 (slowest) 100-Channel 100Ch... - Page 43 Operation 100Ch Channel Function Value Percent/Setting 000 ó 255 Blue 9 0–100% 000 ó 255 White 9 0–100% 000 ó 255 Red 10 0–100% 000 ó 255 Green 10 0–100% 000 ó 255 Blue 10 0–100% 000 ó 255 White 10 0–100% 000 ó...
-
Page 44: 75-Channel
Operation 100Ch Channel Function Value Percent/Setting 000 ó 255 Blue 19 0–100% 000 ó 255 White 19 0–100% 000 ó 255 Red 20 0–100% 000 ó 255 Green 20 0–100% 000 ó 255 Blue 20 0–100% 000 ó 255 White 20 0–100% 000 ó... - Page 45 Operation 75Ch Channel Function Value Percent/Setting 000 ó 255 Red 5 0–100% 000 ó 255 Green 5 0–100% 000 ó 255 Blue 5 0–100% 000 ó 255 Red 6 0–100% 000 ó 255 Green 6 0–100% 000 ó 255 Blue 6 0–100% 000 ó...
- Page 46 Operation 75Ch Channel Function Value Percent/Setting 000 ó 255 Green 18 0–100% 000 ó 255 Blue 18 0–100% 000 ó 255 Red 19 0–100% 000 ó 255 Green 19 0–100% 000 ó 255 Blue 19 0–100% 000 ó 255 Red 20 0–100% 000 ó...
-
Page 47: 15-Channel
Operation 15-Channel 15Ch Channel Function Value Percent/Setting 000 ó 255 Dimmer 0–100% 000 ó 255 0–100% 000 ó 255 Green 0–100% 000 ó 255 Blue 0–100% 000 ó 255 White 0–100% 000 ó 010 No function Strobe 011 ó 255 0–20 Hz 000 ó... - Page 48 Operation 15Ch Channel Function Value Percent/Setting 000 ó 010 No function 011 ó 020 Simple cross 021 ó 029 Simple box 030 ó 038 Square imploder 039 ó 047 Square exploder 048 ó 056 Diamond imploder 057 ó 065 Diamond exploder 066 ó...
-
Page 49: 10-Channel
Operation 10-Channel 10Ch Channel Function Value Percent/Setting 000 ó 255 Dimmer 0–100% 000 ó 255 0–100% 000 ó 255 Green 0–100% 000 ó 255 Blue 0–100% 000 ó 255 White 0–100% 000 ó 010 No function Strobe 011 ó 255 0–20 Hz 000 ó... -
Page 50: 6-Channel
Operation 6-Channel Channel Function Value Percent/Setting 000 ó 255 Dimmer 0–100% 000 ó 255 0–100% 000 ó 255 Green 0–100% 000 ó 255 Blue 0–100% 000 ó 255 White 0–100% 000 ó 010 No function Strobe 011 ó 255 0–20 Hz 4-Channel Channel Function... -
Page 51: Technical Information
Technical Information 5. Technical Information To maintain optimum performance and minimize wear, you should clean this product Product frequently. Usage and environment are contributing factors in determining the cleaning Maintenance frequency. As a rule, clean this product at least twice a month. Dust build-up reduces light output performance and can cause overheating. -
Page 52: Technical Specifications
Technical Specifications 6. Technical Specifications Dimensions and Length Width Height Weight Weight 19.7 in (500 mm) 19.7 in (500 mm) 3.8 in (95.5 mm) 22.2 lb (10 kg) Electrical Power Supply Type Range Voltage Selection Switching (internal) 100–240 VAC, 50/60 Hz Auto-ranging Parameter 120 V 60 Hz... -
Page 53: Contact Us
Contact Us WORLD HEADQUARTERS - Chauvet General Information Technical Support Address: 5200 NW 108 Avenue Voice: (954) 577-4455 (Press 4) Sunrise, FL 33351 Fax: (954) 756-8015 Voice: (954) 577-4455 Email: tech@chauvetlighting.com Fax: (954) 929-5560 World Wide Web Toll free: (800) 762-1084 www.chauvetlighting.com UNITED KINGDOM AND IRELAND - Chauvet Europe Ltd.
Need help?
Do you have a question about the nexus Aq 5x5 and is the answer not in the manual?
Questions and answers