Crown Boiler BSI Series Installation, Operating And Service Instructions
Gas-fired natural draft steam boilers
Hide thumbs
Also See for BSI Series:
- Installation instruction (56 pages) ,
- Installation instructions manual (56 pages) ,
- Instructions for field conversion (12 pages)
Advertisement
Table of Contents
- 1 Table of Contents
- 2 Product Description
- 3 Specifications
- 4 Pre-Installation
- 5 Locating the Boiler
- 6 Air for Combustion & Ventilation
- 7 Venting
- 8 Steam Piping
- 9 Indirect Water Heater Piping
- 10 Gas Piping
- 11 Wiring
- 12 Start-Up & Checkout
- 13 Operation
- 14 Service & Maintenance
- 15 Troubleshooting
- 16 Parts
- Download this manual
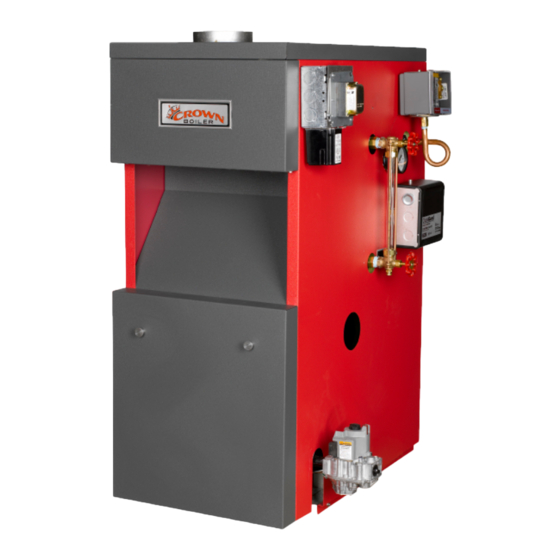
BSI Series
Gas-Fired Natural Draft Steam Boilers
INSTALLATION, OPERATING and SERVICE
INSTRUCTIONS
Models:
BSI069
•
BSI103
•
BSI138
•
BSI172
•
TO THE INSTALLER:
Affix these instructions on or adjacent to boiler.
Provide model number and serial number when
seeking information and support.
TO THE CONSUMER:
Retain these instructions for future reference.
Contact heating contractor for all issues and support.
Improper installation, adjustment, alteration, service or maintenance can cause property damage, injury, or
loss of life. For assistance or additional information, consult a qualified installer, service agency or the gas
supplier. This boiler requires a special venting system. Read these instructions carefully before installing.
980433 Rev 11 - 3/23
D
E S I G N E D
BSI207
•
BSI241
•
BSI276
•
!
WARNING
PROTECT YOUR INVESTMENT
REGISTER YOUR WARRANTY AT
VELOCITYBOILERWORKS.COM
L
T O
E A D
9902339
H
Advertisement
Table of Contents

Related Manuals for Crown Boiler BSI Series


Summary of Contents for Crown Boiler BSI Series
- Page 1 PROTECT YOUR INVESTMENT REGISTER YOUR WARRANTY AT VELOCITYBOILERWORKS.COM E S I G N E D E A D BSI Series Gas-Fired Natural Draft Steam Boilers INSTALLATION, OPERATING and SERVICE INSTRUCTIONS Models: BSI207 BSI069 • • BSI241 BSI103 • • BSI276 BSI138 •...
- Page 3 The Massachusetts Board of Plumbers and Gas Fitters has approved these boilers. See the Massachusetts Board of Plumbers and Gas Fitters website for the latest Approval Code or ask your local Sales Representative. The Commonwealth of Massachusetts requires this product to be installed by a licensed Plumber or Gas fitter. The following terms are used throughout this manual to bring attention to the presence of hazards of various risk levels, or to important information concerning product life.
- Page 4 WARNING Asphyxiation Hazard. Fire Hazard. Explosion Hazard. This boiler requires regular maintenance and service to operate safely. Follow the instructions contained in this manual. • Improper installation, adjustment, alteration, service or maintenance can cause property damage, personal injury or loss of life. Read and understand the entire manual before attempting installation, start-up operation, or service.
-
Page 5: Table Of Contents
Table of Contents Product Description ................1 Specifications ..................1 III. Pre-Installation ..................2 Locating the Boiler ................3 Air for Combustion & Ventilation ............4 Venting ....................8 VII. Steam Piping ..................11 VIII. Indirect Water Heater Piping ..............16 Gas Piping .................... -
Page 6: Product Description
I Product Description The BSI series boilers are low pressure cast iron gas fired steam boilers designed for use in closed steam heating systems at steam pressures below 15psi. These boilers are Category I draft diverter equipped appliances, which must be vented by natural draft using a lined masonry or listed metal chimney system. -
Page 7: Pre-Installation
III Pre-Installation WARNING Carefully read all instructions before installing boiler. Failure to follow all instructions in proper order can cause personal injury or death. 1) Inspect shipment carefully for signs of damage. Any claim for damage or shortage in shipment must be filed immediately against carrier by consignee. -
Page 8: Locating The Boiler
IV Locating the Boiler WARNING Failure to observe the following location requirements could result in a fire, explosion or Carbon Monoxide (CO) hazard. 1) Clearances: • Observe minimum clearances shown below to avoid potential fire hazard. Except as noted, these clearances apply to all combustible construction as well as noncombustible walls, ceilings and doors. -
Page 9: Air For Combustion & Ventilation
V Air for Combustion and Ventilation WARNING • This boiler is not designed for use in a space that is depressurized relative to the outdoors. Operating this boiler in a depressurized space may cause severe personal injury or death. • INSUFFICIENT COMBUSTION AIR SUPPLY may result in the production and release of deadly Carbon Monoxide (CO) into the home. - Page 10 per 1000 BTU/hr of total appliance input, install a pair of identical openings into a third room. Connect additional rooms with openings until the total volume of all rooms is at least 50 cubic feet per 1000 BTU/hr of input. •...
- Page 11 FIGURE 5.2: ALL AIR FROM OUTDOORS, VENTILATED CRAWL SPACE AND ATTIC 6” FIGURE 5.3: ALL AIR FROM OUTDOORS, VIA VENTILATED ATTIC Using the Outdoor Combustion Air Method 1) Openings must be installed between the boiler room and the outdoors or a ventilated space, such as an attic or crawl space, which communicates directly with the outdoors.
- Page 12 • The “free area” of an opening takes into account the blocking effect of mesh, grills, and louvers. Where screens are used, they must be no finer than ¼” (4 x 4) mesh. • If motorized louvers are installed in the openings to the outdoors, they must be interlocked to prevent operation of the fuel burning appliances in the boiler room unless the louvers are open.
-
Page 13: Venting
VI Venting WARNING • Improper venting may result in property damage and/or the release of flue gases, which contain deadly Carbon Monoxide (CO), into the home, which can cause severe personal injury or death. • Do not use plastic venting materials (such as CPVC, PVC and RADEL) to vent this boiler. •... - Page 14 4) Exterior Chimneys - An exterior chimney has one or more sides exposed to the outdoors below the roof line. The National Fuel Gas Code prescribes two conditions under which an exterior chimney may be used: • In some very restrictive cases, this boiler may be vented into an exterior ceramic lined masonry chimney. See the National Fuel Gas Code for information on when exterior chimneys may be used.
- Page 15 Removing an Existing Boiler from a Common Chimney In some cases, when an existing boiler is removed from a common chimney, the common venting system may be too large for the remaining appliances. At the time of removal of an existing boiler the following steps shall be followed with each appliance remaining connected to the common venting system placed in operation, while the other appliances remaining connected to the common venting system are not in operation.
-
Page 16: Steam Piping
VII Steam Piping WARNING • Do not use softened water in steam boilers. Accelerated boiler corrosion will result. Tie in fresh water supply to boiler upstream of a water softener. • Oxygen contamination of boiler water will cause corrosion of iron and steel boiler components, and can lead to boiler failure. - Page 17 7) The single most important factor in determining expected life cycle of a steam boiler is the amount of fresh water added to boiler during operation. Fresh water brings minerals and oxygen into the boiler. These contaminants greatly accelerate corrosion of cast iron boiler sections. Assure all system radiators, piping and vents are absolutely leak tight. •...
- Page 18 FIGURE 7.1: INSTALLATION OF FACTORY SUPPLIED FITTINGS BOILER MINIMUM PIPE DIA. (IN NPT) MODEL "A" "B" "C" "D" BSI069 1 1/2 1 1/4 BSI103 1 1/2 1 1/4 BSI138 1 1/2 1 1/4 BSI172 1 1/2 1 1/4 * SECOND 2" SUPPLY RISER OPTIONAL FIGURE 7.2: STEAM BOILER PIPING FOR GRAVITY RETURN, SINGLE RISER (BSI069 - BSI172 ONLY) 13 13...
- Page 19 BOILER MINIMUM PIPE DIA. (IN NPT) MODEL "A" "B" "C" "D" BSI069 1 1/2 1 1/4 BSI103 1 1/2 1 1/4 BSI138 1 1/2 1 1/4 BSI172 1 1/2 1 1/4 BSI207 1 1/2 1 1/4 BSI241 1 1/2 BSI276 1 1/2 BSI311 1 1/2...
- Page 20 FIGURE 7.5: COMMON NEAR-BOILER PIPING MISTAKES 15 15...
-
Page 21: Indirect Water Heater Piping
VIII Indirect Water Heater Piping NOTICE: • Some indirect water heaters may not be suitable for use with a steam boiler. Consult the water heater manufacturer’s guidelines before installing it in this type of system. • Boiler water temperatures and flow rates in this type of system may be considerably lower than those upon which the water heater manufacturer’s ratings are based. -
Page 22: Gas Piping
IX Gas Piping WARNING • Shut off gas supply before servicing the boiler. • All gas piping must be gas tight. Use thread compound that is listed for gas service on all threaded joints to avoid leaks, which may result in fire or explosion. •... - Page 23 FIGURE 9.1: GAS CONNECTION TO BOILER 18 18...
-
Page 24: Wiring
X Wiring WARNING • All wiring and grounding must be done in accordance with the authority having jurisdiction or, in the absence of such requirements, with the National Electrical Code (ANSI/NFPA 70). • Electrical power may be supplied from more than one circuit. Disconnect electrical power to the boiler and heating system before servicing. - Page 25 FIGURE 10.1: GAS STEAM BOILER CONNECTIONS DIAGRAM, HYDROLEVEL CG-400A LWCO 20 20...
- Page 26 21 21...
- Page 27 Indirect Water Heater Wiring Figure 10.3 shows field wiring for an indirect water heater. A Honeywell R845A or equivalent DPST relay and transformer is required. The high limit described in Part VIII must also be supplied by the installer. A call for heat from the indirect water heater thermostat will energize the relay making both sets of contacts.
-
Page 28: Start-Up & Checkout
XI Start-up and Checkout WARNING Do not leave the boiler in service if it fails any of the following start-up checks. Doing so may result in fire, explosion, or Carbon Monoxide (CO) poisoning. WARNING • Gas leaks may result in fire or explosion. •... - Page 29 FIGURE 11.2: GAS VALVE DETAIL - HONEYWELL VR8204 AND VR8304 Check the manifold pressure and adjust if necessary. To do this, use the following procedure: m) Connect a manometer to the inlet pressure tap on the gas valve (see Figure 11.2). n) Check the inlet line pressure with all gas appliances on and off.
- Page 30 FOR YOUR SAFETY READ BEFORE LIGHTING WARNING: If you do not follow these instructions exactly, a fire or explosion may result causing property damage, personal injury or loss of life. A. This appliance is equipped with an ignition If you cannot reach your gas supplier, call device which automatically lights the pilot.
- Page 31 FIGURE 11.4: MAIN BURNER FLAME 1” BURNERS FIGURE 11.5: PILOT BURNER FLAME CAUTION Avoid operating this boiler in an environment where saw dust, loose insulation fibers, dry wall dust, etc. are present. Gas valve safety shutdown test - With main burners firing, disconnect ignition cable from ignition module. Both pilot burner and main burners should stop firing.
- Page 32 Check Thermostat Operation - Raise and lower temperature setting to start and stop boiler operation. Adjust thermostat to normal setting. Check of External Safety Devices - Verify proper operation of any field installed safety devices, such as an external LWCO. Combustion Chamber Burn-off a) The mineral wool combustion chamber panels may contain a cornstarch based binder that must be burned out at installation to prevent odors during subsequent boiler operation.
- Page 33 m) Turn the boiler back on and operate it at least until it starts steaming. THIS STEP IS IMPORTANT TO DRIVE OUT DISSOLVED GASES IN THE FRESH WATER THAT CAN CAUSE CORROSION; DO THIS EVEN IF THE BOILER IS NOT IMMEDIATELY NEEDED FOR HEATING. n) Conduct pH and Alkalinity test of water in the system.
-
Page 34: Operation
XII Operation Sequence of Operation (Refer to Figures 10.1 & 10.2 for connection and ladder diagrams) 1) When the boiler is energized, 24 volts is immediately applied to terminals “1” (blue) and “4” (yellow) on the vent damp- er. Assuming that there is no call for heat, and that the damper switch is in the “automatic” position, the damper will close. On boilers equipped with Hydrolevel CG400A probe type low water cut-offs, voltage is also always applied to terminals “1”... -
Page 35: Service & Maintenance
Installation, Operating & Service Manual SERIES 2E XIII Service and Maintenance Service and Maintenance Important Product Safety Information: Refractory Ceramic Fiber Product WARNING Some boiler components use materials that contain refractory ceramic fibers (RCF). RCF has been classified as a possible human carcinogen. When exposed to elevated temperatures, RCF may change into crystalline silica, a known carcinogen. - Page 36 WARNING • Label all wires prior to disconnection when servicing controls. Wiring errors can cause improper and dangerous operation. Verify proper operation after servicing. ATTENTION. Au moment de l’entretien des commandes, étiquetez tous les fils avant de les débrancher. Les erreurs de câblage peuvent nuire au bon fonctionnement et être dangereuses. S’assurer que l’appareil fonctionne adéquatement une fois l’entretien terminé.
- Page 37 • For McDonnell & Miller #67 low water cut-offs - Remove and inspect switch and float mechanism. Inspect float bowl for mud accumulation. Clean as required. Replace the switch and float mechanism every five years or 100,000 cycles. Consult the McDonnell and Miller #67 manual for any additional maintenance information. Test the low water cut-off before placing the boiler back into service.
- Page 38 11) Put a light in the combustion chamber and look through the flue passages from the top to verify that they have been thoroughly cleaned. 12) Replace the flue collector gasket strips. If desired, RTV-732 silicone sealant with a 500F intermittent duty temperature rating may be substituted for this rope gasket.
-
Page 39: Troubleshooting
XIV Troubleshooting The following pages contain trouble shooting tables for use in diagnosing control problems. When using these tables the following should be kept in mind: 1) This information is only meant to be used by a professional heating technician as an aid in diagnosing boiler problems. 2) Where applicable, follow all precautions outlined in the Section XI (Start-up and Checkout). - Page 40 Troubleshooting Chart for Boilers Equipped with Hydrolevel CG400A Low Water Cut-offs and Vent Dampers Caution: Read page 35 before attempting to use this chart START Vent damper open? Is there an audible Thermostat click as R8225 relay calls for heat pulls in when the thermostat calls for heat?
- Page 41 Do burners Do burners shut Main shut down when down when water burners pressure level drops below light? exceeds limit cut-off point? setting? 24 volts across red damper lead * Defective damper * Defective and yellow * Defective or loose pressure limit transformer lead? damper harness...
- Page 42 Ignition System Troubleshooting Chart Caution: Read page 35 before attempting to use this chart START (24 volts is present across 24V and 24V (GND) on ignition module but main burners do not light) Spark Does Main spark stop across Pilot burner ignitor/sensor lights?
-
Page 43: Parts
XV Parts The following parts may be obtained from any Crown distributor. To find the closest Crown distributor, consult the area Crown representative or the factory at: Crown Boiler Co. Customer Service P.O. Box 14818 Philadelphia PA. 19134 www.crownboiler.com For boilers installed at elevations above 2000 ft, consult the local Crown representative or the factory for the correct main burner orifice. - Page 44 39 39...
- Page 45 QTY. OR QUANTITY PER BOILER OR CROWN P.N. KEY # DESCRIPTION CROWN P.N. 1" BURNER WITH PILOT BRACKET 150500 1 ea. 1 ea. 1 ea. 1 ea. 1 ea. 1 ea. 1 ea. (Q348 PILOTS) 1" BURNER LESS PILOT BRACKET 150501 2 ea.
- Page 46 41 41...
- Page 47 QTY. OR QUANTITY PER BOILER OR CROWN P.N. KEY # DESCRIPTION CROWN P.N. LEFT SIDE JACKET PANEL 1 ea. 850301 850301 850301 850301 8503012 8503012 8503012 RIGHT SIDE JACKET PANEL 1 ea. 850300 850300 850300 850300 8503002 8503002 8503002 REAR JACKET PANEL 1 ea.
- Page 48 43 43...
- Page 49 Appendix A: Knockdown Boiler Assembly Instructions A. Before Installing 1) Thoroughly inspect the cast iron heat exchanger for any shipping damage, i.e. cracks in the castings, broken lugs or punctures due to mishandling. 2) Do not use the heat exchanger if there is any damage to it. 3) Inspect the joints between the sections for openings.
- Page 50 FIGURE A1: BASE, HEAT EXCHANGER, FLUE COLLECTOR ASSEMBLY 45 45...
- Page 51 5) Install the left side panel in the same manner as the right side. 6) Attach the front corners of the diverter panel to the side jacket panels using #10 sheet metal screws. 7) Install the horizontal (angle) jacket clips in the front edge of the side jacket panels. Slide this clip through the rect- angular slot that is about halfway up the front edge of the side jacket panels and secure with the 8-32 self tapping screws provided.
- Page 52 FIGURE A2: JACKET INSTALLATION 47 47...
- Page 53 F. Electrical Wiring Connections (Also refer to wiring diagrams in Part X of the installation manual) 1) A pre-wired junction box assembly specific to the control package ordered with the boiler has been provided by the factory. 2) Orient the junction box so the black relay, which is mounted to the outside of the junction box, is facing down. 3) Mount the junction box assembly to the right side jacket using the holes provided (See Figure 1 in the installation manual).
- Page 54 FIGURE A3: TAPPING LOCATIONS (SEE TEXT FOR TAPPING USES) 49 49...
- Page 55 SERVICE RECORD DATE SERVICE PERFORMED...
- Page 56 Manufacturer of Hydronic Heating Products P.O. Box 14818 3633 I. Street Philadelphia, PA 19134 www.crownboiler.com...
Need help?
Do you have a question about the BSI Series and is the answer not in the manual?
Questions and answers