Grandstream Networks GXP2135 User Manual
Hide thumbs
Also See for GXP2135:
- User manual ,
- Quick installation manual (24 pages) ,
- Quick reference manual (4 pages)
Table of Contents
Advertisement
Quick Links
Grandstream GXP2135 User
Guide
We are currently working on the new phone system, so please check back for updates to the
user experience.
If you have trouble or encounter an error with the instructions below, please place a
helpdesk ticket, so we can look into the issue. Thank you in advance for your patience!
Calling
Internal Dialing
1. Enter the extension
2. Pickup the handset to make the call
Advertisement
Table of Contents

Related Manuals for Grandstream Networks GXP2135


Summary of Contents for Grandstream Networks GXP2135
- Page 1 Grandstream GXP2135 User Guide We are currently working on the new phone system, so please check back for updates to the user experience. If you have trouble or encounter an error with the instructions below, please place a helpdesk ticket, so we can look into the issue. Thank you in advance for your patience!
-
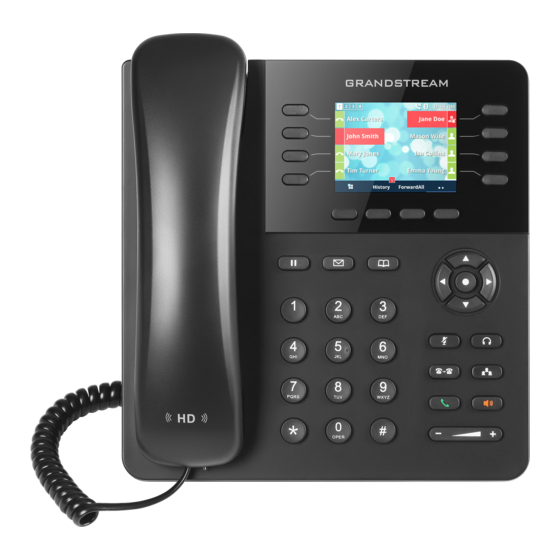
Page 2: Call History
1. For speaker phone, press the red speaker icon just above the volume up button If your call does not succeed, try adding the number 7 before the extension. This issue will go away once ALL campuses are on the new phone system. If you still have trouble, please place a helpdesk ticket for assistance. - Page 3 Phone Directory Webpage The PISD Phone Directory Webpage is the primary means to search for a person's extension. This webpage is continuously updated, so the information is always accurate. Please refer to this page if you are having trouble reaching a person or room as their extension may have changed. 1.
-
Page 4: Voicemail Setup
Voicemail Voicemail Setup 1. Dial *98 + your extension 1. EX: If your extension is 1234, you will enter *981234 then place the call 2. Once prompted, enter your passcode followed by # 1. The default passcode is 1000 3. Once prompted, use option 0 to enter the voicemail setup menu 4. -
Page 5: Attended Transfer
1. The caller will be placed on hold when the transfer button is pressed 2. Enter the extension that you want to transfer the caller to 3. Press the button directly below the phrase BlindTrnf on the screen 4. The caller has now been transferred Using Contact Buttons on the phone's screen 1. -
Page 6: Transfer Directly To Voicemail
1. Press Split 2. Press End Call 3. Press Resume to take the caller off hold 3. If the other extension answers, but is not able to accept the caller: 1. Press Split 2. Press End Call 3. Press Resume to take the caller off hold 5. -
Page 7: Do Not Disturb (Dnd)
Do Not Disturb (DND) DND sends ALL calls straight to voicemail. DND does not record missed calls in the call history. Do Not Disturb (DND) mode is used to block all incoming calls. To enable/disable DND, press the mute icon ( ). -
Page 8: Pairing Bluetooth Devices
2. Use the up and down arrows in the navigation circle to change the selected account 3. Press the center button in the navigation circle 1. This is the circular button surrounded by arrow buttons 4. Navigate to the Canceled Call Forward Always (*73) option 5. -
Page 9: Reset Phone
Reset Phone There are several issues that can be resolved by resetting the phone. These instructions will guide you through the process. This is a great way to troubleshoot a phone issue before placing a ticket with the technology helpdesk. 1.
Need help?
Do you have a question about the GXP2135 and is the answer not in the manual?
Questions and answers