Grandstream Networks GXP-2135 User Manual
Hide thumbs
Also See for GXP-2135:
- User manual ,
- Quick installation manual (24 pages) ,
- Quick reference manual (4 pages)

Related Manuals for Grandstream Networks GXP-2135


Summary of Contents for Grandstream Networks GXP-2135
- Page 1 VoIP Phone System User Guide A guide for using the Voice-over-IP Phones and Web Portal. Revision 4: April 22 , 2020...
-
Page 2: Table Of Contents
VoIP Phone System User Guide Table of Contents About the Phone ............................5 GXP-2135 Keys ............................5 GXP-2135 Rear Connections ........................5 GXP-2170 Keys ............................6 GXP-2170 Rear Connections ........................6 Phone Features ............................. 7 Answering and Making Calls ........................7 Answering a call ............................ - Page 3 VoIP Phone System User Guide Basic Troubleshooting ..........................14 Phone Showing Network Down or Not Registered ................14 The phone is not ringing ........................14 When dialing out, you do not hear the ring sound................14 How do I cancel "call transfer" or "conference"? ................14 BLF Line Keys are not up to date with changes.
- Page 4 VoIP Phone System User Guide Other Useful Information..........................34 Log in and out of all Call Queues using Star Codes ................. 34 P a g e...
-
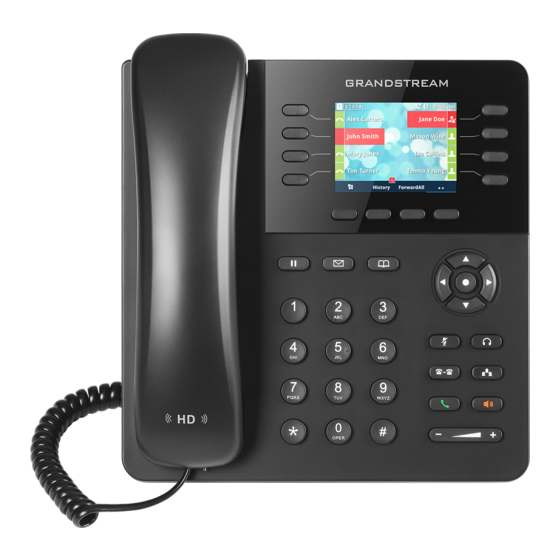
Page 5: About The Phone
VoIP Phone System User Guide About the Phone GXP-2135 Keys GXP-2135 Rear Connections P a g e... -
Page 6: Gxp-2170 Keys
VoIP Phone System User Guide GXP-2170 Keys GXP-2170 Rear Connections P a g e... -
Page 7: Phone Features
VoIP Phone System User Guide GXP-2170 has an additional connection for a side car that is not used. It is located to the side and not in the above picture. Phone Features Answering and Making Calls Answering a call There are a few buttons that you will need to take note of. You have the Green Send button and the Orange Speaker, when pressed will pick up the call on speaker. -
Page 8: Voicemail
VoIP Phone System User Guide Voicemail Voicemail is only enabled on extensions assigned to individual users. Common phones such as the office or sales floor uses only the first extension for voicemail. The Voicemail messages and greeting can be changed by pressing the Voicemail key, entering in the password/pin and following the prompts. Default setting is for Voicemails to be sent to the email address of the assigned user or the group email for the general mailbox. -
Page 9: Use 3-Way/4-Way Calling
VoIP Phone System User Guide In addition to using the BLF keys, you can also use entries in the phonebook. Use 3-Way/4-Way Calling While you are on the first call, press the 4-way call button, you will hear a dial tone. You can dial the extension, telephone number, press the BLF Line Key or use the Phonebook. -
Page 10: Call History
VoIP Phone System User Guide Call History The phones have a Soft Key on the screen when not in use called History. This will show all the incoming and outgoing calls. You can press History and using the Navigation Keys to scroll up and down and you can press the Soft Key Dial to call the number. - Page 11 VoIP Phone System User Guide 3. Once logged in, you will see a menu bar at the top with buttons. Take note of Fax and Contacts. 4. If you are sending a one-time fax to a number and clicked on the Fax icon. You will see a Send Fax button at the top right corner of the screen.
- Page 12 VoIP Phone System User Guide To send a fax, simply click on the number next to the contact name and the new fax dialog will appear. Browse and select the file and click Send (This works the same as on the previous page saving you do not have to enter in the number.) 12 | P a g e...
-
Page 13: Connecting A Headset
Connecting a wired Headset EHS (Ear, Hook, Switch) Headset The GXP-2135 and GXP-2170 support normal RJ11 headset and Plantronics EHS headset. To use the Plantronics EHS headset, contact us with the extension number of the phone you want it enabled on, it has to be activated from our end. -
Page 14: Basic Troubleshooting
VoIP Phone System User Guide Basic Troubleshooting Phone Showing Network Down or Not Registered Make sure that the ethernet cord that is connected to the Network Connection (See Below) is securely connected to the Wall Jack or Switch properly. Then disconnect the Power Supply from the rear of the phone (See Below). -
Page 15: Lcd Status Icons
VoIP Phone System User Guide phone to update, it needs to be rebooted. This can be done by Pressing the Menu Key and Navigating to Reboot, Pressing the Menu/Enter Key and then press the Yes Soft Key. The phone will reboot. Once it reboots, it will update its Line Keys. - Page 16 VoIP Phone System User Guide 16 | P a g e...
- Page 17 VoIP Phone System User Guide 17 | P a g e...
-
Page 18: Line Key Icon Indications
VoIP Phone System User Guide Line Key Icon Indications Line Keys are also called VPK, below is a table on what the statuses are. 18 | P a g e... - Page 19 VoIP Phone System User Guide 19 | P a g e...
- Page 20 VoIP Phone System User Guide 20 | P a g e...
- Page 21 VoIP Phone System User Guide 21 | P a g e...
-
Page 22: Cordless Voip Phones
VoIP Phone System User Guide Cordless VoIP Phones Overview W53P DECT Cordless HD Handset and Base 22 | P a g e... -
Page 23: Equipment Packaging
VoIP Phone System User Guide Equipment Packaging DP752 Base Station • 1 Base Unit • 1 Universal 5v power supply • 1 Bracket • 1 Ethernet Cable DP730 Cordless Handset • 1 Handset unit • 1 Universal 5v power supply •... - Page 24 VoIP Phone System User Guide DP722 Cordless Handset • 1 Handset unit • 1 Universal 5v power supply • 1 Charging Cradle • 1 Belt Clip • 2 Rechargeable batteries W53P Cordless Handset and Base • 1 Handset Unit • 1 Base Unit •...
-
Page 25: Connecting Dp752 Base Station
VoIP Phone System User Guide Connecting DP752 Base Station To Setup the DP752 DECT Cordless VoIP Base Station, please follow the steps below: Connecting via AC power 1. Connect the micro-USB connector into the related port on the base station and connect the other end of the power adapter into an electrical power outlet. -
Page 26: Setting Up The Dp730/Dp722 Handsets
VoIP Phone System User Guide Setting up the DP730/DP722 Handsets Please follow below steps to insert batteries into the Handsets: • Open the battery compartment cover. • For DP730: Inset Li-ion battery with the electrodes in the bottom left corner. •... -
Page 27: Battery Information
VoIP Phone System User Guide Battery Information In order to get the best performance of your DP730/DP722 Handsets, we recommend using original batteries provided in the package or batteries compliant with above specifications. The specifications may differ depending on the age and capacity of the batteries used. Be careful when inserting the batteries into your handset to avoid any risk of short- Important Note: circuit, which lead to damage your batteries and/or the handset itself. -
Page 28: Dp752 Led Patterns
VoIP Phone System User Guide DP752 LED Patterns The DP752 has 3 LED lights on it. Please refer to the following table for the meaning of each light. 28 | P a g e... -
Page 29: Dp730 Handset Description
VoIP Phone System User Guide DP730 Handset Description DP722 Handset Description 29 | P a g e... -
Page 30: Dp722/730 Handset Usage
VoIP Phone System User Guide DP722/730 Handset Usage Because this is a cordless phone, the features are limited compared to the desktop phones. There is no ability to park a call or pick up a parked call. Calls can be transferred to the extension of the cordless or forwarded out. -
Page 31: 3-Way Conference
VoIP Phone System User Guide Attended Transfer 1. Press Left softkey “Options” during a call, and then select Attended Transfer. 2. Enter the number you want to transfer the call to, then press Dial key or press Call Softkey. 3. Once the second call is established, press left softkey Transfer to finish the Attended transfer. 3-Way Conference The DP722/DP730supportscreating a local conference with other parties (including handsets starting the conference). -
Page 32: W53H Handset Description
VoIP Phone System User Guide W53H Handset Description 1. Receiver 2. Power LED indicator 3. Phone Screen 4. Soft Keys 5. Message Key 6. Speakerphone Key 7. Navigation Keys 8. OK / Enter Key 9. On-Hook Key (Send) 10. Off-Hook Key (End) 11. -
Page 33: W53H Handset Usage
VoIP Phone System User Guide W53H Handset Usage Because this is a cordless phone, the features are limited compared to the desktop phones. There is no ability to park a call or pick up a parked call. Calls can be transferred to the extension of the cordless or transferred out. -
Page 34: To Transfer A Call
VoIP Phone System User Guide 3. Press OK and the caller will be placed on hold. 4. Press the Resume softkey to pick the call back up. To Transfer a call. 1. Press the TRANS key while in call, the caller will be placed on hold. 2.
Need help?
Do you have a question about the GXP-2135 and is the answer not in the manual?
Questions and answers