Advertisement
Quick Links
Advertisement

Related Manuals for Faber GALILEO SMART


Summary of Contents for Faber GALILEO SMART
- Page 1 KAPAK TENXHERE COOKER HOOD...
- Page 2 ................89 ....................104 ....................97 UDHËZUES PËR PËRDORIMIN ..................101 USER MANUAL ........................3 ................42...
- Page 3 • • • •...
- Page 4 • • • • • • • • • •...
- Page 5 • • • • • • • • •...
- Page 6 • • • • • • III. • • • • • • • • •...
- Page 7 • • • • • • • • • • • • • • • •...
- Page 8 • 5 x 2,5 mm². • • • • • • • • • • • •...
- Page 9 “.
- Page 15 “ “...
- Page 17 • • „9“...
- Page 18 0 – 1 – 2 – 3 0 – 1 – 2 – 3 0 – 1 0 – 1 0 – 1 – 2...
- Page 21 ENERGY ENERGY ENERGY SAVING SAVING SAVING...
- Page 22 „0“.
- Page 23 „0“ GALILEO SMART...
- Page 24 ER03 ER20 – ER21 85°C. ER22 – ER31 ER36 – ER47...
- Page 25 – – TC = UI = NTC =...
- Page 26 GALILEO SMART faberspa.com GALILEO SMART – 220-240 V, 50 Hz; 220 V, 60 Hz 3N~ / 2N~ 380-415 V, 50 Hz; 3N~ / 2N~ 380 V, 60 Hz 210 x 190 210 x 390 1+2, 3+4...
- Page 27 • • • • •...
- Page 28 • • • • • • • • • • • •...
- Page 29 • • • • • • • • • • •...
- Page 30 • • • • • • • • • • • • • •...
- Page 31 • • • • • • • • • • • • • • • • • • • •...
- Page 32 • • • • •...
- Page 33 ”. 7,4 kW.
- Page 39 „ ” „ ”...
- Page 40 • • INTENSIVE „9” TENSIVE 2...
- Page 41 0 – 1 – 2 – 3 0 – 1 – 2 – 3 0 – 1 0 – 1 0 – 1 – 2...
- Page 42 7,4 kW 4,5 kW 3,5 kW 2,8 kW...
- Page 44 ENERGY ENERGY ENERGY SAVING SAVING SAVING 110 mm 145 mm...
- Page 45 „0”.
- Page 46 „0” GALILEO SMART 7,62 kW 4,72 kW 3,72 kW 3,02 kW...
- Page 47 ER03 ER20 – ER21 ER22 – ER31 ER36 – ER47...
- Page 48 – – TC = UI = NTC =...
- Page 49 GALILEO SMART GALILEO SMART – 220–240 V, 50 Hz; 220 V, 60 Hz 3~/2~ 380–415 V, 50 Hz; 3~/2~ 380 V, 60 Hz 210 x 190 210 x 390 1+2, 3+4...
- Page 50 • • • •...
- Page 51 • • • • • • • • • •...
- Page 52 • • • • • • •...
- Page 53 • • • • • • • • • • • • • •...
- Page 54 • • • • • • • • • • • • • • •...
- Page 55 • • • • • • • • • • • • • • • • •...
- Page 56 7.4 Kw.
- Page 64 • • „9“...
- Page 66 0 - 1 - 2 - 3 0 - 1 - 2 - 3 0 - 1 0 - 1 0 - 1 - 2...
- Page 67 7.4 Kw 4.5 Kw 3.5 Kw 2.8 Kw...
- Page 69 ENERGY ENERGY ENERGY SAVING SAVING SAVING 110 mm 145 mm...
- Page 70 “0“.
- Page 71 "0" GALILEO SMART 7.62 Kw 4.72 Kw 3.72 Kw 3.02 Kw...
- Page 72 ER03 ER20 ER21 ER22 ER31 ER36 ER47...
- Page 73 TC = UI = NTC =...
- Page 74 GALILEO SMART GALILEO SMART...
- Page 75 • • • • •...
- Page 76 • • • • • • • • • • • • •...
- Page 77 • • • • • • • • • •...
- Page 78 • • • • • • • • • • • • • •...
- Page 79 3. PASTRIMI E • • • • • • • • • • • • • • • • • • •...
- Page 80 • • • • • •...
- Page 81 7,4 Kw.
- Page 82 ve Timer...
- Page 85 Funksioni...
- Page 87 Funksioni...
- Page 88 • • “9” INTEN-...
- Page 90 7,4 Kw 4,5 Kw 3,5 Kw 2,8 Kw...
- Page 92 ENERGY ENERGY ENERGY SAVING SAVING SAVING...
- Page 94 Rregullimi i PowerPlus GALILEO SMART 7,62 Kw Timer 4,72 Kw 3,72 Kw 3,02 Kw...
- Page 95 ER03 ER20 ER21 ER22 ER31 ER36 ER47...
- Page 96 TC = UI = NTC =...
- Page 97 RIPARIMI 4300 GALILEO SMART GALILEO SMART...
-
Page 98: Safety Instructions
section of wire between the cable anchor point and the 1. SAFETY terminals must be arranged in INSTRUCTIONS such a way as to allow the live For your own safety and wires to be pulled out before to guarantee proper use the earth wire in the event of of the appliance, please read the cable coming out of its... - Page 99 Never connect the suction of fumes, it is important • appliance to ducts carrying that the regulations set by combustion fumes (heaters, local authorities be followed carefully. If the suction hood is used • WARNING: remove the alongside non-electrical appliances (e.g. appliances installing the appliance.
- Page 100 used by children over the age of 8 years and electric shock. by persons with limited Do not turn the device on • physical, sensory or mental if the surface is cracked or any damage is visible in the thickness of the provided they are material.
-
Page 101: Cleaning And Maintenance
separate remote controlled Never stand on the • system. appliance, as this may WARNING damage it. • Do not rest objects on the Do not rest hot pots and • cooking surfaces. pans on the frame, as this The appliance must be may damage the silicone •... -
Page 102: Electrical Connection
5. ELECTRICAL detergents to be used. The use of protective detergents is recommended. CONNECTION • boiled over, using a scraper pad suitable for • Electrical connections must be carried out by a vitreous ceramic, while the cooker hob is still trained technician. - Page 103 7. CONTROLS for 2 seconds to turn the hob on and activate its functions. All the Digits show and the Timer digits show “ C L “. At this point the hob is on but all the cooking areas and the hood are at zero power. Warning button.
-
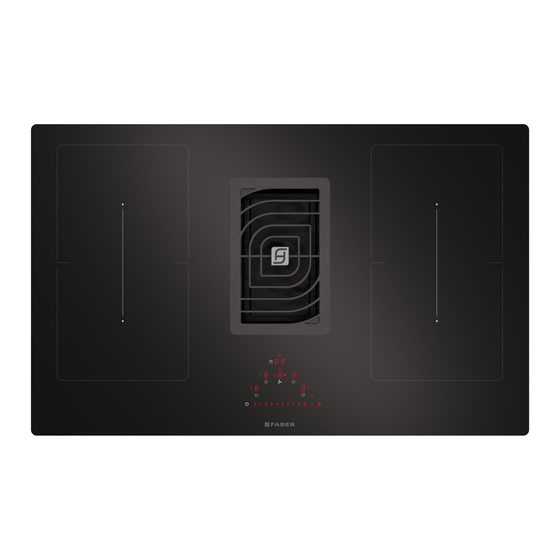
Page 104: Types Of Control
7.1 Types of control Timer controls area Left back cooking Right back cooking area controls area controls Left front cooking Right front cooking area controls area controls Suction hood controls area Power bar The controls for the cooking areas, suction hood and timer can be activated by pressing on the reference Digit... - Page 105 7.2 Controls Controls Description Selecting cooking area controls for 2 seconds. The cooking areas are activated by pressing on the Digit for the reference area. The corresponding Digit lights up The symbol indicates that the timer corresponding to the selected area is active (see the function “Cooking area Timers").
- Page 106 Selecting Timer controls for 2 seconds. Select the controls areas used to manage the cooking area Timers and the suction hood, which normally display “ C L “ (see the Timer functions). The symbol indicates the safety functions button (see “Keyboard Lock (cleaning)”.
-
Page 107: Function Description
7.3 Functions Function Description Used to lock the cooker hob settings to prevent accidental To activate: when no pans are present, press and hold for 3 seconds one of the 4 digits for the cooking areas. Release and slide your Keyboard Lock (Child Safety) The operations described must be completed within 10 seconds. - Page 108 Countdown with alarm for generic use. To activate: with the hob turned on and with no pans present, press the Digits in the Timer controls area one at a time, setting the values individually by selecting them on the power bar Timer (generic) The Display in the Timer management controls area shows the countdown, if it has been set.
- Page 109 minutes if the person using the hob needs to go away for a short time. During the pause: - No energy is being used in any of the cooking areas. - All the Timers are stopped. - The “Turbo“ and “Quick Heating“ functions are deactivated Function Pause + Restart When the 10 minutes are up, the hob will continue with all the...
- Page 110 7.4 Fuction hood controls Timer symbol After selecting the suction hood Digit, press the Timer Management Digit to set the countdown. and it is always enabled. The hood is set by default to ducting mode. With no loads on, press the Hood controls digit to enable the suction hood.
- Page 111 7.5 User Menu (custom settings) The User menu enables the user to customise at will both the audio (tone and volume) and visual signals sent by the hob. Press Press again within 3 seconds. - The symbol will appear. - Continuing to hold , press the 4 Digits for the cooking areas ( ) one at a time in a clockwise direction, starting from the one on the left.
- Page 112 7.6 Installer Menu (Hob power settings) hob cooking areas based on the actual abilities and capacity of the power supply itself. If this is not necessary, the hob can be turned on directly using , otherwise, follow the operations below to access the menu. Continuing to hold , press the 4 Digits for the cooking areas ( ) one at a time in an...
- Page 113 Power management function This product has an electronically controlled power management function. The Power management cooking elements (right and left hand side phases), optimising power distribution and avoiding any overloading of the induction system. To do this, the total power is monitored continuously, and reduced when necessary. If it is not possible another cooking element so that it is at a level immediately below its respective power curve.
- Page 114 Energy saving information - The diameter of the pan bottom must correspond with the diameter of the cooking area. ENERGY ENERGY ENERGY SAVING SAVING SAVING Caution: bottom that are suitable for induction cooking. Using pans with an uneven bottom may detract - When purchasing a pan, check whether the diameter indicated corresponds to the bottom or and may prevent detection of the pan on the...
- Page 115 Normal working noises in the hob Fan noises Induction technology is based on the creation of For the electronic system to operate correctly, the temperature of the cooker hob must be regulated. To do this, the hob is equipped with a cooling the pan.
- Page 116 10 seconds. power for 10 minutes. This can be used, for quickly. MODEL GALILEO SMART - Select one of the areas and press twice on “ 9 “ on the power bar. The corresponding Digit 7.62 Kw displays...
- Page 117 Error codes Possible cause of the Error code Description Solution error "Buzzer sounds on LIN cable damaged or badly switching on. The hood command check connection/replace connected to the hood does not work the LIN cable No error code electronic board displayed"...
- Page 118 The power supply voltage The power supply does not fall within the voltage does not fall Check the mains voltage. range (see technical data for within the range (voltage details). and/or frequency). The cooking area cannot be Internal error in generator Replace the module.
-
Page 119: Maintenance And Repairs
REPAIRS - Make sure that maintenance on electrical Type: 4300 components is only carried out by the Model: GALILEO SMART manufacturer or by the service technicians. - Make sure that damaged cables are only bottom of the product. replaced by the manufacturer or by the service The manufacturer makes continual improvements technicians. - Page 120 • • •...
- Page 121 • • • • • • • • •...
- Page 122 • • • • • • • •...
- Page 123 • • • • • • • • • • • •...
- Page 124 • • • • • • • • • •...
- Page 125 • • • • • • • • • • • • • • • • •...
- Page 126 • • • • • • • •...
- Page 134 • • “9”...
- Page 138 ENERGY ENERGY ENERGY SAVING SAVING SAVING...
- Page 140 GALILEO SMART...
- Page 141 ER03 ER20 ER21 ER22 ER31 ER36 ER47...
- Page 142 TC = UI = NTC =...
- Page 143 GALILEO SMART GALILEO SMART...
- Page 144 EN Warning! Before proceeding with instal- lation, read the Recommendations and S u g g e s t i o n s in the User Manual.
- Page 145 – 5 –...
- Page 146 – 6 –...
- Page 147 112.0540.782 – 7 –...
- Page 148 112.0540.730 112.0540.781 H100 – 8 –...
- Page 149 – 9 –...
- Page 150 R11+1 – 10 –...
- Page 151 600 mm 30 mm L = H - 310 mm – 11 –...
- Page 152 700 mm 130 mm L = H - 310 mm – 12 –...
- Page 153 ≥ 800 mm 230 mm L = H - 310 mm – 13 –...
- Page 154 – 14 –...
- Page 155 – 15 –...
- Page 156 – 16 –...
- Page 157 112.0459.427 112.0459.428 112.0459.429 112.0459.451 225.18 Ø 158.95 216.6 220.3 112.0459.453 112.0459.456 112.0459.455 220.1 244.8 80.58 94.58 94.58 112.0253.681 112.0280.685 112.0280.687 ø 150 ø150 L = 1.5 m Ø 150 mm 112.0253.688 112.0253.690 – 17 –...
- Page 158 112.0540.730 – 18 –...
- Page 159 H100 112.0540.781 – 19 –...
- Page 160 7. 1 – 20 –...
- Page 161 Mono-phase H05V2V-2F Bi-phase 5 x 2.5 mm² Three-phase 1 x 32A circuit breaker 220-240V~ 1+N+GND 2 x 16A circuit breaker 3 x 16A circuit breaker – 21 –...
- Page 162 – 22 –...
- Page 164 991.0599.648_02 - 201120 D00006278_01...
Need help?
Do you have a question about the GALILEO SMART and is the answer not in the manual?
Questions and answers