Table of Contents
Advertisement
Quick Links
Advertisement
Table of Contents

Related Manuals for Norcent LM960


Summary of Contents for Norcent LM960
-
Page 1: Lcd Monitor
LCD MONITOR MANUAL Thank you very much for choosing the Norcent Product. We recommend that you take a few minutes to read carefully through this manual before installing and switching on the product. Please keep this manual in a safe... -
Page 2: Operation Instructions
FCC RADIO FREQUENCY INTERFERENCE STATEMENT WARNING: (FOR FCC CERTIFIED MODELS) This monitor has been tested and found compliant with the limits for a Class B digital device, pursuant to part 15 of the FCC Rules. These limits are designed to provide proper protection against harmful interference to a residential installation. -
Page 3: Table Of Contents
Content Safety Precautions...1 First Setup ...2 Installation ...3 Using OSD Functions ...4 Technical Information...13 Care and Maintenance ...14 Troubleshooting ...14... -
Page 4: Safety Precautions
This monitor is manufactured and tested on a ground principle that a user’s safety comes first. However, improper use or installation may result danger to the monitor as well as to the user. Carefully go over the following WARNINGS before installation and keep this guide handy. -
Page 5: First Setup
First Setup Congratulation for purchasing this monitor of high performance! This monitor comes with the following accessories : Video cable with 15 pin D-SUB connector. Power cable. Audio Cable. User guide book. Quick Installation 1. Connect video cable Make sure both the monitor and computer are powered OFF. -
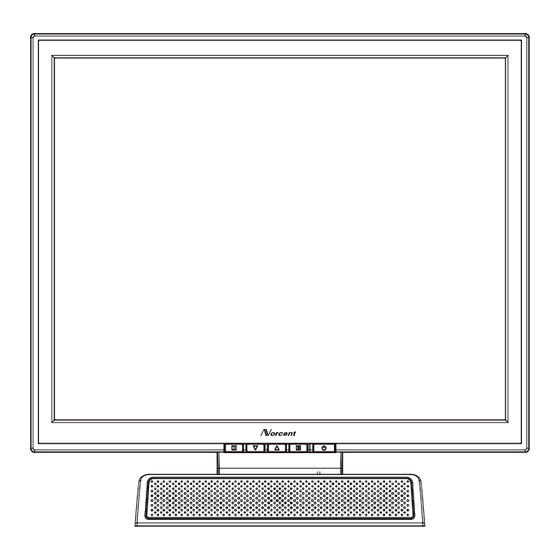
Page 6: Front Panel Control
Front Panel Control ACTIVATE/EXIT OSD SCROLL DOWN/DECREASE SCROLL UP/INCREASE Installation POWER INPUT DVI INPUT SELECT DESIRED FUNCTION POWER ON/OFF LED INDICATOR AUDIO INPUT VGA INPUT... -
Page 7: Using Osd Functions
Using OSD Functions 1. Press the button to display the main menu shown below. 2. Press the button to scroll to the desired menu option. 3. Press the button to select the menu option. 4. Press the button to select submenu option. After making adjustment, press screen. - Page 8 Contrast : To adjust the foreground white level of screen image. Press button to adjust selected contrast. Brightness : To adjust the background black level of screen image. Press button to adjust selected brightness. Color Adjust : To provide four preset color adjustments for improving brightness and color saturation: 9300K, 6500K, 5400K, and User Color.
- Page 9 9300K--Adds blue to screen image for cooler white. 6500K--Adds red to screen image for warmer white and richer red. 5400K--Adds green to screen image for a darker color. User Color : Individual adjustments for red (R), green (G), blue (B). 1.
- Page 10 Image Adjust : To manually adjust the Horizontal /Vertical position ,H. Size, Fine Tune and Sharpness. H./V. Position : To adjust the horizontal and vertical position of the video. H. Position : move screen to the right, : move screen to the left. V.
- Page 11 Fine Tune : To adjust the delay time of data and clock. Press to adjust to user preference. Sharpness : To adjust the clarity of a non-SXGA (1280x1024) signal. Press button to adjust sharpness. Setup Menu : To set language Select, Resolution Notice, OSD position, OSD Time Out and Input Select (Analog).
- Page 12 Language Select : To allow the user to choose from available language. Resolution Notice : There is a OSD message of "For best picture quality change resolution to 1280 x 1024" displayed on the screen after 30 seconds Powering ON or changing mode to lower resolutions (640 x 480/ 720 x 400 / 800 x 600/ 1024 x 768), if the function was "enable".
- Page 13 OSD Position : Press the OSD position. Horizontal OSD Position:To horizontally replace the OSD position. :move OSD to the right, Vertical OSD Position:To vertically replace the OSD position. :move OSD up, OSD Time Out : Sets the length of time the OSD screen is displayed before exiting.
- Page 14 Input Select : Press Input Select to change Input signal to Analog or Digital. Memory Recall : To return to the factory setting condition, about Picture&Audio setting. Press the button to select the Memory Recall menu option. Audio Menu: Volume: To adjust the volume of speaker output. Mute: To select the Mute ON/OFF.
-
Page 15: Supporting Timing Modes
VESA Warning : Do not set the graphic card in your computer to exceed these maximum refresh rates. Doing so may result in permanent damage to your monitor. 640 x 480 @ 60Hz 640 x 480 @ 67Hz 640 x 480 @75Hz... -
Page 16: Technical Information
Technical Information Technical Specification LCD Panel Power Management Displayable Resolution Pixel Dimension LCD Display Color Viewing Angle Tilt Contrast Ratio Brightness Response Time Active Display Area Temperature Compliance Power Speaker 19.0” TFT Energy Star compliant VESA DPMS compatible < 2 W SXGA 1280 x 1024 max. -
Page 17: Care And Maintenance
Please avoid exposing your LCD monitor from direct sunlight or other heat sources. Put your monitor in a well ventilated area. Do not place any heavy things on top of your monitor. Make sure your monitor is installed in a clean and moisture-free area. - Page 18 If any colors (red, green, blue) are missing, check the video cable to make sure it is securely connected. Loose or broken pins in the cable connector could cause an improper connection. Connect the monitor to another computer to verify if it is monitor problem or computer problem.
- Page 19 Norcent Technology, Inc. 550 Cliffside Drive, San Dimas, CA91773 www.norcent.net info@norcent.net support@norcent.net Customer support 909-305-2121...
Need help?
Do you have a question about the LM960 and is the answer not in the manual?
Questions and answers