Inficon D-TEK 3 Operating Manual
Refrigerant leak detector
Hide thumbs
Also See for D-TEK 3:
- Operating manual (357 pages) ,
- Quick start manual (68 pages) ,
- Operating manual (234 pages)
Table of Contents

Subscribe to Our Youtube Channel
Related Manuals for Inficon D-TEK 3


Summary of Contents for Inficon D-TEK 3
- Page 1 Operating Manual ® D-TEK Refrigerant Leak Detector English · Español · Deutsch · Français · Italiano · 中文 ·日本語 · Pyccĸий· Polski · Svenska · Türkçe · Nederlands · · Český 074-710-P16B...
-
Page 2: Table Of Contents
Table of Contents Table of Contents 1 Cautions and Warnings .......................... 4 2 Specifications .............................. 5 3 D-TEK 3 ................................ 7 4 Charging the Battery............................ 8 5 Turning On the Instrument and Preparing for Use .................. 9 6 Pinpoint Mode.............................. 9 7 Manual Zero Mode............................ -
Page 3: Cautions And Warnings
Use in an environment with flammable refrigerant concentration approaching the LEL (lower explosive limit) could cause an explosion or fire resulting in serious injury, death, or damage to property. 4 / 260 074-710-P16B D-TEK 3 Operating Manual... -
Page 4: Specifications
Weight (with battery; not including 0.97 lb. (0.44 kg) carrying case or accessories) To achieve optimal performance and the specified sensitivities, it is recommended to allow D-TEK 3 to run for 15 minutes prior to use. 074-710-P16B D-TEK 3 Operating Manual 5 / 260... - Page 5 Calibration frequency Check annually with calibrated leak standard x = R134a: 32 g/yr R1234yf: 35 g/yr R744: >50 g/yr R717: 35 g/yr R290: 30 g/yr Patents (Pending) Application #10 2018 208 826.8 6 / 260 074-710-P16B D-TEK 3 Operating Manual...
-
Page 6: Tek 3
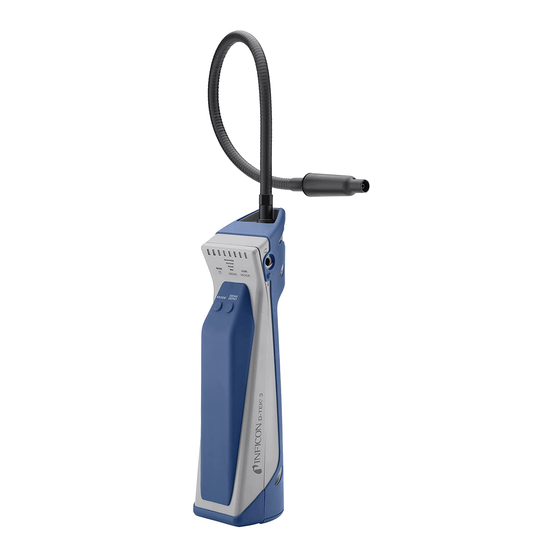
INFICON D-TEK 3 | 3 3 D-TEK 3 leak indicators sensitivity indicators power indicator MODE indicator MODE button SENS/ZERO button battery door eject button 074-710-P16B D-TEK 3 Operating Manual 7 / 260... -
Page 7: Charging The Battery
4 Charging the Battery D-TEK 3 uses a rechargeable lithium ion battery that comes partially charged. INFICON recommends charging the battery before use. Using the supplied charger or charging cradle accessory, a dead battery can be charged to 80% in approximately 2 hours and 100% in approximately 3 hours. -
Page 8: Turning On The Instrument And Preparing For Use
5 Turning On the Instrument and Preparing for Use If the unit does not turn on, the battery is low and needs to be charged. D-TEK 3 can be used while charging. Long press the power button (located on the left side of the body of the instrument) to turn D-TEK 3 On or Off. -
Page 9: Manual Zero Mode
Manual Zero mode requires an extra warm-up time of up to 15 minutes for optimal performance. 8 Earbuds and Volume Control A headphone jack is located on the right side of D-TEK 3 for listening to the alarm sounds through headphones or earbuds. WARNING If attempting to use headphones not supplied by INFICON, be sure to test them carefully to avoid hearing damage. -
Page 10: Removing And Installing The Lithium Ion Battery
Removing and Installing the Lithium Ion Battery | 9 9 Removing and Installing the Lithium Ion Battery Press the eject button on the back of D-TEK 3 and remove the battery door. eject button battery release tab Remove the battery by moving the battery release tab to the side until the battery begins to eject. -
Page 11: Removing And Installing The Sensor
10 | Removing and Installing the Sensor INFICON 10 Removing and Installing the Sensor D-TEK 3 uses a cartridge style sensor that is quick and easy to remove and replace in the field. In addition to the standard sensor, INFICON offers a CO specific sensor for use in refrigeration and air conditioning applications. -
Page 12: Replacing Filters
Replacing Filters | 11 11 Replacing Filters D-TEK 3 uses a hydrophobic filter cartridge that allows air and refrigerants to pass through while filtering out water, dirt, and oil. Examine the white cloth to determine if the filter needs to be changed. If the cloth appears discolored, install a new filter. -
Page 13: Extra-Long Probe
The optional extra-long replacement probe can be used for leak checking in hard-to- reach areas. To install the extra-long probe: Unscrew the standard probe from the D-TEK 3 body using a 10 mm wrench. Screw on the extra-long probe to approximately 35 in·lb (4 N·m). Do not overtighten. -
Page 14: Optional Sensors
Removing and Installing the Sensor [} 12]. D-TEK 3 automatically recognizes the sensor type and the MODE indicator illuminates the appropriate color to indicate the sensor type the entire time the sensor is installed. Green indicates CO red indicates flammable refrigerant, and orange indicates the standard refrigerant sensor is installed. -
Page 15: Cleaning And Storage
INFICON 14 Cleaning and Storage D-TEK 3 can be cleaned with mild detergent or isopropyl alcohol. Care should be taken to prevent cleaner from entering the instrument. Do not clean with gasoline, acetone, or other aggressive solvents as they may damage the plastic or display. -
Page 16: Troubleshooting Guide
The incorrect sensor is installed. Verify that the refrigerant sensor is installed instead of the CO sensor. The pump is not making a The pump has failed. If the battery has a proper sound. charge, contact INFICON. 074-710-P16B D-TEK 3 Operating Manual 17 / 260... -
Page 17: Warranty And Liability-Limitation
INFICON 17 Warranty and Liability-Limitation INFICON warrants your D-TEK 3 Refrigerant Leak Detector to be free from defects of materials or workmanship for one or two years (depending on region) from the date of purchase. INFICON does not warrant items that deteriorate under normal use, including batteries, sensors, and filters. - Page 18 INFICON 1 Przestrogi i ostrzeżenia .......................... 153 2 Specyfikacje.............................. 154 3 D-TEK 3 ............................... 156 4 Ładowanie baterii ............................ 157 5 Włączanie przyrządu i przygotowywanie go do użycia ................ 158 6 Tryb Pinpoint .............................. 158 7 Tryb Manual Zero ............................ 159 8 Słuchawki douszne i regulacja poziomu głośności................
- Page 19 Przyrząd nie nadaje się do stosowania w środowiskach toksycznych lub niebezpiecznych. Przyrząd nie należy do środków ochrony osobistej ani ratunkowych. Podczas pracy w środowiskach potencjalnie toksycznych lub niebezpiecznych należy zachować daleko idącą ostrożność. 074-710-P16B D-TEK 3 Operating Manual 153 / 260...
- Page 20 Napięcie wejściowe 5 V (DC) ±5% Natężenie prądu wejściowego 1 A ±5% Czas rozruchu 45–90 s Zakresy temperatury i wilgotność • Przechowywanie -20–60°C (-4–140°F) • Praca -20–50°C (-4–122°F) • Ładowanie 0–45°C (32–113°F) 154 / 260 074-710-P16B D-TEK 3 Operating Manual...
- Page 21 Dla uzyskania optymalnej wydajność i wskazanego poziomu czułości zaleca się, aby przyrząd D-TEK 3 przed użyciem został uruchomiony na 15 minut. Należy ograniczać używanie przyrządu w temperaturze poniżej 0°C (32°F). Przed użyciem przyrządu w niskiej temperaturze należy wydłużyć czas rozruchu.
- Page 22 3 | D-TEK 3 INFICON 3 D-TEK 3 wskaźniki wycieku wskaźniki czułości wskaźnik zasilania wskaźnik MODE Przycisk Przycisk zmiany zmiany trybu czułości/zerowania (MODE) (SENS/ZERO) Pokrywa komory baterii Przycisk wysuwania 156 / 260 074-710-P16B D-TEK 3 Operating Manual...
- Page 23 Pokrywa komory baterii 4 Ładowanie baterii D-TEK 3 wykorzystuje baterię litowo-jonową wielokrotnego użytku, która w chwili zakupu urządzenia jest częściowo naładowana. Firma INFICON zaleca doładowanie baterii przed jej użyciem. Korzystając z dołączonej do zestawu ładowarki lub stacji dokującej, można naładować baterię do poziomu 80% w ciągu około 2 godziny oraz do poziomu 100% w ciągu około 3 godzin.
- Page 24 Naciśnij i przytrzymaj przycisk zasilania (znajdujący się po lewej stronie obudowy przyrządu), aby włączyć lub wyłączyć urządzenie D-TEK 3. ð Uruchamianie urządzenia D-TEK 3 trwa od 45 do 90 sekund. Po uruchomieniu urządzenie D-TEK 3 jest gotowe do użycia. Przełączanie pomiędzy trybami odbywa się za pomocą przycisku MODE.
- Page 25 MODE. W trybie Manual Zero użytkownik może ręcznie zerować urządzenie do stężenia chłodziwa w otoczeniu, naciskając przycisk SENS/ ZERO. Po ustawieniu nowego punktu zerowego urządzenie D-TEK 3 nie uruchomi alarmu, o ile nie zostanie wykryte wyższe stężenie chłodziwa.
- Page 26 9 | Usuwanie i instalowanie baterii litowo-jonowej INFICON 9 Usuwanie i instalowanie baterii litowo- jonowej Naciśnij przycisk wysuwania z tyłu urządzenia D-TEK 3 i zdejmij pokrywę komory baterii. Przycisk wysuwania Dźwignia zwalniania baterii Wyjmij baterię, przesuwając dźwignię zwalniania baterii do boku, tak aby bateria wysunęła się...
- Page 27 INFICON Usuwanie i instalowanie czujnika | 10 10 Usuwanie i instalowanie czujnika Urządzenie D-TEK 3 wykorzystuje czujnik w postaci wkładu, który można szybko i łatwo wyjmować i instalować w terenie. Oprócz wersji standardowej firma INFICON oferuje czujnik CO do użycia w aplikacjach chłodniczych i klimatyzacyjnych. Patrz Części zamienne i akcesoria [} 165].
- Page 28 11 | Wymiana filtrów INFICON 11 Wymiana filtrów Urządzenie D-TEK 3 wykorzystuje filtr hydrofobowy, który oddziela powietrze i chłodziwo od wody, zanieczyszczeń i smarów. Sprawdź stan białego materiału, aby określić, czy filtr wymaga wymiany. Jeśli kolor materiału uległ zmianie, zainstaluj nowy filtr.
- Page 29 Dodatkowa przedłużona sonda zapasowa może być używana do wykrywania wycieków w trudno dostępnych miejscach. Aby zainstalować przedłużoną sondę: Odkręcić standardową sondę od korpusu D-TEK 3 za pomocą klucza 10 mm. Przykręć przedłużoną sondę, używając momentu 35 cal-funt (4 N·m). Nie dociskaj zbyt mocno.
- Page 30 łatwopalnego czynnika chłodniczego, należy zdemontować standardowy czujnik i zainstalować nowy, zgodnie z instrukcjami zamieszczonymi w części Usuwanie i instalowanie czujnika [} 161]. D-TEK 3 automatycznie rozpoznaje typ czujnika, a wskaźnik TRYB świeci się w odpowiednim kolorze, sygnalizując typ zamontowanego czujnika przez cały okres jego pracy.
- Page 31 Czyszczenie i przechowywanie | 14 14 Czyszczenie i przechowywanie Urządzenie D-TEK 3 można czyścić za pomocą łagodnego detergentu lub alkoholu izopropylowego. Należy zachować ostrożność, aby środek czyszczący nie dostał się do wnętrza przyrządu. Nie używać do czyszczenia benzyny, acetonu ani innych agresywnych rozcieńczalników, ponieważ...
- Page 32 Filtr jest zatkany, co Wymień filtr. Patrz ogranicza przepływ Wymiana filtrów [} 162]. powietrza. Pompa nie działa. Posłuchaj odgłosów pompy. Jeśli pompa nie emituje dźwięku, a bateria jest prawidłowo naładowana, należy skontaktować się z firmą INFICON. 166 / 260 074-710-P16B D-TEK 3 Operating Manual...
- Page 33 INFICON gwarantuje, że Twój D-TEK 3 wykrywacz nieszczelności czynnika chłodniczego jest wolny od wad materiałowych i produkcyjnych przez jeden lub dwa lata (w zależności od regionu) od daty zakupu. Firma INFICON nie obejmuje gwarancją elementów zestawu, których stan ulega pogorszeniu w wyniku normalnego użytkowania, w tym baterii, czujników i filtrów.
- Page 34 17 | Gwarancja i ograniczenie odpowiedzialności INFICON przyrząd oraz wstępnie opłacony transport zwracanego urządzenia. Firma INFICON nie ponosi odpowiedzialności za jakiekolwiek przypadkowe lub wynikowe szkody. Cała tego rodzaju odpowiedzialność jest WYŁĄCZONA. 168 / 260 074-710-P16B D-TEK 3 Operating Manual...
Need help?
Do you have a question about the D-TEK 3 and is the answer not in the manual?
Questions and answers