Table of Contents

Related Manuals for Bulteh 2000 EKOMILK Spectra


Summary of Contents for Bulteh 2000 EKOMILK Spectra
- Page 1 Bulteh-2000 ltd.19, Industrial Area Stara Zagora 6000, Bulgaria Tel./ Fax:(+359 42) 626019; Tel. :(+359 42) 620896; E-mail: bulteh@bulteh.com Infrared-Ultrasonic Hybrid Milk Analyzer USER’S GUIDE Version 4.1 Revision: 03.01.2023...
-
Page 2: Table Of Contents
Sending results to HTTP server ......30 9.6 SFTP access to Ekomilk Spectra ......30... -
Page 3: General Information
1 General information Ekomilk Spectra is designed for fast and cost effective control of milk quality - detecting adulterants (ammonium sulfate, urea, etc.) and milk parameters (Fat, Solids Not Fat, etc.). The mid-infrared spectral module allows for detection of adulterants and their concentration without the use of chemicals and the well established ultrasonic module measured the milk parameters. -
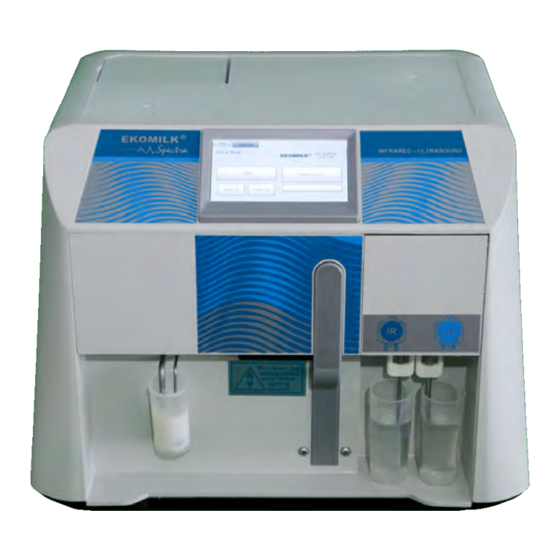
Page 4: Knowing The Parts
Parameters: Measuring ranges: Limit of detection: 0,5 % 12 % 0,1% (abs.) Solids non fat (SNF) 0,2% (abs.) Milk density (CLR) 1,0200 1,0400 g/cm3 0,0005 g/cm3 (abs.) Protein 0,2 % (abs.) -1,000 ° C 0,01 ° C (abs.) Freezing Point Added Water to Milk 60 % 5 % (abs.) -
Page 5: Safety Measures
Filter Measuring mug -25 ml. Cleaning solution mug - 40 ml. Mug for waste milk 3 Safety measures 1. Read carefully and strictly follow the instructions described in this user’s guide. 2. Under no circumstances you should try to repair Analyzer’s power lead by yourself. 3. -
Page 6: Method Of Work
4 Method of work 1. Place vertically the Analyzer on a table or any other flat surface. 2. Connect the Power Supply (Model AC/DC-CL-DT 12/10) to the power supply outlet ”In 12 V DC” on the Power Supply Panel and to the mains socket. Attention: Before start working with the device make sure all the preparation work is done. -
Page 7: Milk Samples Requirements
13. Instruction for preparing 500 ml EkoSpectra Clean working solution (3.5%), used for cleaning before switching off: Take a transparent, non-sparkling 500ml water bottle with deionized water (or distilled water) and warm it up to about 30-35 ° C. Then pour the 18 grams EkoSpectra Clean package into the bottle. -
Page 8: Infrared Module Cleaning
6.1 Infrared module cleaning Ekomilk Spectra cleaning procedure works on a reversal principle to prevent problems with cuvette clogging. NOTE: Instructions for preparing EkoZero solution are on the packaging label of the concentrate, also described in the section 4. Clean the infrared module, following the steps below: ˆ... -
Page 9: Ultrasonic Module Cleaning
6.2 Ultrasonic module cleaning Cleaning the ultrasonic module requires more time than cleaning the infrared module because different solutions are used to maintain the ultrasonic sensor in good condition. The cleaning of the ultrasonic module is similar to the cleaning of the infrared module: ˆ... - Page 10 Methods for daily and periodic clean of the Ekomilk Spectra analyzer’s ultrasonic module 1. DAILY CLEANING Daily cleaning is required when: ˆ The interval between two consecutive measurements is more than half of one hour. ˆ The daily job is finished.
- Page 11 Take care this solution does not contact your eyes or skin! Attention! Use only EkoWeek working solution as a cleaning agent. The EkoWeek concentrate can damage your analyzer! 2.1. Perform the daily cleaning first. Attention! Make sure that the analyzer is properly cleaned with pure water before going on to the next item of the procedure.
-
Page 12: Cleaning Before Switching Off
6.3 Cleaning before switching off When you press the power button to turn off the analyzer, the cleaning procedure will begin: ˆ place cleaning solution mug filled with EkoZero solution under the IR peristaltic pump (figure 2) ˆ place an empty mug for waste milk under the inlet of the infrared module ˆ... -
Page 13: Zero Procedure
7 Zero procedure The ”zero procedure” must be performed at the beginning of the working day and on every hour during the day. This procedure is necessary to account for imperceptible changes in the environmental conditions of the measurements and their compensation. Failure to set to zero may adversely affect measurement accuracy. -
Page 14: Milk Analysis
8 Milk analysis Since Ekomilk Spectra is a hybrid analyzer using infrared technology for adulterant detection and ul- trasonic for standard milk parameters measurement, it can make complex measurements using both modules, or it can be set to only use either the infrared or the ultrasonic module for measurement. So if there is a problem with one of the modules the analyzer can continue working with the other module. -
Page 15: Start Measurement
If there are drops of milk or cleaning solution left in the system, they will fall into the mug. Position of the components: (Figure 11) ˆ place the measuring mug, filled with sample on the Ekomilk Spectra’s working surface ˆ place the empty mug for cleaning solution under the US peristaltic pump Work of ultrasound module: When initiating a measurement, the peristaltic pump on the ultrasound module takes a sample of milk (a yellow arrow, Figure 11), which fills the ultrasonic sensor. - Page 16 A new window pops up asking for the measurement configuration (Figure 13). The main thing here is to select what modules of the hybrid analyzer to be used for the measurement process. To use only the infrared or the ultrasound the check in the corresponding check box must be ticked. To use both infrared and ultrasound simultaneously for complex measurement both check boxes should be marked.
- Page 17 Figure 15: Measurement with infrared Figure 16: Measurement with ultrasound Figure 17: Measurement with infrared and ultrasound Figure 18: Adulterant and probability...
-
Page 18: Testing With Reference Samples
Mesurement , Zero , Clean IR , Clean US and measuring configuration. 9.2 Settings menu This section describes how to configure and use other Ekomilk Spectra options. 9.2.1 Calibrate touchscreen Settings System Touchscreen To calibrate your touch screen please, follow the instructions that will appear. In case of a mistake, turn... -
Page 19: Display Parameters
9.2.2 Display parameters Settings System Display params. You can configure result view. You can: ˆ hide ultrasound parameters ˆ hide corrected or raw values of ultrasound parameters ˆ display 1 or 2 decimal places for fat and SNF ˆ display on CLR instead density ˆ... -
Page 20: Firmware Update/Gui/Os
”fw” and then you need to copy update file(for firmware (.bfu), for GUI/OS (.zip)) into ”fw” folder. Take the USB flash drive and plug the USB stick in one of the Ekomilk Spectra USB ports. For Firmware open Settings... -
Page 21: Printers
Reports Printer Printers Ekomilk Spectra supports 2 type of printers - internal (Panel EP108PP) and external (Datecs EP50). ˆ Printer mode - manual, auto(printing after every measurement). ˆ Printer parameters - you can choose which parameters you want to print and sort. - Page 22 b) When both devices are connected via cable and adapter it needs to make visible them each other. Easiest way is to make PC as DHCP server with a small program called SmallD- HCPServer.exe (files will be sent separately). Executing that program allows PC set IP (in same subnet) to Spectra.
- Page 23 2. Download measurement result There are few ways to download last data including app, HTTP request, batch scripts, via SFTP. Following text describes some of them. All of them convert necessary data (last measurement) in CSV file format. a) First of methods is with program called getData.exe. After start, enter IP of the Spectra and push GET button - last record will be downloaded in current directory with name last record.csv b) Second method is with HTTP request.
-
Page 24: Connections
9.4 Connections 9.4.1 Wi-Fi Ekomilk Spectra works with only one Wi-Fi dongle (you need to order it extra). To connect to the network, you must first plug the Wi-Fi module into one of the Ekomilk Spectra USB ports (Figure 24). - Page 25 RFCOMM communication protocol Command list Start zero procedure. cleanI Start Infrared system cleaning procedure. cleanU Start Ultrasound system cleaning procedure. MEAS:a,b Start the measurement process. There are two arguments ’a’ and ’b’. STOP Stop current process. Detailed description [ Command ] An ASCII case-sensitive command.
- Page 26 Figure 25: (a) Zero procedure (b) Cleaning procedure (c) - (d) Errors ˆ Stop the current procedure [ Command ] STOP – x is canceled - the ’x’ argument indicates which procedure was canceled [ Outline ] Example: Figure 26: Stop the current procedure...
- Page 27 ˆ Measurement procedure [ Command ] MEAS:a,b (for Infrared the command is MEAS:a, ) ’a’ - type of measurement: ’b’ - type of milk: [ Argument ] – C (for Cow) – I (for Infrared) – B (for Buffalo) – U (for Ultrasound) –...
-
Page 28: Admin Menu
This menu helps us to do the calibration remotely. Use of this menu is rare - for example, when the Ekomilk Spectra is damaged and part of the infrared system needs to be replaced (the cuvette, the glass of the cuvette, measuring board, etc.). - Page 29 But strongly recommend to don’t touch them, unless you are not absolutely sure what you do and reference instrument is really exact. From drop-down menu select for which milk type you want to set correction, then click desired parameter, which you want to correct. A, B and C are constants, used in internal calculations of ultrasound measurement board.
-
Page 30: Auto Cleaning
Send results FTP server Ekomilk Spectra can send results to FTP server. The results are stored in comma separated value (CSV) file with this header: ˆ CP code - Collection Point Code of the analyzer. It serves as the ID. -
Page 31: Long Measurement
This functionality is used to start a set of samples. We use results to generate a ”data eeprom”. The procedure need to be perform in very rare situations - for example, when the Ekomilk Spectra was damaged and the infrared board is replaced. -
Page 32: Sending Results To Http Server
Send results HTTP server Ekomilk Spectra can send results to HTTP server. The results are stored in JSON file. Format of file is represented in next example: Here is the steps you need to doing to sending json files to HTTP server: 1. - Page 33 Windows PowerShell (Command Prompt) and navigate to where they are created (for example: C:/Users/root/Desktop). After that open Windows PowerShell (Command Prompt) and write - sftp ftp user@ Ekomilk Spectra IP (for example: sftp ftp user@192.168.0.173) to connect to the Ekomilk Spectra.
-
Page 34: Errors List
10 Errors list Error message PROBLEM/CAUSE/REMEDY MLMS ERROR ! Ultrasonic measuring system damaged 1. Air bubbles in the measuring sensor. Fill again the mug with milk and repeat the measurement. Empty Camera 2. The suction system has some air leak. 3. -
Page 35: Appendix 1 - Some Reason For Ekomilk Accuracy And Repeatability Deviations
11 Appendix 1 - Some reason for Ekomilk accuracy and repeatability deviations Below are described some reasons that may worsen the accuracy and repeatability of the Ekomilk Spectra Analyzers measurement results. Some information about the way to avoid these problems is provided as well. - Page 36 (with water or milk) to be made before the real samples are tested. 10. Wrong milk type tested - Ekomilk Spectra is factory calibrated for three different kinds of milk - cow, buffalo and mixed milk. If another kind of milk is tested it may result in a measurement...
-
Page 37: Appendix 2 - Send Last Result Over Serial Port(Continuous Mode)
12 Appendix 2 - Send last result over serial port(Continuous mode) This mode can be available after measurement (Figure 31). You can send data manual or auto (after every measurement). The data is sent until you close the results dialog. Figure 31: Send data Data of Spectra last measurement can be send over serial port like 93 chars long packet(as ASCII string, contains 18 subpackets, starts with ”[”... - Page 38 (PURE milk) subpackets with corrected values will be filled with 0000 (ASCII 0x30 0x30 0x30 0x30). This is a full list of measurable ultrasound parameters. Possible, in some cases user don’t want to see all of them. If some parameter is disabled for displaying, it’s place in this packet will be filled with spaces (0x20).
-
Page 39: Appendix 3 - Troubleshooting
13 Appendix 3 - Troubleshooting 13.1 Filter clogging(infrared only) In case of air bubbles visible in the thin tubing entering the cuvette, the filter on the spout of the infrared module could be clogged (see more section 2). This is often the problem when that happens because the peristaltic pump cannot suck in enough sample and vacuum is created in the system. - Page 40 4. Plug the syringe to the thin tube and gently pull the piston. This creates vacuum that suck any particles that might have been stuck in pockets and acting as valves. Try in the opposite direction if the attempt is not successful. You can repeat this several times, until you manage to unclogging the cuvette minimally to continue with further washing procedures.
- Page 41 In case of impossibility to unclog the cuvette as a last action to resort to the following: 1. Eject the cuvette - see more section 14 (The operation of cuvette ejecting or replacement should be performed by an authorized service or technician) 2.
-
Page 42: Sticking Of Pump's Silicone Hose(Infrared And Ultrasound)
13.3 Sticking of pump’s silicone hose(infrared and ultrasound) If the Ekomilk Spectra has not been used for a long time or has not been cleaned, the pump hose may become stuck. Signs of this are, for example, if the pump is rotating but cannot suck milk or cleaning solution. - Page 43 7. Once it has blown off you can start assembling it. When replacing the silicone hose, you can gently rotate the pump to make it easier to install. 8. Carefully put the plastic cover on the pump and you will hear it fasten. Then release the outer pump cover and you are ready.
-
Page 44: Maintenance
14 Maintenance Instructions for cuvette ejecting and replacement Note: Never subtract the cuvette, while the device is turn on. Note: If the cuvette is removed, the calibration may not be appropriate and the Ekomilk Spectra may will not measure correctly. The operation of cuvette ejecting or replacement should be performed by an authorized service or technician. - Page 45 3. When the cuvette is unlocked, pull it out. 4. The cuvette is released from the system, when unplugging the upper and lower hose from the nozzles.
- Page 46 5. Inserting the cuvette into the system. NOTE: When inserting the cuvette back in the analyzer, it is very important to take care of the direction of the hoses, help manually to ensure their proper direction and to avoid hose pinching and bending.
-
Page 47: Guarantee
15 Guarantee Guarantee period is one year after purchasing data. Improper handing, transport and storage will invalidate the guarantee. Guarantee is void if warranty labels are removed. The guarantee Guarantee card period for the cuvette windows* is 6 months. *The cuvette windows are slightly soluble in water and they need to be replaced every 6 months, otherwise the measurement correctness will be affected.
Need help?
Do you have a question about the EKOMILK Spectra and is the answer not in the manual?
Questions and answers