
Subscribe to Our Youtube Channel
Related Manuals for Bulteh 2000 SMART EBULLIOMETER


Summary of Contents for Bulteh 2000 SMART EBULLIOMETER
- Page 1 SMART EBULLIOMETER USER’S GUIDE Document revision: 11 25.05.2022 Firmware Version 01.11B...
-
Page 2: Table Of Contents
1. General information ......................... 4 1.1. Applications ..........................4 1.2. Working principle ......................... 4 1.3. Working using classic ebulliometer ....................4 1.4. Working using SMART EBULLIOMETER ................4 2. Description ............................4 2.1. Appearance ............................ 4 2.2. Measuring system ......................... 6 2.3. - Page 3 5.4.9. About device ..........................39 5.4.10. System ............................ 39 5.5. "Cooling" mode ........................... 39 6. Errors description ........................... 40 6.1. Error group table: ........................41 6.2. Description of error group 1: File system errors ................. 41 6.3. Description of error group 2: Disk errors - SD card or USB flash memory ....... 41 6.4.
-
Page 4: General Information
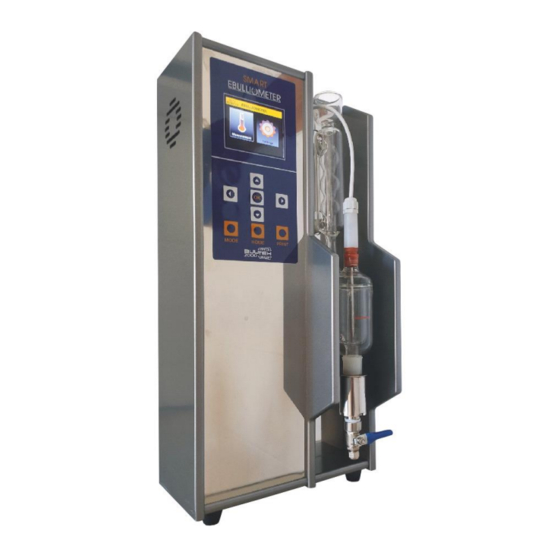
1. General information 1.1. Applications The main application of SMART EBULLIOMETER is for volume content measurement of ethyl alcohol in wine but it is possible to be used for volume content measurement of ethyl alcohol in other low alcohol content liquids - for example beer. - Page 5 Fig.1...
-
Page 6: Measuring System
2.2. Measuring system Fig.2 2.3. Schematic of cooling system connections Fig. 3... -
Page 7: Display And Keyboard
2.4. Display and keyboard Fig. 4 2.5. Rear panel Fig. 5... -
Page 8: Characteristics
3. Characteristics 3.1. Measuring characteristics at alcohol content measurement: Range (% by volume ) 0 -15 15 - 25 Resolution 0,01% 0,01% ±0,05% ±0,1% Repeatability ±0,1% ±0,2% Measurement accuracy (absolute) at boiling temperature measurement: 0 -120 °C Range 0,001 °C Resolution ±0,02 °C Repeatability... -
Page 9: Working With The Device
Water at the device cooling system outlet is taken away to the sewerage network by gravity. Turn on cooling water, adjust the flow rate from 0.5 to 1.0 L/min (using tap) and check for leaks at connection points. Attention: Make sure the output hose of cooling system is not blocked (folded, pressed, squeezed etc.). The output hose blockage leads to flooding of measuring system and serious damage of the device Remove the polyethylene bag covering the inlet of the measuring system. -
Page 10: Measurement" Mode
From this screen you may select the icon "Measurement" or "Settings" using the buttons <Left arrow> / <Right arrow>. 5.3. "Measurement" mode "Measurement" mode is designed to determine the boiling point of the sample(wine) and calculating the volume percentage of ethyl alcohol. Attention: During this procedure tap water must flow through the cooling system ( see point 4). - Page 11 Attention: The precise wine volume is very important for the accuracy of ebulliometer! After the starting of "Measurement" mode ( see item 5.3.) the user should select the wine type that will be measured - Dry, semi-dry, semi-sweet, sweet, User type 1, User type 2, ... User type 10. Note: The following parameters can be entered for each of the above types of wines: - Sugar content - Alcohol correction...
-
Page 12: Automatic Reading Of The Boiling Point And The Percentage Of Alcohol
The measurement process is fully automated and no need any actions from the user. If the user wants to break the measurement process this can be done using the buttons <MODE> or <HOME>. 5.3.1. Automatic reading of the boiling point and the percentage of alcohol In the device is embedded a boiling temperature determination algorithm based on multiple criteria. - Page 13 This way, the temperature displayed on the screen at the time of pressing the button <OK> is taken as the boiling temperature of the sample and is used to calculate the percentage of alcohol in the sample. In this case, the results are displayed as follows : Manually read value - An icon indicating that the calculated result for alcohol content is made on the basis of a manually read sample (wine) boiling temperature.
- Page 14 In case you have a printer connected to the device and it is selected ( see item 5.4.6.5. ) the measurement results will be printed out automatically. Example of printout in case of automatic reading of the boiling temperature: Example of printout in case of manual reading of the boiling temperature: If you want to print the results again, press the <PRINT>...
-
Page 15: Settings" Menu
content. That differs from the sugar content of the tested samples with no more than ±5%. The calibration value can be entered as a acohol correction for the corresponding wine type. To enter this value use "Alcohol content correction"( see item 5.4.2.2. ). 3. -
Page 16: Wine Settings" Menu
After confirmation with the <OK> button, the selected option is saved in the non-volatile memory of the device and remains valid until the next change. Depending on the selected option, the access to some of the modes from the "Settings" menu is determined. 5.4.2. -
Page 17: Editing Of Sugar Content
Using the buttons <Up arrow> /<Down arrow> select one of the menu item and confirm with <OK> button. 5.4.2.1. Editing of Sugar content Once "Sugar contents" menu option is selected (see item 5.4.2.) on the screen will appear the value of sugar content for the selected wine type, saved in the non-volatile memory in the device. -
Page 18: Editing Of Alcohol Content Correction
5.4.2.2. Editing of alcohol content correction Once "Alcohol content correction" menu option is selected (see item 5.4.2.) on the screen will appear the value of alcohol content correction for the selected wine type, saved in the non-volatile memory in the device. Use the buttons <Left arrow>... -
Page 19: Cleaning" Mode
Once "Edit the note" menu option is selected (see item 5.4.2.) on the screen will appear the text for the selected wine type, saved in the non-volatile memory in the device. The blinking cursor indicates the position at which the next character will be entered. Use the <Left Arrow> / <Right Arrow>... -
Page 20: Water" Mode
Current temperature - currently measured value of the cleaning solution temperature Time - the elapsed time since the start of the cleaning mode After the cleaning procedure finish the device shows the following message: 5.4.4. "Water" mode Important: The "Water" mode must be used in case the atmospheric pressure sensor is disabled ( see item 5.4.6.4.). - Page 21 Current temperature - currently measured value of the distilled water temperature Time - the elapsed time since the start of the measurement process The measurement process is fully automated and no need any actions from the user. If the user wants to break the measurement process this can be done using the buttons <MODE> or <HOME>.
-
Page 22: Calibration" Menu
5.4.5. "Calibration" menu To select the "Calibration" menu, from the "Settings" menu (see item 5.4.), Select the "Calibration" option using <Down arrow> / <Up arrow> buttons and then confirm with the <OK> button. To return to the "Settings" Menu, press the <MODE> button. To return to the Home screen, press the <HOME> button. - Page 23 Before starting the "Temperature sensor calibration" mode clean the SMART EBULLIOMETER measuring system thoroughly with distilled water. Close the discharge valve, measure another 50 mL distilled water and pour it into the inlet of the measuring system.
-
Page 24: Alcohol Contents Calibration
After the completion of the first measurement, a series of similar messages will follow with instructions for the laboratory assistant (user) until the complete completion of the calibration procedure, which will be announced by the following message: If you have a printer connected to the device and you have selected it (see item 5.4.6.5), the measurement results will be printed automatically. - Page 25 If you select "NO" using the <Left arrow> / <Right arrow> buttons and confirm with the <OK> button you will return to the "Calibration" menu. If you select "YES" using the <Left arrow> / <Right arrow> buttons and confirm with the <OK> button, the procedure for calibrating the alcohol content will start.
-
Page 26: Configuration" Menu
After flushing with 100 mL of water-alcohol solution, empty the measuring system and pour the water- alcohol solution to the level line, confirm with the <OK> button to start the measurement. After the completion of the preliminary measurement, several (three) similar measurements will be performed, from which the calibration parameters will be calculated. -
Page 27: Language Select
To return to the "Settings" Menu, press the <MODE> button. To return to the "Home screen", press the <HOME> button. 5.4.6.1. Language select To select the "Language" menu, from the "Configuration" menu (see item 5.4.6.), select the "Language" option using <Down arrow> / <Up arrow> buttons and then confirm with the <OK> button. A menu with supported languages will appear on the display and the currently selected language will be marked. -
Page 28: Temperature Scale
From this screen, using the <Left arrow> / <Right arrow> buttons select the date, month, year, hour or minute field. Once you have selected the field you want to change, use the <Down Arrow> / <Up Arrow> buttons to change the value. After you are ready with the changes, press the <OK>... -
Page 29: Printer
A menu with two options - "Enabled" and "Disabled" will appear on the display and the currently selected state be marked. Use <Down Arrow> / <Up Arrow> to select your prefered state and then confirm with the <OK> button. Your selection will be stored in the non-volatile memory of the device and will remain valid until the next change. -
Page 30: Buzzer
If you do not want the changes to be saved, press the <MODE> or <HOME> button. Example: If you have connected DEP 50 ESC / POS printer to the ebuliometer using the RS232 cable, and if you want to print the measurement results on paper, you need to select the "RS232 Printer - 1200/8 / E / 1" option. -
Page 31: Data Collection Upload
To return to the "Settings" Menu, press the <MODE> button. To return to the "Home screen", press the <HOME> button. 5.4.7.1. Data collection upload After each measurement, the results are automatically saved (added) to the current daily file of the SD card built into the device. - Page 32 Table describing the Minute encoding in the names of the data collection files: Minute Example of data collection file name:...
- Page 33 210705AS.CSV where 21 -Year 07 - Month 05- Date A - Hour (encoded) - in this case 10 S - Minute(encoded) - in this case 56 Notes: 1).The creation time of the data collection files on the external USB flash drive corresponds to the time of their uploading (copying) .
- Page 34 When the copying (uploading) is complete, a message will appear on the screen about the number of files copied. Example: The data collection files are in CSV format and can be open with any text editor or specialized program (application). Description of the contents of the data collection files: The rows that start with asterisk ( are header rows.
-
Page 35: Error Log Upload
5.4.7.2. Error log upload Any errors that occur during the device operation are automatically saved (added) to a file ( Error Log File) on the built-in SD card in the device Each file contains the registered errors from one day and is kept up to 90 days. -
Page 36: Diagnostic Files Upload
When the copying (uploading) is complete, a message will appear on the screen about the number of files copied. Example: Error log files have LOG file extension and can be opened with each text editor. Example of file name: 20200729.LOG where: 2020 - year 07 - month... - Page 37 This mode allows the diagnostic files to be uploaded (copied) to the external USB flash-pen drive, which must be plugged into one of the USB connectors located on the back panel of the device. Important: Once the files have been uploaded to the USB flash-pen drive they can be send to the distributor or the manufacturer for analysis.
-
Page 38: Upload All Files
The diagnostic files have "EDG" file extension. They can not be open and they are intended to be used for analysis from the producer. Example of file name: 200908F4.EDG where: 20 - year 09 - month 08 - date F - hour ( encoded, in this example - 15) 4 - minute (encoded, in this example 8 ) 5.4.7.4. -
Page 39: Serial Number Restore
Example: K:\EBULL\ CALDATA\U0200001.EPC where : К - Device label (USB flash pen drive ) EBULL - Ebulliometer folder CALDATA - Folder containing calibration files U0200001.EPC - Pressure calibration recovery file for Ebulliometer serial number U0200001 Note: The EBULL and CALDATA folders on the USB flash-pen drive must be created by the user. Before starting the "Pressure calibration restore"... -
Page 40: Firmware Update
with the < OK>. A panel will appear on the display in which the user must enter the serial number printed on the back panel of the device: After the user enters the serial number and confirm with <OK> button the recovery process starts. Upon successful completion of the serial number recovery procedure, a message will appear: 5.4.8. - Page 41 menu (see item 5.4.), by using the <Down arrow> / <Up arrow> buttons and then confirm with the < OK>. A menu for selecting the desired update file is displayed after the device finds suitable firmware update files located on the USB flash-pen drive, Using the <Down arrow>...
-
Page 42: About Device
5.4.9. About device To enter in the "About device" mode from the "Settings" menu (see item 5.4.), select the " About device" menu option using the <Down arrow> / <Up arrow> buttons and then confirm with the < OK>. Example of "About device" panel: where: EBULLIOMETER - device type Serial Number - Device serial number... -
Page 43: Errors Description
Note: This mode does not allow measurements to be made on either wine or water. To monitor the current temperatures, select the <Cooling> icon using the <Left Arrow> / <Right Arrow> buttons and then press the <OK> button. Once the power block temperature drops below 45.0 ° C and the PCB temperature drops below 40.0 ° C, the device automatically exits this mode and measurements are allowed. -
Page 44: Error Group Table
6.1. Error group table: Group Description File system errors Disk errors - SD card or USB flash memory User settings related errors File management related errors Real time clock related errors Power block and power management related errors EEPROM related errors System timers related errors Atmospheric pressure sensor related errors Temperature sensor related errors... -
Page 45: Description Of Error Group 4: File Management Related Errors
Temperature sensor calibration need restoring Wrong defined time period Damaged measurements counter Measurements counter check-sum error No pressure sensor found 6.5. Description of error group 4: File management related errors Code Description The operation is aborted File check-sum error Firmware update file version error Incompatible device type stored in firmware update file ( SUF file) Incompatible firmware type stored in firmware update file ( SUF file) Incompatible encoding in firmware update file (SUF file) -
Page 46: Description Of Error Group 7 : Eeprom Related Errors
Measured heater voltage in active state and relay turned off is under minimum value Measured heater voltage in passive state is over maximum value Measured heater voltage in passive state is under minimum value Error in heater current measurement test Dangerous high temperature of the power block. -
Page 47: Description Of Error Group 10: Temperature Sensor Related Errors
Command execution failed Configuration error FIFO WATERMARK not reached Unknown error Sensor is nor enabled Invalid FIFO REQ FRAME CNT 6.11. Description of error group 10: Temperature sensor related errors Code Description I2C protocol - No start I2C protocol - No acknowledge The readiness time of the result is out of the time limit The EEPROM write time is out of the time limit EEPROM write error... -
Page 48: Warranty Card
7. WARRANTY CARD This ebulliometer is warranted from the date of purchase. This warranty covers all expenses incurred in connection with defects in materials and workmanship in this product, excluding broken glass and water leakage defect. This warranty does not cover expenses incurred in connection with defects resulting from improper operation, maintenance or abuse.
Need help?
Do you have a question about the SMART EBULLIOMETER and is the answer not in the manual?
Questions and answers