
Subscribe to Our Youtube Channel
Related Manuals for Bulteh 2000 EKOMILK Bond


Summary of Contents for Bulteh 2000 EKOMILK Bond
-
Page 1: Operating Instructions
Industrial Area, VEREA PLAST building, Stara Zagora BULGARIA Tel./Fax:(+359 42) 626019; Tel. :(+359 42) 620896 e-mail bulteh@sz.inetg.bg ULTRASONIC MILK ANALYZER OPERATING INSTRUCTIONS... -
Page 2: Table Of Contents
TABLE OT CONTENTS KEY FEATURE CONTROLS PARTS AND ACCESSORIES ANALYZER INSTALLATION MILK SAMPLES MAIN MENU HOW TO ANALYZE THE MILK PRINTING DATA (IN CASE OF MICRO PRINTER CONNECTED TO THE ANALYZER) CLEANING DATA TRANSFER CALIBRATION CALIBRATION VALUES SAVING CONDUCTIVITY CALIBRATION PH CALIBRATION TIME &... -
Page 3: Key Feature
Micro printer and automatic data capture are integrated. Based upon ultra-sound technology, the instrument does not require any costly chemicals, caustic or reagents for testing. EKOMILK BOND is an example of accuracy and efficiency of bench chemistry methods. Test results are coming just in 45... -
Page 4: Controls
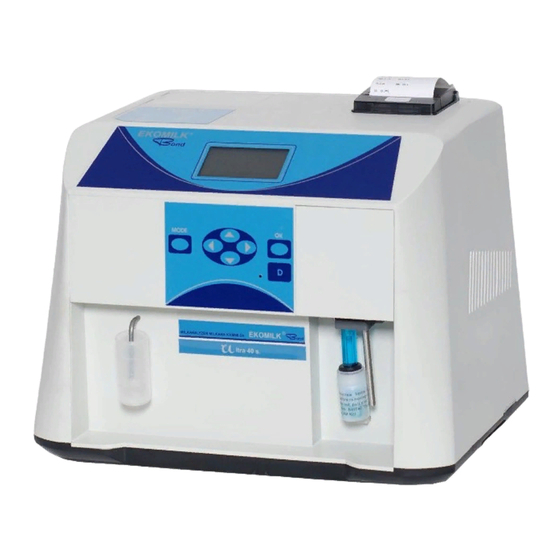
CONTROLS Fig. 1. Appearance 1. Select the work mode 2. Skip and search forwards& backwards 3. Confirm the choice 4. Tube (sucker) 5. Plastic support 6. pH electrode 7. Temperature sensor 8. Measuring mug 9. Micro printer Fig. 2. Controls on the rear panel 1. -
Page 5: Parts And Accessories
PARTS AND ACCESSORIES Item Description EKOMILK BOND TOTAL User’s guide Connector 12V CD Milk analyzer software tools User’s guide (CD Milk analyzer software tools) RS232 Cable (Null Modem, Link cable) Measuring mug Plunger Buffer solution Conductivity 500 ml 5.02 (±0,5%) mS/cm (18±0,1°C). -
Page 6: Analyzer Installation
ANALYZER INSTALLATION Place the Analyzer on a table or any other flat surface. Place vertically the Analyzer on a table or any other flat surface. Setting of AC Power Supply Voltage Connect the AC power lead first to the analyzer and then to the mains socket. Switch on the AC power. -
Page 7: How To Analyze The Milk
Place it on the Ekomilk working surface. For more information, see “pH MEASUREMENT - ADDITIONAL INFORMATION”. Remark: EKOMILK BOND uses 3 sensors for milk parameters measuring – ultrasound, conductivity and pH. Load on both measuring mugs the same milk and to get correct results at once. -
Page 8: Printing Data (In Case Of Micro Printer Connected To The Analyzer)
Press button MODE and by means of the search buttons ▲, ▼ select REC CHOICE. Press OK. The message RECORD DATA? Y will appear on the display. Change Y to N by means of the search buttons ▲, ▼ and press OK to start the measurement. This way the RECORD DATA mode will remain turned off until the Milk analyzer is switched off. -
Page 9: Cleaning
CLEANING This section is to give directions for daily and periodical cleaning of milk analyzers Ekomilk in order to assure their long life and proper functioning. ULTRASONIC SENSOR CLEANING 1. DAILY CLEANING Daily cleaning is required when: - The interval between two consecutive measurements is more than half of one hour; - The daily job is finished. - Page 10 1.2.2. Fill the measuring mug with 2 % solution of the alkaline cleaner EkoDay (25°- 40°C), dip the tube (sucker) into the cleaning solution and place the measuring mug on the Ekomilk working surface. Put the analyzer in cleaning mode, set 20 cycles and press the OK button. When the CLEANING stage is over CLEANING END is shown on the display.
- Page 11 EKOMILK HEAVILY CONTAMINATED SENSORS CLEANING PROCEDURE This procedure is to be applied to any type of EKOMILK series milk analyzers in order to clean heavily contaminated ultrasonic sensors from milk stone deposits. Milk stone is naturally laid on the ultrasonic sensors inside wall during the measurement cycles.
-
Page 12: Data Transfer
RS 232 Null Modem Cable or USB cable Communication set up: Step 1 Connect the milk analyzer EKOMILK BOND to the PC. Switch off the milk analyzer and the PC. Step 2 Start Milk Data 2001 (version 1.4) program. -
Page 13: Calibration
On the bottom of the PC screen a progress bar provides visual feedback about the progress of transmission procedure ATTENTION! IN ABOUT 1-2 MINUTES A MESSAGE APPEARS ON THE COMPUTER SCREEN: 1. Transfer is successful When transfer is completed successfully, new rows are added to the table. The message "The data received successfully! OK appears on the computer display. -
Page 14: Calibration Values Saving
- Subtract the Milk analyzer FAT value from FAT value achieved with classical method. If the difference value is in the spec limits there is no need of fat calibration. Otherwise add this difference value as a fat calibration value using the procedure described in “Calibration values saving”; - Determine a milk sample SOLIDS NON FAT (SNF) by means of a classical method;... -
Page 15: Conductivity Calibration
r CALIBRATION - Press OK. - The display shows PASS 1 - first password number prompt. - Set with search buttons▲, ▼ the first password number. Press OK to confirm it. - A prompt for the second password number appears on the display - PASS 2. Enter the second password number then in the same way as the first one. -
Page 16: Ph Calibration
2. Before calibrating, it is necessary to clean the Ekomilk using the procedure described in “CLEANING OUT - Weekly procedure”. 3. Fill the mug with conductivity buffer. Put the mug on to pos. 4, 5 – fig. 1 the tube (sucker) to be into the solution. - Page 17 Attention: It is best to select a buffer as close as possible to the actual pH value of the sample to be measured. Use standard calibration buffers that the temperature and the sample solution are the same. Steps: 1. Press the search buttons ▲, ▼ to select CALIBRATION mode. Enter the password as it is described in “CALIBRATION VALUES SAVING”...
-
Page 18: Time & Date Calibration
TIME & DATE CALIBRATION Press the search buttons▲, ▼ to select CALIBRATION mode. Enter the password as it is described in "CALIBRATION VALUES SAVING" and select TIME & DATE to be calibrated. Press OK to confirm. The message TIME: 00:00:00 appears on the display: ... -
Page 19: Ph Electrode - Replacement
pH electrodes have a finite lifespan due to their inherent properties. How long a pH electrode will last will depend on how it is cared and the solution it is used to measure. Even if an electrode is not used it still ages. -
Page 20: Tratable Acidity - Additional Information
. 6. Release both buttons. The display will show the message Bulteh 2000 Bootloader 1.01. 7. Use Windows Explorer to run pH2TA.EXE. 8. The program window will appear on the PC screen. 9. Click on the COM PORT box and the list of all available COM ports appears. Choose the COM port connected to the milk analyzer. -
Page 21: Milk Conductivity - Additional Information
11. Choice of acidity measuring unit and transformation table.Press button Change Settings, choose the desired measuring unit and table and press the button Store Settings. 12. Edit the user’s tables The user can edit only the user’s tables. The user’s tables can contents from 2 to 30 rows. Default table Th[°] La[%]... - Page 22 mastitis. Infections damage the tissue of the udder. This allows sodium and chlorine ions from the blood to be released into the milk. The concentration of ions in the milk is thereby raised, and it can more easily conduct an electrical current - the conductivity of the milk increases. ...
-
Page 23: Micro Printer - Additional Information
MICRO PRINTER - ADDITIONAL INFORMATION: 1. General information Printing Method: Thermal Paper Width: 57.5mm Paper Diameter: 55mm Resolution: 203DPI Printing Speed: Up to 90mm/s Barcode Supported: I25,UPC-A,UPC-E,EAN-8, EAN- 13,Codebar,Code39, Code93,Code128,Code11,MSI Font: ASCII(12x24) Graphic printing: Direct bitmap printing Paper Sensor: Photo-sensor Head temperature detection: Thermistor Communication Interface:... -
Page 24: Error's List
ERROR’S LIST ERROR REMEDY MESSAGE MOTOR ERROR Motor damage. Contact your dealer to make the repairs. EMPTY CAMERA 1. Air bubbles in the measuring sensor. Fill again the mug with milk and repeat the measurement. ERROR 02 2. The suction system has some air leak. Check the Plug (on the top of the analyzer) position and fix it using the plunger if it is necessary. -
Page 25: Some Reasons For Ekomilk Accuracy And Repeatability Deviations
ERROR REMEDY MESSAGE measurement - Additional information” Replace the out of order Temperature probe with a new one. Try again to calibrate the milk analyzer If the problem still exists, the pH measuring system is out of order. Contact your dealer to make the repairs. CAL ERROR 64 Conductivity calibration error. -
Page 26: Guarantee
reference the milk acidity of the milk sample must be less than 25°T for cow, buffalo and goat milk and less than 28°T for sheep milk. Another issue is the milk coagulation contaminates the ultrasonic sensor and it must be properly cleaned then.
Need help?
Do you have a question about the EKOMILK Bond and is the answer not in the manual?
Questions and answers