
Related Manuals for Bulteh 2000 Ekomilk Spectra


Summary of Contents for Bulteh 2000 Ekomilk Spectra
- Page 1 Bulteh-2000 ltd.19, Industrial Area Stara Zagora 6000, Bulgaria Tel./ Fax:(+359 42) 626019; Tel. :(+359 42) 620896; E-mail: bulteh@bulteh.com Infrared-Ultrasonic Hybrid Milk Analyzer USER’S GUIDE Version 3.0 Revision: 01.10.2020...
-
Page 2: Table Of Contents
Sending results to HTTP server ....31 SFTP access to Ekomilk Spectra ..... 32... -
Page 3: General Information
1 General information Ekomilk Spectra is designed for fast and cost effective control of milk quality - de- tecting adulterants (ammonium sulfate, urea, etc.) and milk parameters (Fat, Solids Not Fat, etc.). The mid-infrared spectral module allows for detection of adulterants and their concentration without the use of chemicals and the well established ultrasonic module measured the milk parameters. - Page 4 Environmental conditions: Ambient air temperature 15 °C 35 °C Milk temperature 5 °C 35 °C Relative humidity 30 % 80 % Parameters: Measuring ranges: Limit of detection: 0,5 % 12 % 0,1% (abs.) Solids non fat (SNF) 0,2% (abs.) Milk density (CLR) 1,0200 1,0400 g/cm3 0,0005 g/cm3 (abs.)
-
Page 5: Knowing The Parts
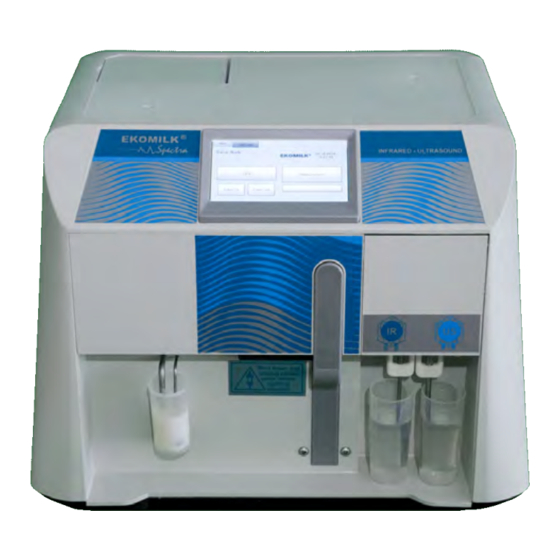
2 Knowing the parts 1. Infrared module inlet 2. Ultrasonic module inlet 3. Cuvette (Infrared module) 4. Infrared module outlet 5. Ultrasonic module outlet 6. Infrared module peristaltic pump 7. Ultrasonic module peristaltic pump 8. Touchscreen display Filter Measuring mug -25 ml. Cleaning solution mug - 40 ml. -
Page 6: Method Of Work
6. EkoClean is a powder substance, which in case of direct contact can irritate res- piratory organs and eyes. 7. Wear protective gloves/protective clothing/eye protection/face protection. 8. If by accident there is a direct contact the user should take these precautions: •... -
Page 7: Milk Samples Requirements
8. Warming up From a cool start after switching on the device it will take a few minutes for the modules to warm up. Status indicator in the top left corner on the main menu shows the progress in percentage. When the warming up is finished the status indicates ”Ready”... -
Page 8: Cleaning Procedure
The order of cleaning is not important. 6.1 Infrared module cleaning Ekomilk Spectra cleaning procedure works on a reversal principle to prevent problems with cuvette clogging. NOTE: Instructions for preparing EkoZero solution are on the packaging label of the concentrate, also described in the section 4. - Page 9 Figure 3: Clean IR Full infrared cleaning The IR module requires additional cleaning. It is recommended to be performed every 14 days, if necessary more often. It is also used in cases when the device will not be used for a long time (more than a week). For this purpose is use EkoClean (it is delivered in the form of granules in 2 packages 18 grams each).
-
Page 10: Ultrasonic Module Cleaning
6.2 Ultrasonic module cleaning Cleaning the ultrasonic module requires more time than cleaning the infrared module because different solutions are used to maintain the ultrasonic sensor in good condition. The cleaning of the ultrasonic module is similar to the cleaning of the infrared module: •... - Page 11 Methods for daily and periodic clean of the Ekomilk Spectra analyzer’s ultrasonic module 1. DAILY CLEANING Daily cleaning is required when: • The interval between two consecutive measurements is more than half of one hour. • The daily job is finished.
- Page 12 1.2.3. Fill the cleaning solution mug with alkaline clean water, press the but- Cleaning US . Make 5 cycles. It’s important to remove all the residues from the cleaning solution EkoDay! 2. PERIODICAL CLEANING PROCEDURE To ensure a good work of the Milk Analyzer it is advisory to clean the device at least once a week strictly performing underwritten procedure.
-
Page 13: Zero Procedure
Figure 7: Hand-cleaning 7 Zero procedure The ”zero procedure” must be performed at the beginning of the working day and on every hour during the day. This procedure is necessary to account for imperceptible changes in the environmental conditions of the measurements and their compensation. Failure to set to zero may adversely affect measurement accuracy. -
Page 14: Milk Analysis
Figure 9: Zero procedure 8 Milk analysis Since Ekomilk Spectra is a hybrid analyzer using infrared technology for adulterant de- tection and ultrasonic for standard milk parameters measurement, it can make complex measurements using both modules, or it can be set to only use either the infrared or the ultrasonic module for measurement. - Page 15 Position of the components: (Figure 11) • place the measuring mug, filled with sample on the Ekomilk Spectra’s working surface • place the empty mug for cleaning solution under the US peristaltic pump...
-
Page 16: Start Measurement
8.2 Start measurement To initiate a measurement press the Measurement button from the main menu (Fig- ure 12). Figure 12: Main menu A new window pops up asking for the measurement configuration (Figure 13). The main thing here is to select what modules of the hybrid analyzer to be used for the measurement process. - Page 17 Figure 14: Resetting configuration After the measurement finishes successfully a window appears with measured milk parameters and adulterants if any detected (Figure 15, 17). If a substantial volume of unknown adulterant is detected - you will see ”Abnormal sample”. Figure 15: Measurement with infrared Figure 16: Measurement with ultrasound Figure 17: Measurement with infrared and ultrasound...
-
Page 18: Graphical User Interface
The main menu contains the most important and commonly used buttons: Mesure- ment , Zero , Clean IR , Clean US and measuring configuration. 9.2 Settings menu This section describes how to configure and use other Ekomilk Spectra options. 9.2.1 Calibrate touchscreen Settings System Touchscreen To calibrate your touch screen please, follow the instructions that will appear. -
Page 19: Firmware Update/Gui/Os
Sys Info, Figure 20), open it and create folder with name ”eedata” (for example: spectra/188/eedata) and then you need to copy eeprom file into ”eedata” folder. Take the USB flash drive and plug the USB stick in one of the Ekomilk Spectra USB ports. For infrared eeprom update open: Settings... -
Page 20: Data
9.3 Data 9.3.1 Export Data with USB Flash Drive Settings System Export When inserting a USB flash drive into the devices USB port, located on the back panel of the analyzer, the button Files becomes active and the data transfer to the external memory is now available. - Page 21 b) When both devices are connected via cable and adapter it needs to make visible them each other. Easiest way is to make PC as DHCP server with a small program called SmallDHCPServer.exe (files will be sent separately). Executing that program allows PC set IP (in same subnet) to Spectra. Initial IP of PC will be 192.168.10.10.
- Page 22 2. Download measurement result There are few ways to download last data including app, HTTP request, batch scripts, via SFTP. Following text describes some of them. All of them convert necessary data (last measurement) in CSV file format. a) First of methods is with program called getData.exe. After start, enter IP of the Spectra and push GET button - last record will be downloaded in current directory with name last record.csv b) Second method is with HTTP request.
-
Page 23: Connections
- cleaning (infrared and ultrasound), start mea- suring, zero and stop processes. Ekomilk Spectra works with many different Bluetooth dongles. The same as Wi-fi, first plug the GPRS dongle into one of the Ekomilk Spectra USB ports (Figure 23). Then from Settings... - Page 24 2. RFCOMM communication protocol • Command list Start zero procedure. cleanI Start Infrared system cleaning procedure. cleanU Start Ultrasound system cleaning procedure. MEAS:a,b Start the measurement process. There are two arguments ’a’ and ’b’. STOP Stop current process. • Detailed description [ Command ] An ASCII case-sensitive command.
- Page 25 Measurement procedure – [ Command ] MEAS:a,b (for Infrared the command is MEAS:a, ) Argument ’a’ - type of measurement, which can be: * I (for Infrared) * U (for Ultrasound) * B (for Both) * IR (for Infrared with double-check) * BR (for Both with double-check) Argument ’b’...
- Page 26 Example: Figure 25: Measurement procedure Figure 26: Measurement procedure...
- Page 27 Cleaning procedure – [ Command ] cleanI (for Infrared) / cleanU (for Ultrasound) Starting the procedure returns: * OK - commands is accepted and procedure is being started. [ Outline ] * Cleaning in progress... - On every 5 seconds * FIN - the procedure is completed.
- Page 28 Stop the current procedure – [ Command ] STOP Procedure returns: [ Outline ] * x is canceled - the ’x’ argument indicates which proce- dure was canceled Example: Figure 28: Stop the current procedure • Errors If errors occur, Spectra sends them to the virtual serial port: –...
-
Page 29: Admin Menu
This menu helps us to do the calibration remotely. Use of this menu is rare - for example, when the Ekomilk Spectra is damaged and part of the infrared system needs to be replaced (the cuvette, the glass of the cuvette, measuring board, etc.). - Page 30 But strongly recommend to don’t touch them, unless you are not absolutely sure what you do and reference instrument is really exact. From drop-down menu select for which milk type you want to set correction, then click desired parameter, which you want to correct.
-
Page 31: Auto Cleaning
Send results FTP server Ekomilk Spectra can send results to FTP server. The results are stored in comma separated value (CSV) file with this header: • CP code - Collection Point Code of the analyzer. It serves as the ID. - Page 32 4. Send result - this step is the most important, because the ftp file is generated at the end of every shift and sending to your server, if Ekomilk Spectra is connected to the internet. If you don’t have internet connection, you can send files manual.
-
Page 33: Sending Results To Http Server
Send results HTTP server Ekomilk Spectra can send results to HTTP server. The results are stored in JSON file. Format of file is represented in next example: Here is the steps you need to doing to sending json files to HTTP server: 1. -
Page 34: Sftp Access To Ekomilk Spectra
9.6 SFTP access to Ekomilk Spectra With this functionality you can download data/result files, update firmware, update eep- rom, etc. To make SFTP connection, first you need to connect Ekomilk Spectra to the Network and see IP address (Figure 22). -
Page 35: Errors List
• Download data/result file - to download data/result file open Windows PowerShell (Command Prompt) and navigate to the directory where you want to download the data/result files. After that connect to Ekomilk Spectra and navigate to data/result directory. With command get followed by file name you will start download (for example: get 2019 10 25.txt). -
Page 36: Appendix 1 - Some Reason For Ekomilk Accuracy And Repeatability Deviations
Below are described some reasons that may worsen the accuracy and repeatability of the Ekomilk Spectra Analyzers measurement results. Some information about the way to avoid these problems is provided as well. 1. Aired milk - this is milk with a lot of tiny air bubbles inside. This air bubbles are very small and it takes long time - from one to more than 10 or even 20 hours for these air bubbles to get out of the milk. - Page 37 In this case it is recommended several dummy samples (with water or milk) to be made before the real samples are tested. 10. Wrong milk type tested - Ekomilk Spectra is factory calibrated for tree different kinds of milk in accordance with the customer request - cow, buffalo and mixed milk.
-
Page 38: Appendix 2 - Send Last Result Over Serial Port(Continuous Mode)
12 Appendix 2 - Send last result over serial port(Continuous mode) This mode can be available after measurement (Figure 33). You can send data manual or auto (after every measurement). The data is sent until you close the results dialog. Figure 33: Send data Data of Spectra last measurement can be send over serial port like 89 chars long packet(as ASCII string, contains 17 subpackets, starts with ”... - Page 39 values will be filled with 0000 (ASCII 0x30 0x30 0x30 0x30). This is a full list of measurable ultrasound parameters. Possible, in some cases user don’t want to see all of them. If some parameter is disabled for displaying, it’s place in this packet will be filled with spaces (0x20).
-
Page 40: Appendix 3 - Troubleshooting
13 Appendix 3 - Troubleshooting 13.1 Filter clogging(infrared only) In case of air bubbles visible in the thin tubing entering the cuvette, the filter on the spout of the infrared module could be clogged. This is often the problem when that happens because the peristaltic pump cannot suck in enough sample and vacuum is created in the system. -
Page 41: Sticking Of Pump's Silicone Hose(Infrared And Ultrasound)
13.3 Sticking of pump’s silicone hose(infrared and ultrasound) If the Ekomilk Spectra has not been used for a long time or has not been cleaned, the pump hose may become stuck. Signs of this are, for example, if the pump is rotating but cannot suck milk or cleaning solution. - Page 42 4. Slowly pull out the plastic cover. 5. Remove the silicone hose from the pump and see where it stuck. 6. Then grasp it with two fingers and begin to massage it. 7. Once it has blown off you can start assembling it. When replacing the silicone hose, you can gently rotate the pump to make it easier to install.
-
Page 43: Maintenance
Note: Never subtract the cuvette, while the device is turn on. Note: If the cuvette is removed, the calibration may not be appropriate and the Ekomilk Spectra may will not measure correctly. The operation of cuvette ejecting or replacement should be performed by an authorized service or technician. - Page 44 3. When the cuvette is unlocked, pull it out. 4. The cuvette is released from the system, when unplugging the upper and lower hose from the nozzles.
- Page 45 5. Inserting the cuvette into the system. NOTE: When inserting the cuvette back in the analyzer, it is very important to take care of the direction of the hoses, help manually to ensure their proper direction and to avoid hose pinching and bending. 6.
-
Page 46: Guarantee
15 Guarantee Guarantee period is one year after purchasing data. Im- proper handing, transport and storage will invalidate the guarantee. Guarantee is void if warranty labels are removed. The Guarantee card guarantee period for the cuvette windows* is 3 months. *The cuvette windows are slightly soluble in water and they need to be replaced every 3-4 months, otherwise the measure- ment correctness will be affected. - Page 47 Purchaser Service report Service entry date Damage Delivery date Signature...
Need help?
Do you have a question about the Ekomilk Spectra and is the answer not in the manual?
Questions and answers
hello the Ekomilk Spectra Analyzer Bulteh 2000 has been showing ERROR as milk hot sample and empty camera, where milk is drained out from the inlet module as sample is to be analyzed. How can this problem be fixed or what would you consider to be done?
To troubleshoot the ERROR message on the Bulteh 2000 Ekomilk Spectra Analyzer related to hot milk samples and empty camera:
1. Hot Milk Sample:
- Ensure the milk sample temperature is below 38°C.
- If the temperature is above the limit, refill the mug with a properly cooled milk sample.
- Restart the measurement process.
2. Empty Camera (Measuring System Contaminated or Damaged):
- If the error persists after using milk at the correct temperature, the measuring system may be contaminated or damaged.
- Perform a thorough cleaning of both the infrared and ultrasonic modules using their specific cleaning solutions.
- If cleaning does not resolve the issue, the system may require inspection or repair.
These steps address errors such as "HotSample" and conditions where the measuring system is not functioning properly.
This answer is automatically generated