Table of Contents
Advertisement
Available languages
Available languages
Advertisement
Table of Contents

Related Manuals for Provision ISR S3


Summary of Contents for Provision ISR S3
- Page 1 Installation Guide...
-
Page 3: Table Of Contents
CONTENTS 1. Package Contents Page 1 2. Camera Controls Introduction Page 2-3 3. Recorder Installation Page 4-6 4. Initial Settings Page 7 5. Video Recording Mode Operation Page 7 6. Photo Mode Operation Page 7 7. Playback Mode Operation Page 7 8. -
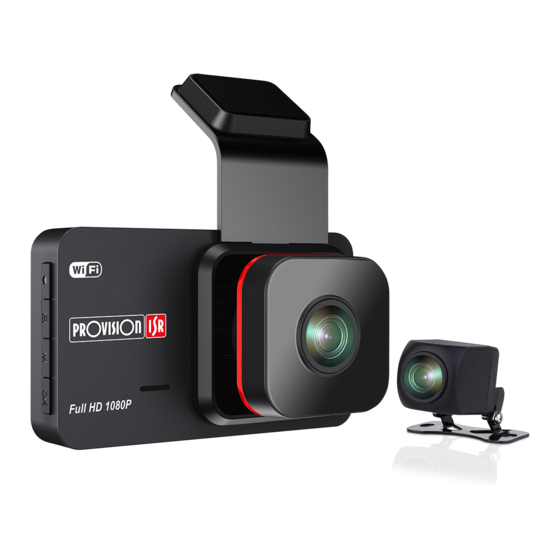
Page 4: Package Contents
Package Contents: Car Camera Back Camera Car Charger Trim Removal Tool 3M Sticker Quick Guide Car Air Freshener... -
Page 5: Camera Controls Introduction
Camera Controls Introduction Speaker 13 14 3” screen... - Page 6 Operating Instructions Icon Name POWER - Press for more than 3 seconds to turn on/off the camera. Under recording mode, press to Lock Current video. LOCK - Under Recording mode, press to take a picture. - Under Standby mode, press to switch between Video mode, MODE Photo mode and Playback mode.
-
Page 7: Recorder Installation
Recorder Installation 1. Before starting video recording, please insert a Micro SD (TF) card (not included) into the slot until it locks in place. - The Micro SD (TF) card capacity can be up to 128GB (class 10 and above). - The Micro SD (TF) card needs to be formatted. - Page 8 3. Lay the "Car Charger" cable provided in the box between the camera and the car's cigarette-lighter socket (see suggested diagram). 4. Lay the "Back Camera" cable (see suggested diagram) and plug the back camera connector into the Dash camera. Rear Camera Front Camera 5.
- Page 9 6. Start the engine, and the dash camera will automatically turn on. Press the “OK” button to enter the “Standby Mode”. > Date/Time > Auto Power Off A. Press the “MENU” button twice to > Beep Sound enter the SETUP list. >...
-
Page 10: Initial Settings
Initial Settings Set the Date and Time (watermark): 1. Press the “OK” button to stop the video recording. 2. Press the “Menu” button twice, choose the “Date / Time” option and press the “OK” button to enter. 3. Press the “UP” / “DOWN” buttons to adjust the values, press the “MODE” button to confirm, and press the “OK”... -
Page 11: Menu Settings Operation
Menu Settings Operation 1. Press the “OK” button to stop recording and press the “Menu" button to enter the “System Settings Menu”. 2. Use the “UP”/ “DOWN” buttons to navigate the menu options. 3. Press the “OK” button to enter a selected option, and use the “UP”/ “DOWN” buttons to navigate between the settings. -
Page 12: Special Features
Normal/Black and White/Sepia Normal +3, +2, +1, 0, -1, -2, -3 Anti-Shaking Cancel/Ok Auto Display Off Off/30seconds/1minute/2 minutes Auto Power Off Off/3minutes/5minutes/10minutes Factory default: 50Hz English, 한국, Français, ,עברית Factory default: 简体中文,繁体中文,日本语, English YY/MM/DD Date/Time WiFI Special Features 1. Loop Recording The camera will keep recording until the storage is full. - Page 13 3. Motion Detection When motion detection is on, the camera will automatically record any movement detected in front of the camera. This feature must be turned off during regular driving/recording. The primary purpose of motion detection is video surveillance. When parking your car, power the camera via any USB power source, and let the camera record any movement in front of it.
-
Page 14: How To Connect To The Camera
How to connect to the camera: 1. Download the mobile APP: The camera’s App is available on Apple Store and Google Play. Scan the following QR code to auto-direct to the APP page. You can also download the APP by searching “ RoadCam”. RoadCam App:... -
Page 15: The Roadcam App
The Provision Dashcam APP: Once successfully connected to the APP, you will see the following window: Enter the Dashcam’s Setting View the video files, View the pictures, edit or share them edit or share them Stop/Start recording Take a picture... -
Page 16: Specifications
Specifications 3.0 inch Super HD IPS Screen Front: 150° / Back: 150° MOV H.264 VGA/1M/2M/3M/5M/8M/10M Supported Supported WiFi Supported Off / 1 minutes / 3 minutes / 5 minutes Micro SD (TF) card (Max support 128GB) TYPE-C 5V Power Port Supported English, 한국, Français, ... - Page 21 :מפרט טכני HD IPS מסך 0.3 אינץ' סופר מסך 150° :קדמית: °051 / אחורית עדשה 1 לוקס תאורה מינימלית 1080FHD / 720P / VGA רזולוציית וידאו MOV H.264 פורמט וידאו 10M / 8M / 5M / 3M / 2M / 1M / VGA רזולוציית...
- Page 22 :RoadCam אפליקציית ,לאחר חיבור הסמארטפון למצלמה באופן אלחוטי ובפתיחת האפליקציה :יוצג התפריט הבא הגדרות המכשיר צפייה, עריכה או צפייה, עריכה או שיתוף קבצי וידאו שיתוף תמונות התחלת/עצירת הקלטה על גבי כרטיס הזיכרון צילום תמונה...
- Page 23 :כיצד להתחבר למצלמה (, חפש את האפליקציהPlay / חנותApp Store) 1. פתח את חנות האפליקציות ." והורד אותהRoadCam" . באיור הבא, להורדת האפליקציהQR -ניתן גם לסרוק את קוד ה RoadCam אפליקציית iOS/Android -סרוק ל " במצלמה כדי לעצור את ההקלטה הנוכחית. לאחר מכן, לחיצהOK"-2. לחץ על לחצן ה "...
- Page 24 3. גלאי תנועה כאשר גלאי התנועה פעיל, המצלמה תקליט אוטומטית כל תנועה הנעשית לפניה. מאפיין זה חייב להיות מנוטרל בזמן נהיגה / הקלטה רגילה. מטרתו העיקרית של מאפיין זה היא למקור מתחUSB -למעקב. כאשר הרכב בחניה, הפעל את המצלמה באמצעות חיבור ה .)ספק...
- Page 25 רגילה ברירת מחדל רגילה / שחור ולבן / חום כהה צבע ברירת מחדל: אוטומטי / אוטומטי +3, +2, +1, 0, -1, -2, -3 :ברירת מחדל חשיפה תמונה נוגד ברירת מחדל: כבוי פעיל / כבוי טלטולים חותמת תפריט פעיל :ברירת מחדל פעיל...
- Page 26 :תפעול תפריט הגדרות " כדיMenu" " כדי לעצור את הקלטת הוידאו הנוכחית ואז לחץ על לחצןOK" 1. לחץ על לחצן .("System Setting Menu") להיכנס לתפריט הגדרות המערכת .2. השתמש בלחצני "מעלה / מטה" כדי לנווט בין אפשרויות התפריט " על מנת להיכנס לתפריט האפשרות שבחרת. השתמש בלחצני "מעלהOK" 3. לחץ על לחצן ."...
- Page 27 :הגדרות ראשוניות :("הגדרת תאריך ושעון )"סימן מים ." )אישור( כדי לעצור את הקלטת הוידאוOK" 1. לחץ על לחצן " )תפריט( ואז באמצעות לחצן "מטה", חפש ובחרMenu" 2. לחץ פעמיים על לחצן ." על מנת לאפשר את הבחירהOK" ". לאחר מכן לחץ על לחצןDate/Time" באפשרות 3.
- Page 28 " )אישור(, כדי להיכנסOK" 6. התנע את הרכב והמצלמה תידלק אוטומטית. לחץ על לחצן ."ל-"מצב המתנה > Date/Time > " )תפריט( פעמייםMenu" א. לחץ על לחצן Auto Power Off > .על מנת להיכנס לתפריט הגדרות Beep Sound > Language > Frequency >...
- Page 29 3. השחל את הכבל המצורף בערכה, מהמצלמה לשקע המצית ברכב )ראה הצעת חיבור .(בתמונה 4. השחל את כבל המצלמה האחורית )ראה הצעת חיבור בתמונה( וחבר את מחבר המצלמה .האחורית למצלמה הקדמית מצלמה אחורית מצלמת רכב למצלמה ואת צידו השני של הכבל, עם חיבורTYPE-C 5. חבר את קצה הכבל עם חיבור .מטען...
- Page 30 :התקנת המצלמה 1. לפני התחלת הקלטת וידאו, יש להכניס כרטיס ( לחריץ המתאים ולוודאTF) SD מיקרו אינו כלולSD שהכרטיס ננעל במקומו )כרטיס .(בערכה 128GB - קיבולת הכרטיס יכולה להיות עד .( ומעלהClass 10 )איכות של ( לפניTF) SD -- יש לפרמט את כרטיס ה השימוש.
- Page 31 הוראות תפעול מס' צלמית שם / תיאור - לחיצה על כפתור זה במשך 3 שניות ומעלה להדלקת/כיבוי הדלקה/כיבוי המצלמה מנעול - במצב הקלטה, לחיצה על מנת לנעול הקלטה נוכחית - במצב הקלטה, לחיצה על מנת לצלם תמונה - במצב המתנה, לחיצה על מנת לעבור בין מצב וידאו, מצב צילום מצב...
- Page 32 :היכרות עם פקדי המצלמה 13 14 IPS LCD...
- Page 33 :תכולת אריזה מצלמת רכב מצלמה אחורית מטען רכב מקל עזר לחיווט 3M מדבקת מדריך התקנה מקוצר ריחן עץ לרכב...
- Page 34 תוכן עניינים 1 1. תכולת אריזה....................עמוד 2-3 2. היכרות עם פקדי המצלמה................עמוד 4-6 3. התקנת המצלמה..................עמוד 7 4. הגדרות ראשוניות ..................עמוד 7 5. תפעול מצב הקלטת וידאו................עמוד 7 6. תפעול מצב צילום תמונה ................עמוד 7 7. תפעול מצב פלייבק ..................עמוד 8-9 8.
- Page 36 מדריך התקנה...
Need help?
Do you have a question about the S3 and is the answer not in the manual?
Questions and answers
hello - can you see on the screen what the reverse camera is seeing - when you park your car for example?