
Related Manuals for SKAARHOJ RCP Pro

Summary of Contents for SKAARHOJ RCP Pro
- Page 1 SKAARHOJ RCP Pro Canon CR-N300/N500 USER GUIDE | June 2022 Get the latest version of this User Guide at: https://www.skaarhoj.com/support/manuals/...
-
Page 2: Table Of Contents
Network Interface Details Power over Ethernet (PoE) Specifications Accessing Blue Pill DHCP or Static IP Wi-Fi Access Point Link from SKAARHOJ Firmware Updater SKAARHOJ Firmware Updater and Micro USB Select Mapping Adding Devices Auto Discover Manually Added Device Details Populate Constant Sets... -
Page 3: Important Information
Important Information Legal Notice • Do not use organic solvents, such as benzene or ethanol when cleaning the surface of the Attention: controller The content and instructions of this document are subject to change without prior notice. Updates will be added to the manual. Regulatory Compliance Best effort have been conducted to verify the For private households: Information on... -
Page 4: What's In The Box
This user guide is suitable for the following • Pressure and direction sensitive joystick pad models • Custom iris joystick with built in display and tally RCP Pro with Canon XC Protocol default light configuration • Industry standard form factor (4"/102mm wide) •... -
Page 5: Controller Diagram
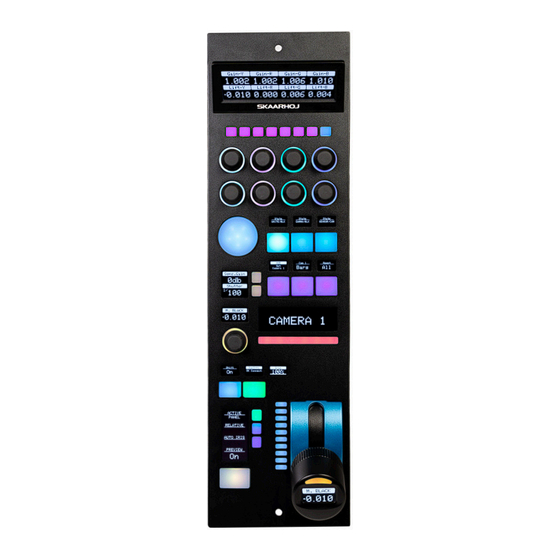
Controller Diagram 1. Large tilted display with 8 tiles. Functions associated with encoders from group 3 2. Preset/Camera Select 3. 8 rotary encoders with RGB backlight for function identification 4. Elastomer joypad 5. Group of 6 4-way buttons with associated displays 6. -
Page 6: Backside
Backside 1. DB9 (EXT I/O) For external routing/tally systems 2. Camera Selector 3. Micro USB 2.0 Port 4. IP Network RJ45 Port For IP Control with PoE+ (5-30w IEEE 802.3at) 5. Status LED For status and debugging 6. 12V DC Power Supply Connect the supplied DC Power adaptor 7. -
Page 7: System Configuration
System Configuration Connection The SKAARHOJ RCP Pro communicates to The layout of the configuration for the RCP Pro is camera(s) via a network. No video signal done towards control of a single camera, but up processing is done on the SKAARHOJ RCP Pro. -
Page 8: Network Interface Details
-5W-30W PoE (+) -PoE Standard: IEEE 802.3af/t Remember a SKAARHOJ controller and client must be on the same subnet (192.168.10.* or one defined for the local network used by the controller). With multiple SKAARHOJ units connected to the same network they need to have different IP addresses! Power over Ethernet (PoE) Specifications... -
Page 9: Wi-Fi Access Point
Link from SKAARHOJ Firmware Updater If the SKAARHOJ Firmware Updater open on a computer running on the same subnet as the Blue Pill, the Blue Pill should appear below the main controller access buttons of the updater. Clicking on Configure next to the panel’s information will open the web interface directly. -
Page 10: Skaarhoj Firmware Updater And Micro Usb
SKAARHOJ Firmware Updater and Micro USB If a network connection to the Blue Pill in not available, the IP address can be set using a Micro USB cable. In this case the Blue Pill will appear in the “Select Device” dropdown and the “IP Config” tab in the Firmware Updater can be used to set the IP address (same procedure from UniSketch): In this case it was identified as “/dev/tty.usbmodem4430361”... -
Page 11: Adding Devices
Adding Devices There are two main ways a device can be added to a new Blue Pill, Auto Discover and Manually. Auto Discover Searching on the network for devices will find many types by a combination of mDNS look-ups and other methods. -
Page 12: Device Details
Device Details Panels have their status displayed clearly in the overviews on the Home screen. Clicking on a device name in the Devices section will open up the details. Here the name, ID number, Active status, and IP address of the device can be changed. By default the device name will be the same as the model name, the ID will be auto generated in order, and the status will be active. -
Page 13: Populate Constant Sets
Tally Index Tally Index number sets the input number to be reflected on the buttons. This is associated with the Tally Forwarding constant set, see https://wiki.skaarhoj.com/ for more information. This column does not need to be filled out for standard operation. -
Page 14: Controller Use
Controller Use Overall the controller has seven Menus. To change between the menus press M1- M6 and a shift accessible ENG menu. It is necessary to press SHIFT then select a camera for use, by default no camera is selected. C1-C8 Default Shifted... - Page 15 K1-K9 The tiles in the main display are associated with Knob 1-8 Home Exposure Exposure- Color Color- Shifted Details Matrix Shifted WB Mode Auto Iris Flicker Reduction WB Mode Matrix Sharpness Level Matrix Phase Red Gain Iris (Abstract) Exposure Red Gain Color Space Sharpness Limit Matrix Gain...
-
Page 16: Db9 (Ext I/O)
DB9 (EXT I/O) This is the pinout for the DB9 connector on the RCP Pro. Dimensions... -
Page 17: Troubleshooting
Contact Support You are always welcome to contact us for support questions - write an email to support@skaarhoj.com and we will do our best to accommodate your request. In order for us to provide the best support please state: •...
Need help?
Do you have a question about the RCP Pro and is the answer not in the manual?
Questions and answers