Advertisement
- 1 Names of Parts
- 2 Inserting the Batteries
- 3 Checking the Batteries
- 4 Loading the Film
- 5 Taking Pictures
- 6 Flash Photography
- 7 Red-eye reduction lamp
- 8 How to use the selftimer
- 9 Rewinding and Removing the Film
- 10 Printing the Date and Time (QUARTZDATE model only)
- 11 Care and Storage Precautions
- 12 SPECIFICATIONS
- 13 Videos
- 14 Documents / Resources
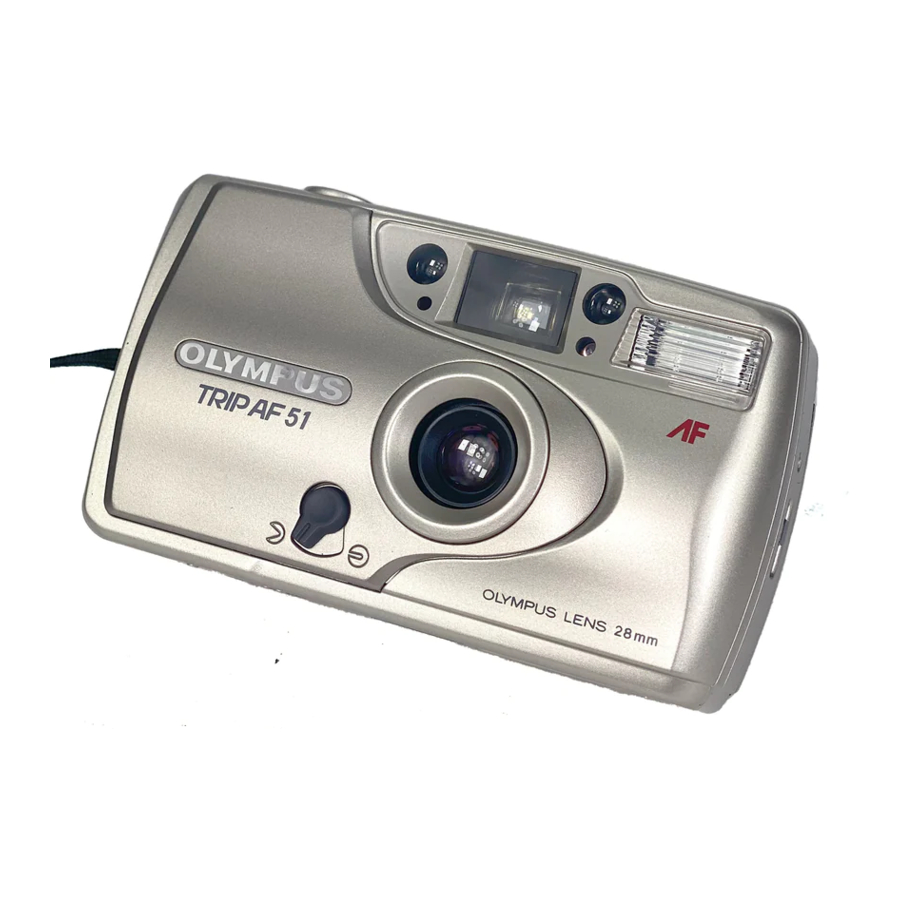
Names of Parts
Before using your camera, read these instructions carefully to ensure correct use.
Camera body

- Shutter release button
- Selftimer button
- Exposure counter
- Autofocus window *
- AE light sensor *
- Viewfinder
- Red-eye reduction lamp/selftimer signal
- Flash *
- Lens *
- Lens barrier switch
- Strap eyelet
- Battery warning lamp
- Flash-charged indicator
- Back cover
- Film window
- Battery compartment cover
- Rewind switch
- Tripod socket
- Back cover release
* Smudges or dirt can cause blurred pictures.
Clean lens by wiping with a soft cloth.
Viewfinder

- Picture frame
- Autofocus frame
Cautions in regard to batteries
- Observe the caution items listed on the battery.
- Prepare spare batteries for long trips or shooting in cold places.
Inserting the Batteries

- Open the battery compartment cover.
- Insert the batteries, making sure that they are positioned correctly.
(Use two AA (LR6) alkaline batteries.)

Notes:
- Close the lens barrier before inserting the battery.
- Ni-Cd batteries, manganese batteries, and nickel-hydrogen batteries cannot be used.
- When the camera is not to be used for an extended period, remove the batteries to prevent damage due to possible battery leakage.
- Do not mix different types of batteries, or new and old batteries.
Checking the Batteries

- Slide the lens barrier switch to turn the camera on. (
![]() )
) - Confirm that the Battery Warning lamp is not lit.
Note:
- Exchange the battery when the Battery Warning lamp lights (
![]() ).
).
 ).
).Loading the Film

- Open the back cover by sliding the back cover release in upward direction (
![]() ).
). - Insert the film and make sure the film leader is lying flat.
![warning]()
Notes:- Use negative color film with ISO 100, 200 or 400 DX coding.
- Align the film leader with the mark, position the film so it does not overlap any of the positioning guides
![]()
- Close the back cover.
The film will automatically advance to the first and "1" will appear in.

Notes:
- If the exposure counter does not advance, open the back cover and reinsert the film.
- Loading the film is only possible when the film is inserted after the batteries have been inserted.
Taking Pictures

- Slide the lens barrier switch to turn the camera on. (
![]() )
) - Confirm that the flash-charged indicator
![]() lights.
lights. - Position the autofocus frame
![]() on your subject, press the shutter release button lightly (
on your subject, press the shutter release button lightly (![]() ). Recompose your subject in the picture frame
). Recompose your subject in the picture frame ![]() and press the shutter release button fully(
and press the shutter release button fully(![]() ).
).
 on your subject, press the shutter release button lightly (
 and press the shutter release button fully(
 ).
).
Note:
- When the flash-charged indicator is blinking, the flash is charging and the shutter can not be released.
- The flash-charged indicator goes out automatically after about 3 minutes. (It lights again when the shutter release button is pressed lightly or when the power is turned on again.)
- Always close the lens barrier when shooting is finished.
Focusing range: 0.8 m (2.6 ft) to ∞ (infinity)
Flash Photography

When it is dark, the flash will be triggered automatically.
- Press the shutter release button lightly, confirm lighting of the flash-charged indicator, and then press the shutter button all the way.
- When the flash-charged indicator is lit, the flash is charging and the shutter can not be released.
| ISO | Flash range |
| 100 | 0.8m (2.6 ft.) ~ 2.3m (7.5 ft.) |
| 400 | 0.8m (2.6 ft.) ~ 4.6m (15 ft.) |
Use of color negative film
Red-eye reduction lamp

Red-eye reduction lamp
This lamp helps to reduce the red-eye effect with flash pictures. The red-eye reduction lamp lights when the shutter release button is pressed lightly ( ) and press the shutter release button fully (
 ) after the red-eye reduction lamp has been lit for about 1 second.
How to use the selftimer

Attach the camera to a tripod or similar support.
- Press the selftimer button (
![]() ).
). - The selftimer signal will blink and the shutter will be released about 10 seconds later.
Note:
- When the flash-charged indicator is blinking, the flash is being recharged and the selftimer does not work.
- The selftimer can be cancelled by pressing the selftimer button again or by closing the lens barrier.
Rewinding and Removing the Film

- Rewinding is started automatically when the film end is reached.
- Make sure that the rewinding sound has stopped and that "S" is displayed in the exposure counter, and then open the back cover (
![]() ) and remove the film.
) and remove the film. - To rewind the film before the end of the roll, slide the rewind switch.
Printing the Date and Time (QUARTZDATE model only)

After replacing the batteries, correct the data.
- Press the MODE button
![]() to choose the desired mode.
to choose the desired mode. - No data
- Month/day/year
- Day/month/year
- Year/month/day
- Day/hour/minute
 to choose the desired mode.
 Correcting the Data
- Press the MODE button
![]() to choose the mode.
to choose the mode. - Press the SELECT button
![]() until the data you want to correct starts blinking. Press the SET button
until the data you want to correct starts blinking. Press the SET button ![]() to correct it.
to correct it. - Press the MODE button
![]() again to finish correcting the data.
again to finish correcting the data.
![warning]()
Note: Make sure that the date mark "—" appears on the LCD panel.
 until the data you want to correct starts blinking. Press the SET button
  to correct it.
Care and Storage Precautions

Attaching the Strap
- Do not drop the camera.
- Never use thinner, benzene or other organic solvents to clean the camera.
- Do not expose the camera to water or sand.
- Do not expose the camera to extreme heat (over 40°C/104°F) or extreme cold (below –5°C/23°F). For example, do not leave the camera in a closed vehicle under direct sunlight.
SPECIFICATIONS
Type: 35 mm Autofocus, lens-shutter camera.
Film format: Standard DX-coded 35 mm film.
Image size: 24 x 36 mm
Lens: Olympus 28 mm F5.6, 3 elements in 3 groups.
Shutter: Programmed electronic shutter (1/140 - 1/40 sec)
Viewfinder: Reverse Galilean-type viewfinder.
Focusing: AUTO-focus
Focusing range: 0.8 m (2.6 ft.) – ∞ (infinity).
Exposure counter: Progressive type, automatic reset.
Selftimer: Electronic selftimer with approx 10 sec. delay.
Concellation is possible.
Film speed range: Automatic setting with DX-coded film (ISO 100/200, 400). For non DX-coded film, film speed is fixed at ISO 100.
- About 20 rolls of 24-exposure film can be used with two new batteries (with 50% flash 20°C/68°F, less films in low temperature).
Film loading: Automatic loading.
Film advance: Automatic film winding.
Film rewind: Automatic rewind at end of roll.
Mid-roll rewind also possible.
Flash: Built-in flash with red-eye reduction lamp. Flash is automatically activated under low light conditions.
Power source: Two 1.5 V AA alkaline/LR6 batteries. Ni-Cd batteries, manganese batteries, and nickel-hydrogen batteries cannot be used.
Dimensions: 111.5 (W) x 64.5 (H) x 38 (D) mm (4.4 x 2.5 x 1.5 inches).
Weight: 136 g (4.8 oz.), without batteries.
Design and specifications are subject to change without notice.
OLIMPUS AMERICA INC.
Two Corporate Center Drive, Melville, NY 11747-3157, U.S.A. Tel. 1-800 "O" CAMERA (622-6372)
OLIMPUS OPTICAL CO. (EUROPA) GMBH
(Premises/Goods delivery) Wendenstrasse 14-18,
20097 Hamburg, Germany. Tel. 040-237730
(letters) Postfach 10 49 08. 20034 Hamburg. Germany
This device complies with part 15 of the FCC Rules. Operation is subject to the conditions that this device does not cause harmful interference.
This Class B digital apparatus meets all requirements of the Canadian interference-Causing Equipment Regulations.
 This camera complies with EU directive 89/336/EEC for CE marking.

VideosOlympus Trip AF 51 - Has This One Surprising Feature Video
Documents / ResourcesDownload manual
Here you can download full pdf version of manual, it may contain additional safety instructions, warranty information, FCC rules, etc.
Advertisement


Need help?
Do you have a question about the TRIP AF 51 and is the answer not in the manual?
Questions and answers