Advertisement
Before using your camera, read these instructions carefully to ensure correct use.

- Olympus advises you to shoot a trial roll of film before using your camera to take important photographs such as on an overseas trip, honeymoons, etc.

- Do not put the used batteries into a fire and do not heat, disassemble or try to short them out.
- In case of abnormality or breakage, immediately remove the batteries, but do not touch the inside and do not try to disassemble the camera.
- Do not look into the sun through the viewfinder!
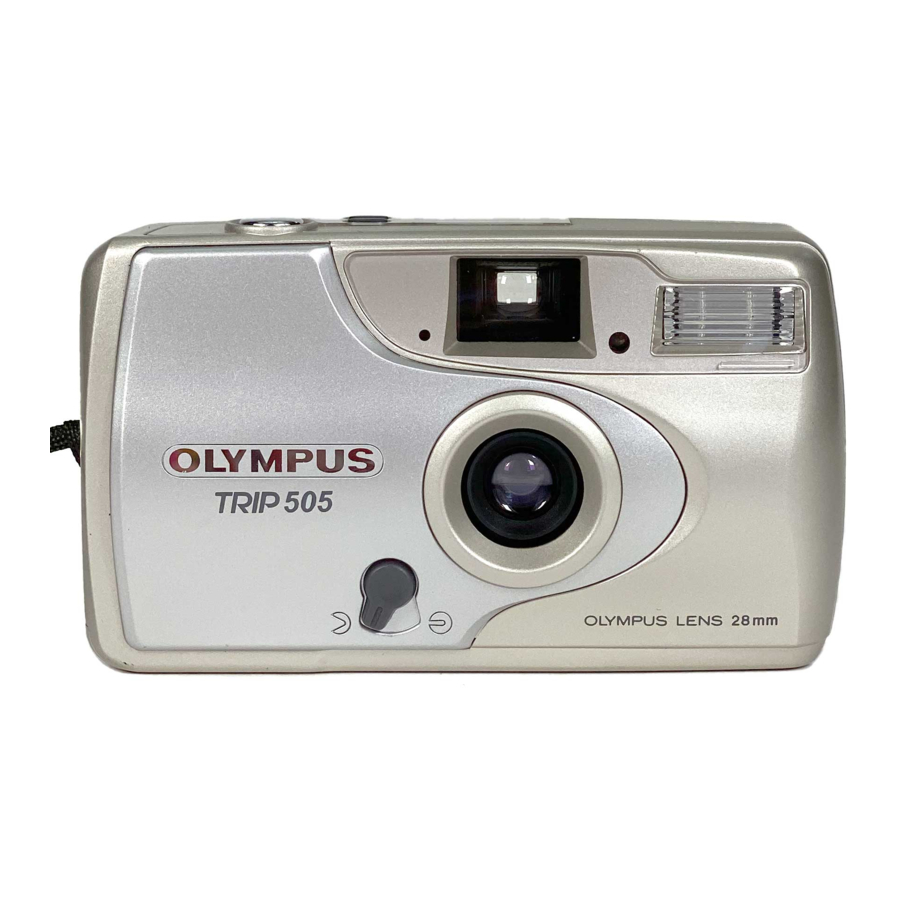
Names of Parts

Camera body
- Shutter release button
- Selftimer button
- Flash mode button
- LCD panel
- AE light sensor*
- Viewfinder
- Red-eye reduction lamp/selftimer signal
- Flash*
- Lens*
- Lens barrier switch
- Strap eyelet
- Green lamp
- Back cover
- Film window
- Battery compartment cover
- Rewind switch
- Tripod socket
- Back cover release
* Smudges or dirt can cause blurred pictures. Clean lens by wiping with a soft cloth.
LCD panel
- Red-eye reduction Flash mode.
- Film wind/rewind mark
- Fill-In mode
- Off (Flash Overriden) mode
- Exposure counter
- Selftimer mode
- Battery check
Cautions in regard to batteries
- Observe the caution items listed on the battery.
- Prepare spare batteries for long trips or shooting in cold places.
Inserting the Batteries

- Open the battery compartment cover.
- Insert the batteries, making sure that they are positioned correctly. (Use two AA (LR6) alkaline batteries.)
Notes:
- Close the lens barrier before inserting the battery.
- Ni-Cd batteries, manganese batteries, and nickel-hydrogen batteries cannot be used.
- When the camera is not to be used for an extended period, remove the batteries to prevent damage due to possible battery leakage.
- Do not mix different types of batteries, or new and old batteries.
Checking the Batteries

Slide the lens barrier switch to turn the camera on. ( )
)
LCD panel
 lights: lights: | Battery is OK. You can shoot.
|
 lights: lights: | Battery power is low. Replace the batteries. |
 blinks: blinks: | Battery power is dead. Picture cannot be taken. |
Loading the Film


- Open the back cover by sliding the back cover release in upward direction (
![]() ).
). - Insert the film and make sure the film leader is lying flat.
Notes:- Use negative color film with ISO 100, 200 or 400 DX coding.
- Align the film leader with the mark, position the film so it does not overlap any of the positioning guides
![]() .
.
- Close the back cover.
The film will automatically advance to the first frame and "![]() " will appear in the exposure counter.
" will appear in the exposure counter.
 .
. " will appear in the exposure counter.
Notes:
- If the exposure counter does not advance, the film was not loaded correctly. Open the back cover and reinsert the film.
- Loading the film is only possible when the film is inserted after the batteries have been inserted.
Taking Pictures

- Slide the lens barrier switch to the open position. (
![]() )
) - Look through the viewfinder and aim at your subject.
- Press the shutter release button lightly, confirm that the green lamp is lit (
![]() ).
).
Press the shutter release button (![]() ).
).
 ).
). ).
).Note:
- When the green lamp is blinking, the flash is charging and the shutter can not be released.
- The LCD panel indication goes out automatically after about 5 minutes. (It lights again when the shutter release button is pressed lightly or when the power is turned on again.)
- Always close the lens barrier when shooting is finished.
Focusing range: 1.0 m (3.3 ft) to ∞ (infinity)

Press the flash mode button () to select the appropriate mode for the shooting conditions or your requirements.
- No display Auto Flash: This mode is used normally. The flash fires automatically in dark places.
![]() Red-Eye Reduction: Reduce the effect which causes eyes to appear red in pictures.
Red-Eye Reduction: Reduce the effect which causes eyes to appear red in pictures.![]() Off (Flash Override): Use this mode when you do not want the flash to fire even in dark places.
Off (Flash Override): Use this mode when you do not want the flash to fire even in dark places.![]() Fill-In: Use this mode when you want the flash to fire regardless of lighting conditions.
Fill-In: Use this mode when you want the flash to fire regardless of lighting conditions.
 Red-Eye Reduction: Reduce the effect which causes eyes to appear red in pictures.
 Off (Flash Override): Use this mode when you do not want the flash to fire even in dark places.
 Fill-In: Use this mode when you want the flash to fire regardless of lighting conditions.
Note:
- In the Off (Flash Override) modes, use a tripod to prevent camera-shake.
- When the green lamp blinks, the flash is being recharged and the shutter does not release.
- Turning off the camera restores the Auto Flash mode except when the camera is set to the Red-Eye Reduction Flash mode.
| ISO | Flash range |
| 100 | 1.0m (3.3 ft.) ~ 2.3m (7.5 ft.) |
| 400 | 1.0m (3.3 ft.) ~ 4.6m (15 ft.) |
Use of color negative film
How to use the selftimer

Attach the camera to a tripod or similar support.
- Press the selftimer button (
![]() ) to display
) to display ![]() on the LCD panel.
on the LCD panel. - Press the shutter release button.
- The selftimer signal will blink and the shutter will be released about 10 seconds later.
 on the LCD panel.
Note:
- When the green lamp is blinking, the flash is being recharged and the selftimer does not work.
- The selftimer can be cancelled by pressing the selftimer button again or by closing the lens barrier.
Rewinding and Removing the Film

- Rewinding is started automatically when the film end is reached.
- Make sure that the rewinding sound has stopped and that "
![]() " "0" is displayed in the exposure counter, and then open the back cover (
" "0" is displayed in the exposure counter, and then open the back cover (![]() ) and remove the film.
) and remove the film.
 " "0" is displayed in the exposure counter, and then open the back cover (
Note: You may also slide the rewind switch to rewind the film in midroll.
Attaching the Strap

Care and Storage Precautions
- Do not drop the camera.
- Never use thinner, benzene or other organic solvents to clean the camera.
- Do not expose the camera to water or sand.
- Do not expose the camera to extreme heat (over 40°C/104°F) or extreme cold (below –5°C/23°F). For example, do not leave the camera in a closed vehicle under direct sunlight.
SPECIFICATIONS
Type: 35 mm fixed focus, lens-shutter camera.
Film format: Standard DX-coded 35 mm film.
Image size: 24 x 36 mm
Lens: Olympus 28 mm F5.6, 3 elements in 3 groups.
Shutter: Programmed electronic shutter (1/140 – 1/2 sec)
Viewfinder: Reverse Galilean-type viewfinder.
Focusing: Fixed-focus
Focusing range: 1.0 m (3.3 ft.) – ∞ (infinity).
Exposure counter: Progressive type, automatic reset.
Selftimer: Electronic selftimer with approx 10 sec. delay. Cancelation is possible.
Film speed range: Automatic setting with DX-coded film (ISO 100/200, 400). For non DX-coded film, film speed is fixed at ISO 100.
OLYMPUS OPTICAL CO., LTD.
San-Ei Building, 22-2, Nishi Shinjuku 1-chome, Shinjuku-ku, Tokyo, Japan.
Tel. 03-3340-2211
OLYMPUS AMERICA INC.
Two Corporate Center Drive, Melville, NY 11747-3157, U.S.A.
Tel. 1-800 "O" CAMERA (622-6372)
OLYMPUS OPTICAL CO. (EUROPA) GMBH.
(Premises/Goods delivery) Wendenstrasse 14-18, 20097 Hamburg, Germany. Tel. 040-237730
(letters) Postfach 10 49 08. 20034 Hamburg. Germany
OLYMPUS SINGAPORE PTE. LTD.
491B River Valley Road, #13-04 Valley Point Office Tower, Singapore 248373
Tel. 7387838 / 1-800-OLYMPUS (6596787)
OLYMPUS KOREA CO., LTD.
2F Duckhung Bd., 1328-10 Seocho-Dong, Seocho-gu, Seoul 137-070 Korea.
Tel. 82-2-3486-3200

VideosOlympus TRIP 505 - Camera Review Video
Documents / ResourcesDownload manual
Here you can download full pdf version of manual, it may contain additional safety instructions, warranty information, FCC rules, etc.
Advertisement


Need help?
Do you have a question about the TRIP 505 and is the answer not in the manual?
Questions and answers