Advertisement
- 1 What's in the box
- 2 Sensor overview
- 3 Sensor unit overview
- 4 Before use
- 5 Check the sensor before use
- 6 Test the sensor signal strength
- 7 Mount the sensor
- 8 General product care
- 9 Storage
- 10 Frequently asked questions
- 11 Important safety instructions
- 12 Customer service & product warranty
- 13 Technical specifications
- 14 Disclaimer
- 15 Documents / Resources
Before using this product, please read Important safety instructions.
This manual has instructions on how to set up and register your new sensor.
For instructions on sensor settings, see the User guide that came with your VS150.
What's in the box
Your product package contains the following items. Save your sales receipt and original packaging in the event warranty service is necessary.

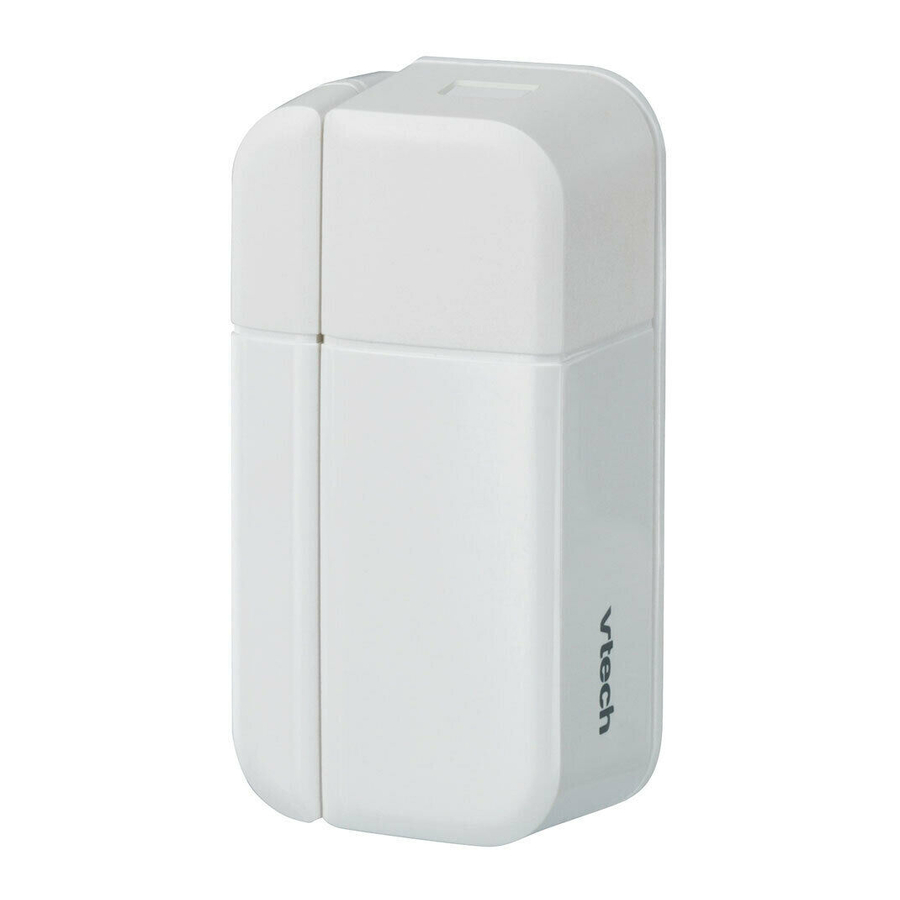
Sensor overview

- Magnet unit
- Sensor unit
Sensor unit overview

- Latch button
- Press to open the battery compartment case.
- Back cover
- Pair button
- Press and hold to enter the registration mode.
- LED light
- Red for a second when the sensor is powered on.
- Flashes red when the sensor is in the registration mode.
- Battery compartment case
Before use
Install batteries to the open/closed sensor

- Press the latch button on the sensor to open the battery compartment case.
- Insert two AAA batteries into the battery compartmen
 NOTES
NOTES
- Do not mix old and new batteries. Do not mix alkaline, standard (Carbon-Zinc) or rechargeable (Ni-Cad, Ni-Mh, etc) batteries.
- While you insert the batteries, make sure the polarities are correct.
- The batteries operate properly under the temperature between -18°C (0°F) and 55°C (130°F).
Add and register a sensor
You need to register the Contact Sensor with your VTech telephone system.
- Place your telephone base into pairing mode as per the instructions in your telephone user guide.
- Press and hold the pair button (P) on the Contact sensor, until the LED light flashes red, to enter the registration mode.
The registration process takes about 90 seconds to complete.
Replacing a sensor
If you have purchased this new VS001 accessory sensor to replace an old sensor, follow the instructions to deregister your old sensor, and then register this new sensor to the telephone base.
To deregister a sensor on VS150:
- Press MENU when the phone is not in use.
- Enter the code *33734# to access the DEREGISTER menu.
- Scroll to Single sensor, and then press SELECT.
- Scroll to the sensor you want to deregister, and then press SELECT.
- Press YES to confirm the deregistration.
Check the sensor before use

- Separate the sensor unit from the magnet unit.
- You will hear an alert tone, followed by an announcement - "Open/Closed X is open", from the handset.
- The handset will display Open/Closed X is open.
Test the sensor signal strength
You can mount the Contact sensor on a door, window, or medicine cabinet that opens or closes.
- Take the sensor unit and magnet unit to the desired mounting location, and hold them at the object and the frame respectively.
- Use your handset to enter the Settings menu, and then the Sensor setup menu. Follow the steps to test the sensor's signal strength, and then exit the sensor setup mode.
- Open the door, window, or medicine cabinet again to make sure you receive alerts.


NOTES
- Move the base closer to the mounting location, or move the sensor closer to the base, if the sensor is out of range
- Use adhesive tape to hold the sensor temporarily in place.
- Depending on surroundings and obstructing factors, like walls or cabinets, the sensor may not transmit to the base properly.
Mount the sensor
We recommend you to mount the magnet unit on a door, window, or medicine cabinet, and mount the sensor unit on its respective frame.
NOTES
- Make sure the mounting surface is clean. A textured surface or any imperfections to a smooth surface can keep the sticker from making a strong bond.
- Make sure you align the magnet unit with sensor unit when mounting.
- The distance between the sensor unit and magnet unit must be less than 1 cm (0.4 inch).
![]()
- The door images in this installation guide are for conceptual reference only.

 TIPS
TIPS
- If there is a difference in level between the door, window, or medicine cabinet and its respective frame, or the frame is too narrow or has some decorative molding, you can choose to mount the open/closed sensor with spacer. You can also mount the magnet unit on the frame, and the sensor unit on the door, window, or medicine cabinet instead.
- You can choose to mount the sensor unit with sticker first, and then use screws later if you decide to mount it at that location for long term.
Mount the magnet unit
Without spacer
Mount with sticker

- Attach the sticker C onto the rectangular area at the rear side of the magnet unit,
- Stick the magnet unit onto the door.
With spacer
Mount with sticker

You can choose one out of the four spacers with suitable height, and then add it to the magnet unit.
- Push the spacer towards the magnet unit until it securely clicks into place.
- Attach the sticker C onto the rectangular area at the rear side of the spacer.
- Stick the magnet unit onto the door.
Mount the sensor unit
Without spacer

Mount with sticker
- Attach the sticker B onto the rectangular area at the rear side of the back cover
- Stick the sensor unit onto the frame.
-OR-
Mount with screws
- Press the latch button on the sensor unit to open the battery compartment case.
- Use a pencil to mark two holes on the desired location on the frame, with the aid of the two holes on the back cover of the sensor unit. Then, remove the back cover and drill two holes into the frame.
- Align the holes on the back cover with the holes on the frame. Tighten the small screws into the holes to secure the back cover onto the frame.
- Push the battery compartment case back to the mounted back cover until it securely clicks into place.
With spacer

Mount spacer with sticker
- Attach the sticker A onto the rectangular area at the rear side of the spacer.
- Stick the spacer onto the frame.
-OR-
Mount spacer with screws
- Use a pencil to mark two holes on the desired location on the frame, with the aid of the two holes on the spacer of the sensor unit. Then, remove the spacer and drill two holes into the frame.
- Align the holes on the spacer with the holes on the frame. Tighten the large screws into the holes to secure the spacer onto the frame.
Mount sensor unit onto spacer
- Press the latch button on the sensor unit to open the battery compartment case from the back cover.
- Align the holes on the battery compartment back cover with the holes on the mounted spacer.
- Tighten the small screws into the holes to secure the back cover of the sensor onto the mounted spacer.
- Push the battery compartment case back to the mounted spacer until it securely clicks into place.
General product care
Taking care of your sensor
Your sensor contains sophisticated electronic parts, so it must be treated with care.
Avoid rough treatment
Place the sensor down gently. Save the original packing materials to protect your sensor if you ever need to ship it.
Avoid water
Your sensor can be damaged if it gets wet. Do not use the sensor outdoors in the rain, or handle it with wet hands. Do not install the sensor near a sink, bathtub or shower.
Electrical storms
Electrical storms can sometimes cause power surges harmful to electronic equipment. For your own safety, take caution when using electrical appliances during storms.
Cleaning your sensor
Your sensor has a durable plastic casing that should retain its luster for many years. Clean it only with a dry non-abrasive cloth. Do not use dampened cloth or cleaning solvents of any kind.
Storage
When you are not going to use the sensor for some time, remove the battery from the sensor. Store the sensor in a cool and dry place.
Frequently asked questions
Below are the questions most frequently asked about the sensor. If you cannot find the answer to your question, call 1300 369 193 for customer service.
The display shows Open/Closed X Low battery. | Press and hold CANCEL on the handset to erase the message. Replace the batteries with new ones. |
The sensor does not work at all. | Make sure two AAA batteries are installed. |
| Check if the desired sensor is on the sensor list. If the desired sensor is not found, then it may be deregistered from the telephone base. Register the sensor again. | |
| The sensor may be out of range. Move the sensor closer to the telephone base. |
Important safety instructions
When using your equipment, basic safety precautions should always be followed to reduce the risk of fire, electric shock and injury, including the following:
- Adult setup is required.
- Do not use this product near water. For example, do not use it next to a bath tub, wash bowl, kitchen sink, laundry tub or swimming pool, or in a wet basement or shower.
- Do not place this product on an unstable table, shelf, stand or other unstable surfaces.
- This product should not be placed in any area where proper ventilation is not provided. Slots and openings in the back or bottom of this product are provided for ventilation. To protect them from overheating, these openings must not be blocked by placing the product on a soft surface such as a bed, sofa or rug. This product should never be placed near or over a radiator or heat register.
- Never push objects of any kind into this product through the slots because they may touch dangerous voltage points or create a short circuit. Never spill liquid of any kind on the product.
- To reduce the risk of electric shock, do not disassemble this product, but take it to an authorized service facility. Opening or removing parts of the product other than specified access doors may expose you to dangerous voltages or other risks. Incorrect reassembling can cause electric shock when the product is subsequently used.
- Periodically examine all components for damage.
- Children should be supervised to ensure that they do not play with the product.
- The product is not intended for use by persons (including children) with reduced physical, sensory or mental capabilities, or lack of experience and knowledge, unless they have been given supervision or instruction concerning use of the appliance by a person responsible for their safety.
SAVE THESE INSTRUCTIONS
Battery
![]()
Use only the batteries indicated in this manual. There may be a risk of explosion if a wrong type of battery is used for the sensor unit.- Do not dispose of the battery in a fire. Check with local waste management codes for special disposal instructions.
- Do not open or mutilate the battery. Released electrolyte is corrosive and may cause burns or injury to the eyes or skin. The electrolyte may be toxic if swallowed.
- Exercise care in handling batteries in order not to create a short circuit with conductive materials.

Customer service & product warranty
Please retain this booklet with your sales receipt as proof of the date of purchase.
Customer Service
If you require assistance in operating this product, please call the TecHelp Information Line on 1300 369 193 or contact VTech by e-mail at: tcpsupport_au@vtech.com.
Voluntary Product Warranty
In addition to your Statutory Rights and subject to the conditions below, VTech warrants that this product will be free from any defect in materials or workmanship under conditions of normal use for a period of 12 months from date of purchase.
To make a claim under this Voluntary Product Warranty you must call the TecHelp Information Line on 1300 369 193 or contact VTech by e-mail at: tcpsupport_au@vtech.com where a Customer Service Representative will inform you of the product return process.
Statutory Rights
Our goods come with guarantees that cannot be excluded under the Australian Consumer Law. You are entitled to a replacement or refund for a major failure and compensation for any other reasonably foreseeable loss or damage. You are also entitled to have the goods repaired or replaced if the goods fail to be of acceptable quality and the failure does not amount to a major failure.
Technical specifications
| Frequency control | Crystal controlled PLL synthesizer |
| Transmit frequency | 1881.792 - 1897.344 MHz |
| Channels | 10 |
| Sensor operating temperature | -18°C (0°F) to 55°C (130°F) |
| Nominal effective range | Actual operating range may vary according to environment conditions at the time of use. |
| Power requirements | 2 x AAA batteries |
Disclaimer
This product is not designed for security purposes. When properly installed and maintained, this product may in some cases reduce the risk of burglary, fire, robbery or other events occurring without providing an alarm. VTech is not responsible for losses, injury, or damage resulting from the use of this product.

Vtech Telecommunications (Australia) Pty Ltd.
A member of THE VTECH GROUP OF COMPANIES.
VTech is a registered trademark of VTech Holdings Limited.
Specifications are subject to change without notice.
© 2018 VTech Telecommunications (Australia).
All rights reserved. Version 2. 08/18.

Documents / ResourcesDownload manual
Here you can download full pdf version of manual, it may contain additional safety instructions, warranty information, FCC rules, etc.
Download VTech VSMART VS001 - Wire-Free Contact Sensor User Guide
Advertisement


Need help?
Do you have a question about the VSMART VS001 and is the answer not in the manual?
Questions and answers