Advertisement
Assembly

BOSCH display-holder
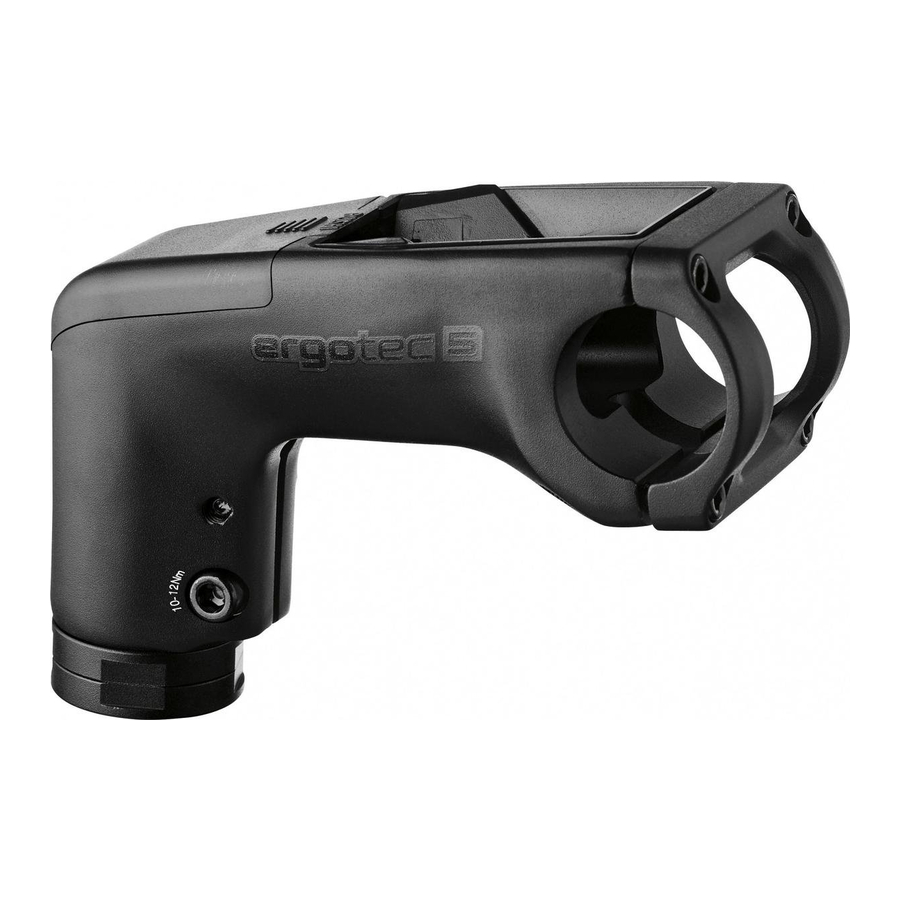
ergotec display-holder
 Please check the 'Level' number on the stem against the adjacent table to make sure that the stem is suitable for the intended purpose.
Before fitting the stem make sure that it is suitable for the maximum permitted overall weight of the bike. You will find the relevant information in the product description, or it can be obtained from the bicycle manufacturer.
Before using the product please read the following assembly and safety instructions carefully. Keep these instructions in a safe place and if necessary pass them on to the next owner.
Assembly and fitting require the relevant technical knowledge and skills. If you do not have these, please contact a specialist bicycle dealer.
- Before assembly please check that the inner diameter of the Ahead stem clamp (28.6 mm) matches the outer diameter of the steer fork. There are 2 different sizes here:
with 1" steer tube: external diameter 25.4 mm and with 1 1/8" steer tube: external diameter 28.6 mm.
The inner diameter of the stem clamp must match the outer diameter of the steer tube.
- You should also check the clamping length of the steer tube. This has to be 56 - 58 mm, including the bearing adjustment mechanism.
- Then place the bearing adjustment mechanism c on the steer tube so that the protruding thread is at the top.
- You now place the stem on the steer tube and on the thread of the bearing adjustment mechanism and adjust it in such a way that it is aligned with the front wheel.
For safety reasons the stem should never be combined with a carbon steer tube – risk of breakage!
For safety reasons the steer tube must not be more than 2 mm shorter than the stem clamp.
- With a 5 mm hexagonal key you now lightly tighten the two tube clamping screws
![]() .
. - Then remove handlebar clamp screws
![]() using a 4 mm hexagonal key and remove the handlebar clamp
using a 4 mm hexagonal key and remove the handlebar clamp ![]() .
. - Then use a 2.5 mm hexagonal key to disassemble hexagonal screw
![]() on the bottom of the BOSCH display holder, which fixes the two contact plates to the magnetic plate.
on the bottom of the BOSCH display holder, which fixes the two contact plates to the magnetic plate. - Now use a 2.5 mm hexagonal key to remove hexagonal screw
![]() from the top of the BOSCH display holder, which fixes the magnetic plate to it.
from the top of the BOSCH display holder, which fixes the magnetic plate to it. - Then press the magnetic plate together with the contact plates upwards out of the Kiox display holder.
- Now lead the two cables with the contact plates from the front through the display cutout on the stem and then through the rear cutout of the ergotec display holder.
- First place the right and then the left contact plate on the underside of the magnetic plate and tighten them again with hexagonal screw
![]() . The screw should only be tightened a few turns. Please also observe the installation and safety instructions provided by BOSCH.
. The screw should only be tightened a few turns. Please also observe the installation and safety instructions provided by BOSCH. - Then insert the magnetic plate diagonally from above into the ergotec display holder, making sure that it is flush with the top of the front area. Now press the rear part of the magnetic plate downwards until it audibly clicks into place. Then fit hexagonal screw
![]() , which fastens the magnetic plate to the ergotec display holder.
, which fastens the magnetic plate to the ergotec display holder. - Afterwards tighten screw
![]() .
. - Now insert the ergotec display holder into the stem from above
- Then use a 2.5 mm hexagonal key to fit hexagonal screw
![]() and a 2 mm hexagonal key to fit hexagonal screw
and a 2 mm hexagonal key to fit hexagonal screw ![]() .
. - Then lay the two cables.
 .
. using a 4 mm hexagonal key and remove the handlebar clamp
  .
. on the bottom of the BOSCH display holder, which fixes the two contact plates to the magnetic plate.
 from the top of the BOSCH display holder, which fixes the magnetic plate to it.
 and a 2 mm hexagonal key to fit hexagonal screw
  .
. For safety reasons the stem should never be combined with carbon handlebars – risk of breakage.
You should also make sure that the clamping surfaces are clean and free from grease.
- Before mounting, check the length of the clamping area on the handlebar clamp. This must be at least 60 mm long.
- Now place the clamping area of the handlebars centrally into the handlebar clamping section of the stem and tighten it lightly.
Make sure that the cables are not jammed.
- Now adjust the grip ends or the handlebar bar position to your needs.
- Then first tighten the two upper handlebar clamp screws and then the two lower handlebar clamp screws evenly to a tightening torque of 6 - 8 Nm. Make sure that the upper part of the handlebar clamp is in contact with the stem.
For safety reasons, the maximum tightening torque of 8 Nm must not be exceeded.
- Now you adjust the play on the bearings. Hold lower ring
![]() with a 36 mm open-end wrench. Using a second 36 mm wrench, turn upper ring
with a 36 mm open-end wrench. Using a second 36 mm wrench, turn upper ring ![]() counterclockwise until there is no more play in the bearings.
counterclockwise until there is no more play in the bearings. - To secure the upper ring, tighten grub screw
![]() to a tightening torque of 2 Nm using a 2 mm hexagonal key.
to a tightening torque of 2 Nm using a 2 mm hexagonal key. - Now push cover cap
![]() from behind onto the stem until it engages.
from behind onto the stem until it engages. - Now you can then attach the Kiox display
![]() to the stem.
to the stem.
 with a 36 mm open-end wrench. Using a second 36 mm wrench, turn upper ring
  counterclockwise until there is no more play in the bearings.
 to a tightening torque of 2 Nm using a 2 mm hexagonal key.
 from behind onto the stem until it engages.
 to the stem.
Note: In order not to damage the rings during the setting operation, the following points should be observed:
- Grub screw n must be loosened until it does not rest on the thread and the rings can be turned freely.
- The setting should only be made when the vehicle is stationary and not suspended.
- If the steering bearing has its own clamping system, this must be released before the setting is made.
Please also observe the mounting and safety instructions of the steering bearing manufacturer.
Safety instructions
The tightness of the screws should be checked after approx. 500 km and then regularly as part of the regular service, but at least once a year.
In order to avoid a fall or an accident, the stem must always be replaced if it is damaged in any way.
You should not attach any additional equipment such as a child's seat or a luggage rack to the stem. This could lead to excessive strain and as a result to the breaking of the stem.

The product classification of the ergotec Safety Level corresponds to the DIN EN ISO 4210 norm for bikes and DIN EN 15194 for e-bikes. E-bike-type: pedal assist up to the indicated speed.
* Retrofitting only with the approval of a recognised certifying
Guarantee
For ergotec stems the following guarantee periods apply:
- with safety level 6 - 6 years or 35,000 km
- with safety level 5 - 5 years or 30,000 km
- with safety level 4 - 4 years or 25,000 km
- with safety level 3 - 3 years or 20,000 km
- with safety level 2 - 3 years or 15,000 km
Guarantee claims should be processed through a specialist bicycle dealer.

Documents / Resources
References
Download manual
Here you can download full pdf version of manual, it may contain additional safety instructions, warranty information, FCC rules, etc.
Advertisement


Need help?
Do you have a question about the Stem Integra-BK and is the answer not in the manual?
Questions and answers