HEPRO GRIPO User Manual
Hide thumbs
Also See for GRIPO:
- Instruction manual (52 pages) ,
- User manual (32 pages) ,
- Manual (12 pages)
Table of Contents
Advertisement
Available languages
Available languages
Quick Links
Advertisement
Chapters
Table of Contents

Related Manuals for HEPRO GRIPO


Summary of Contents for HEPRO GRIPO
- Page 1 GRIPO BRUKSANVISNING / USER MANUAL SVENSKA ENGLISH...
- Page 2 Med hjälp av flertalet tillbehör kan stången trygghet vid uppstigning och förflyttning i hemmet. anpassas för många olika brukare. Hepro Gripo passar i alla hem, och är mycket enkel att erbjuder tre olika modeller som gör det lättare att montera. Stödstången fungerar utmärkt som den är, finna en stång som passar önskat...
-
Page 3: Table Of Contents
Innehåll Innehåll ............................2 Symbolförklaring ........................4 Innehåll i leveransen ....................... 4 Säkerhet ..........................5 Instruktioner före använding....................6 1. Innan montering ........................7 2. Montering ..........................7 3. Demontering ........................8... -
Page 4: Symbolförklaring
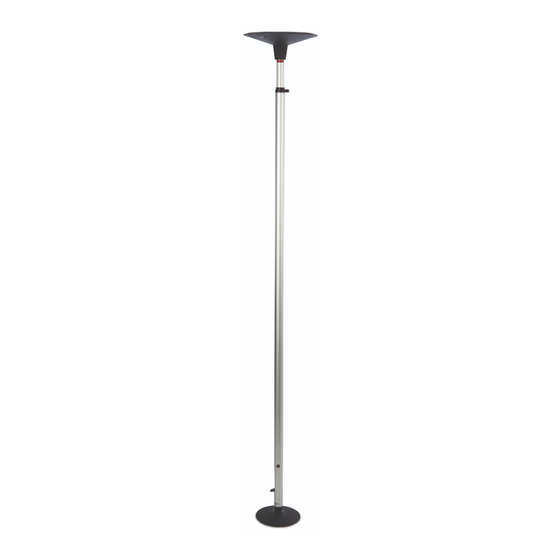
Symbolförklaring Producent CE-märkning Varning Medicinteknisk produkt Produktionsdatum Läs bruksanvisningen noga innan användning Serienummer Innehåll i leveransen STÅNG TOPPPLATTA / BOTTENPLATTA GASFJÄDER AK T I V OCH T RYG G I A L L A L I V E T S FA SER REV 1 - 20 22... -
Page 5: Säkerhet
Använd inte produkten med någon annan extrautrustning än den som beskrivs i denna bruksanvisning. • Gripo kan monteras i dusch, men produkten borde inte permanent stå nedsenket i vann eller andra vätskor R engör produkten med vatten på max •... -
Page 6: Instruktioner Före Använding
ANVÄNDINGSMILJÖ Denna produkt är avsedd att användas inomhus i privata hem eller på institutioner. Gripo-stången ska vara rumstempererad innan den sätts upp. AVSEDD ANVÄNDNING ANVÄNDARVIKT Avsedd att användas av personer som behöver Maximal brukarvikt 210 kg. -
Page 7: Innan Montering
User manual 1. Innan montering Art. nr. 35200 Art. nr. 35210 Topp-platta (den största) Art. nr. 35202 Gasfjäder Innerrör Snabbfäste Ytterrör Fotpedal Bottenpl atta (den minsta) h e p r o . n o... - Page 8 MONTERING AV GRIPO MOT TAK Innan man monterar Gripo måste man ta reda på vilken sorts tak det är. Om det är ett gipstak är det viktigt att Gripo monteras enligt skissen. Undvik att placera Gripo mellan takbjälkar, även vid spånplattetak. Taket måste tåla en punktkraft på...
-
Page 9: Montering
User manual 2. Montering Innan du börjar med montering: Sätt stången på den lilla bottenplattan, så att stången passar i spåren på plattan. Sätt gasfjädern överst på innerröret och skjut gasfjädern mot det röda säkerhetsmärket. Placera den stora topp-plattan överst på gasfjädern så at plattan passar i spåren på gasfjäderen. Kraften som verkar mot taket är 100 kg h e p r o . - Page 10 Sätt stången på ett lämpligt ställe Dra ut fotpedalen Öppna snabbfäste Snabbfäste Skjut upp innerröret tills topp-plattan når taket, medan bottenplattan fortsatt står i kontakt med golvet. Se till att stången är lodrät AK T I V OCH T RYG G I A L L A L I V E T S FA SER REV 1 - 20 22...
- Page 11 User manual Rotera det inre röret medurs så att innerröret låser fast i ytterröret. Lås snabbfästet h e p r o . n o...
-
Page 12: Demontering
Trampa ned fotpedalen. Är man osäker på om taket tål belastningen, tryck ned fotpedalen sakta och försiktigt medan man iakttar taket så att inga sprickor uppstår. Kontrollera att den röda markeringen är borta. Om den röda markeringen syns, demontera stången och börja om från punkt 2. - Page 13 Gripo is a sturdy, flexible supportive aid that helps With the help of various accessories, the pole can you stand up and move around the house. Gripo is be adapted to a wide range of applications. Hepro suitable for any home and is very easy to install.
- Page 14 Contents Contents ............................ 2 Explanation of symbols ....................... 4 Package contents ........................4 Safety and Security ........................ 5 Operating Instructions ......................6 1. Before mounting ........................7 2. Mounting ..........................7 3. Dismantling .......................... 8...
-
Page 15: Explanation Of Symbols
User manual Explanation of symbols Manfacturer CE marking Warning Medical devices Date of Manufacture Read the user manual carefully before Serial number. Package contents TOP PLATE/BOTTOM GAS SPRING POLE PLATE h e p r o . n o... -
Page 16: Safety And Security
Do not use this product with any accessories other than those described in this user manual. • Gripo can be mounted in the shower, but the product should not be permanently immerse in water or other liquids. • Clean the product with water at max. -
Page 17: Operating Instructions
USAGE ENVIRONMENT This product is intended for use in private homes or institutions. The Gripo pole should be at room temperature before it is mounted. USER WEIGHT INTENDED USE Max. -
Page 18: Before Mounting
1. Before mounting Top plate (the largest) Art. nr. 35200 Art. nr. 35210 Art. nr. 35202 Gas spring Inner tube Quick release Outer tube Foot pedal Baseplate (the smallest) - Page 19 Roofs and floors must be strong enough to withstand a point load of 100 kg. For plaster ceilings, it is very important that Gripo is installed as shown in the diagram. Avoid placing Gripo between roof beams or attaching it to chipboard roofs.
-
Page 20: Mounting
2. Mounting Before you start assembling… Place the pole on the small bottom plate so that the pole fits in the track. Place the gas spring on top of the inner tube and push the gas spring against the red safety mark. Attach the large top plate to the top of the gas spring so that the pole fits in the track. - Page 21 User manual Place the pole in a suitable place Pull out the foot pedal Open the quick connect Slide the inner tube up until the top plate reaches the ceiling completely, while the bottom plate remains in contact with the floor.
- Page 22 Rotate the inner tube clockwise so that the inner tube locks into the outer tube. Lock the quick connect.
-
Page 23: Dismantling
User manual Press the foot pedal down. If you are unsure of whether the roof can withstand the load, be careful not to crack the roof while gently pressing down on the foot pedal. Check that the red marking is gone. If the red marking is visible, dismantle the pole and start from point 2. - Page 24 Notater / Notes h e p r o . n o...
- Page 25 User manual User manual Notater / Notes h e p r o . n o h e p r o . n o...
- Page 26 User manual Notater / Notes h e p r o . n o...
- Page 27 User manual User manual Versjonslogg / Edit VERSJON 2022 EDIT OBS! Bruksanvisningen är bara giltig vid NB! The user manual is only valid at the time of tryckningstillfället. Uppdaterad the printing. The latest version will always be available at our website. bruksanvisning ligger på...
- Page 28 Tømmerveien 10, 8250 Rognan - Norge hepro.no | firmapost@hepro.no | (+47) 46 74 55 55 AK T I V OCH T RYG G I A L L A L I V E T S FA SER REV 1 - 20 22...
Need help?
Do you have a question about the GRIPO and is the answer not in the manual?
Questions and answers