HEPRO GRIPO User Manual
Hide thumbs
Also See for GRIPO:
- Instruction manual (52 pages) ,
- User manual (28 pages) ,
- Manual (12 pages)
Table of Contents
Advertisement
Available languages
Available languages
Quick Links
Advertisement
Chapters
Table of Contents

Related Manuals for HEPRO GRIPO


Summary of Contents for HEPRO GRIPO
- Page 1 GRIPO BRUKSANVISNING / USER MANUAL NORSK ENGLISH...
- Page 2 Ved hjelp av diverse tilbehør kan stangen tilpasses trygghet ved oppreisning og forflytning i hjemmet. mange forskjellige brukssituasjoner. Hepro tilbyr 3 Gripo passer i alle hjem og er meget enkel å ulike modeller som gjør det lettere å finne en stang montere. Støttestangen fungerer utmerket alene, som passer til ønsket bruksområde.
-
Page 3: Table Of Contents
User manual Innhold Innhold ............................3 Symbolforklaring ........................4 Innhold i pakken ........................4 Sikkerhet ............................ 5 Instruksjoner for bruk ......................6 1. Innen montering ........................7 2. Montering ..........................9 3. Demontering ......................... 12 h e p r o . n o... -
Page 4: Symbolforklaring
Bruksanvisning Symbolforklaring Produsent CE-merking Advarsel Medisinskutstyr Produksjonsdato Les bruksanvisningen nøye før bruk Serienummer Innhold i pakken STANG TOPPPLATE / BUNNPLATE GASSFJÆR A K T I V O G T R YG G I A L L E L I V E T S F A S E R... -
Page 5: Sikkerhet
• Ikke bruk dette produktet med annet tilleggsutstyr enn beskrevet i denne bruksanvisningen. • Gripo kan monteres i dusj, men produktet bør ikke permanent stå nedsenket i vann eller andre væsker • Vask produktet med vann på maks. 85 °C i minimum 3 minutter, eller desinfiser kjemisk med et... -
Page 6: Instruksjoner For Bruk
For informasjon tilrettelagt for brukere med syns-, lese-, skrivevansker og kognitive svekkelser; henvend deg til salgspersonen eller terapeuten. BRUKSMILJØ Dette produktet er ment for bruk i private hjem eller institusjoner. Gripo-stangen bør være romtemperert før den settes opp. BRUKERVEKT TILTENKT BRUK Maksimal brukervekt 210 kg. -
Page 7: Innen Montering
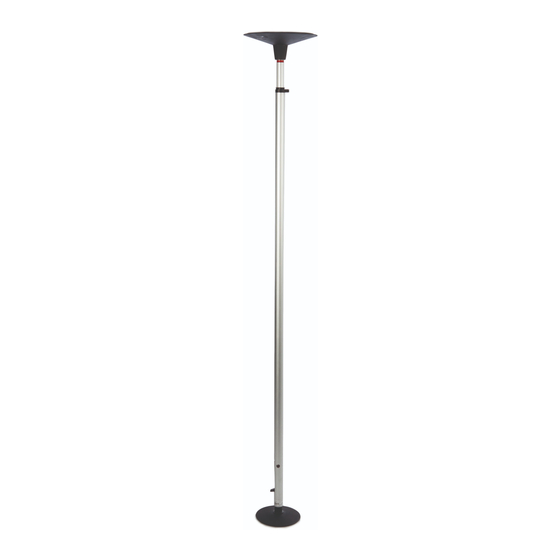
User manual 1. Innen montering Art. nr. 35200 Art. nr. 35210 Topplate (den største) Art. nr. 35202 Innerrør Hurtigkobling Ytterrør Fotpedal Bunnplate (den minste) h e p r o . n o... - Page 8 ønsket sted. Tak og gulv må ha styrke nok til å tåle en punktbelastning på 100 kg. Ved gipstak er det svært viktig at Gripo monteres slik skissen viser. Unngå å plassere Gripo mellom takbjelker også ved sponplatetak. Ved montering av Gripo på gipstak eller andre svake tak anbefales det å...
-
Page 9: Montering
User manual 2. Montering Før du begynner med montering. Plasser stangen på den lille bunnplaten slik at stangen passer i sporet. Kraften som virker mot taket er 100 kg h e p r o . n o... - Page 10 Bruksanvisning Plasser stangen på egnet sted Dra ut fotpedalen Åpne hurtigkoblingen Skyv innerrøret opp til topplaten når helt i taket, mens bunnplaten fortsatt holdes i kontakt med gulvet. Påse at stangen er loddrett. A K T I V O G T R YG G I A L L E L I V E T S F A S E R...
- Page 11 User manual Roter det indre røret med klokken slik at innerrøret låses fast i ytterrøret Lås hurtigkoblingen h e p r o . n o...
-
Page 12: Demontering
Bruksanvisning Trykk ned fotpedalen. Dersom man er usikker på om taket tåler belastningen, følg med at taket ikke slår sprekker mens man forsiktig trykker fotpedalen ned. Sjekk at rød markering er borte. Hvis den røde markeringen er synlig, demonter stangen og start fra punkt 2. Pass på... - Page 13 User manual User manual Notater / Notes h e p r o . n o h e p r o . n o...
- Page 14 Notater / Notes h e p r o . n o...
- Page 15 User manual User manual Notater / Notes h e p r o . n o h e p r o . n o...
- Page 16 User manual Notater / Notes h e p r o . n o...
- Page 17 Gripo is a sturdy, flexible supportive aid that helps With the help of various accessories, the pole can you stand up and move around the house. Gripo is be adapted to a wide range of applications. Hepro suitable for any home and is very easy to install.
- Page 18 Contents Contents ............................ Explanation of symbols ......................Package contents ........................Safety and Security ......................... Operating Instructions ......................1. Before mounting ........................2. Mounting ..........................3. Dismantling ...........................
-
Page 19: Explanation Of Symbols
User manual Explanation of symbols Manfacturer CE marking Warning Medical devices Date of Manufacture Read the user manual carefully before Serial number. Package contents TOP PLATE/BOTTOM GAS SPRING POLE PLATE h e p r o . n o... -
Page 20: Safety And Security
Do not use this product with any accessories other than those described in this user manual. • Gripo can be mounted in the shower, but the product should not be permanently immerse in water or other liquids. • Clean the product with water at max. -
Page 21: Operating Instructions
User manual Operating Instructions DESIGNED AND MANUFACTURED IN SERIAL NUMBER PLACEMENT ACCORDANCE WITH: • MDR 2017/745 bottom of the product’s outer • Relevant parts of EN 12182:2012 aluminium tube. CUSTOMISED INFORMATION For information intended for users with vision, reading, writing, and cognitive impairments, please contact the salesperson or therapist. -
Page 22: Before Mounting
1. Before mounting Top plate (the largest) Art. nr. 35200 Art. nr. 35210 Art. nr. 35202 Gas spring Inner tube Quick release Outer tube Foot pedal Baseplate (the smallest) - Page 23 Roofs and floors must be strong enough to withstand a point load of 100 kg. For plaster ceilings, it is very important that Gripo is installed as shown in the diagram. Avoid placing Gripo between roof beams or attaching it to chipboard roofs.
-
Page 24: Mounting
2. Mounting Before you start assembling… Place the pole on the small bottom plate so that the pole fits in the track. Place the gas spring on top of the inner tube and push the gas spring against the red safety mark. Attach the large top plate to the top of the gas spring so that the pole fits in the track. - Page 25 User manual Place the pole in a suitable place Pull out the foot pedal Open the quick connect Slide the inner tube up until the top plate reaches the ceiling completely, while the bottom plate remains in contact with the floor.
- Page 26 Rotate the inner tube clockwise so that the inner tube locks into the outer tube. Lock the quick connect.
-
Page 27: Dismantling
User manual Press the foot pedal down. If you are unsure of whether the roof can withstand the load, be careful not to crack the roof while gently pressing down on the foot pedal. Check that the red marking is gone. If the red marking is visible, dismantle the pole and start from point 2. - Page 28 Notater / Notes h e p r o . n o...
- Page 29 User manual User manual Notater / Notes h e p r o . n o h e p r o . n o...
- Page 30 Notater / Notes h e p r o . n o...
- Page 31 User manual User manual Versjonslogg / Edit VERSJON EDIT 2022 NB! Bruksanvisningen er kun gyldig på utskriftstidspunkt. Oppdatert bruksanvisning ligger på våre nettsider. available at our website. h e p r o . n o h e p r o . n o...
- Page 32 Tømmerveien 10, 8250 Rognan - Norge hepro.no | firmapost@hepro.no | (+47) 46 74 55 55 A K T I V O G T R YG G I A L L E L I V E T S F A S E R...
Need help?
Do you have a question about the GRIPO and is the answer not in the manual?
Questions and answers