AT&T EL52103 User Manual
Dect 6.0 cordless telephone/ answering system with caller id/call waiting
Hide thumbs
Also See for EL52103:
- User manual (103 pages) ,
- Quick start manual (39 pages) ,
- User manual (36 pages)

Related Manuals for AT&T EL52103


Summary of Contents for AT&T EL52103
- Page 1 User’s manual EL52103/EL52113/EL52203/ EL52213/EL52253/EL52303/ EL52313/EL52333/EL52353/ EL52403/EL52503 DECT 6.0 cordless telephone/ answering system with caller ID/call waiting TONE TONE...
- Page 2 This telephone meets the California Energy Commission regulations for energy consumption. Your telephone is set up to comply with the energy- conserving standards right out of the box. No further action is necessary. Model number: EL52103/EL52113 (one-handset system) EL52203/EL52213/EL52253 (two-handset system) EL52303/EL52313/EL52333/EL52353 (three-handset system)
- Page 3 Quick start guide Telephone base Power adapter for telephone base TONE Cordless handset Charger for cordless handset Wall mount bracket (1 for EL52103/EL52113) with power adapter installed (2 for EL52203/EL52213/ (1 for EL52203/ EL52253) EL52213/EL52253) (3 for EL52303/EL52313/ (2 for EL52303/EL52313/...
-
Page 4: Table Of Contents
User’s manual EL52103/EL52113/EL52203/ EL52213/EL52253/EL52303/ EL52313/EL52333/EL52353/ EL52403/EL52503 DECT 6.0 cordless telephone/ TONE TONE answering system with caller ID/call waiting Table of contents Getting started Telephone operation Installation ................1 Making, answering and ending calls....20 Quick reference guide - handset ......2 Making a call ............20 Quick reference guide - telephone base ... - Page 5 Directory Answering system Directory overview ............30 Answering system settings ........48 Shared directory ...........30 Announcement ............48 Directory memory capacity ......30 Answer on/off ............50 Exiting the directory ...........30 Call screening ............51 Create directory entries ...........31 Number of rings ............52 Create a new directory entry ......31 Remote access code...........53 Add a predialed telephone number to Message alert tone..........54...
- Page 6 Maintenance..............83 Important safety information ........84 Safety information ..........84 Precautions for users of implanted cardiac pacemakers ..........86 Pacemaker patients ..........86 ECO mode ..............86 Especially about telephone answering systems ..............86 FCC Part 68 and ACTA..........87 FCC Part 15 ..............88 California Energy Commission battery charging testing instructions .........89 Limited warranty ............90 Technical specifications ...........93...
-
Page 7: Getting Started
Getting started Installation You must install and charge See pages 7 and 8 for the battery before using the easy instructions. cordless handset. Install the telephone base close to a telephone wall jack and an electrical outlet not controlled by a wall switch. The telephone base can be placed on a flat surface or vertically mounted on the wall (page 9-10). -
Page 8: Quick Reference Guide - Handset
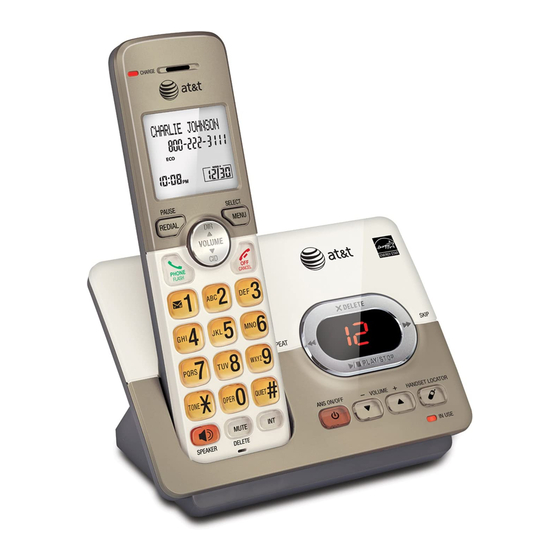
Getting started Quick reference guide - handset CHARGE light On when the handset is charging in the telephone base or charger. DIR/volUmE • Press to scroll up while in menus (page 12). • Press to increase the listening volume (pages 24 and 61). - Page 9 Getting started Quick reference guide - handset CID/volUmE • Press to scroll down while in menus. • Press to decrease the listening volume (pages 24 and 61). • Press to show the caller ID log when the handset is not in use (page 43). •...
- Page 10 Getting started Quick reference guide - handset mAIn mEnU Play messages (page 60) Answering sys (page 48) Play messages Directory (page 30) Caller ID log (page 43) Ringers (page 13) Set date/time (page 16) Settings (page 12) Web address (page 27) Using menus Press mEnU/SElECT to enter the main menu.
-
Page 11: Quick Reference Guide - Telephone Base
Getting started Quick reference guide - telephone base /REPEAT • Press to repeat a message (page 61). • Press twice to play the previous message (page 61). message window Displays the number of messages or other answering system information. x/DElETE •... -
Page 12: Telephone Base And Charger Installation
Getting started Telephone base and charger installation Install the telephone base and charger, as shown below. If you subscribe to high-speed Internet service (DSL - digital subscriber line) through your telephone line, you must install a DSL filter between the telephone line cord and the telephone wall jack. -
Page 13: Battery Installation And Charging
Getting started Battery installation and charging Battery installation Install the battery, as shown below. Plug the battery Align the cover flat Insert the supplied connector securely battery with the label against the battery THIS SIDE UP facing into the socket inside compartment, then the handset battery up, as indicated. -
Page 14: Battery Charging
Getting started Battery installation and charging Battery charging Once you have installed the battery, the screen indicates the battery status (see the following table). If necessary, place the handset in the telephone base or charger to charge the battery. For best performance, keep the handset in the telephone base or charger when not in use. -
Page 15: Wall Mount Installation
Getting started Wall mount installation The telephone base comes ready for tabletop use. If you want to mount your telephone on a wall, use the provided wall mount bracket to connect with a standard dual-stud telephone wall mounting plate. If you do not have this mounting plate, you can purchase one from many hardware or consumer electronics retailers. - Page 16 Getting started Wall mount installation Plug the telephone line cord (or DSL filter) into the wall jack. Plug the power adapter into a power outlet not controlled by a wall switch. Align the holes on the wall mount bracket with the standard wall plate and slide the wall mount bracket down until it locks securely.
-
Page 17: Wall Mount To Tabletop Installation
Getting started Wall mount installation Wall mount to tabletop installation To change the telephone base from wall mount installation to tabletop installation, follow the steps, as mentioned below. If the telephone line cord and power adapter cord are bundled, untie them first. -
Page 18: Telephone Settings
Telephone settings Menu overview Use the menu to change the telephone settings. Press mEnU/ in idle mode (when handset is not in use) to enter the SElECT main menu. Press to scroll through menu items. Press /SElECT to select or save the indicated item. mEnU -oR- Press... -
Page 19: Handset Settings
Telephone settings Handset settings Ringer volume You can set the handset ringer volume level (1-6), or turn and Ringer off the ringer off. When the ringer is off, Ringer volume appears on the handset screen. Press mEnU/ in idle mode to enter the main menu. SElECT Press to scroll to Ringers, then press... -
Page 20: Lcd Language
Telephone settings Handset settings lCD language You can select the language used for all screen displays. LCD language Press mEnU/ in the idle mode to enter the SElECT main menu. to scroll to Settings, then press Press /SElECT. mEnU Press /SElECT to select lCD language.
Need help?
Do you have a question about the EL52103 and is the answer not in the manual?
Questions and answers