WAGNER F230 Owner's Manual
Airless sprayer
Hide thumbs
Also See for F230:
- Owner's manual (100 pages) ,
- Owner's manual (104 pages) ,
- Operating manual (125 pages)
Table of Contents
Advertisement
Quick Links
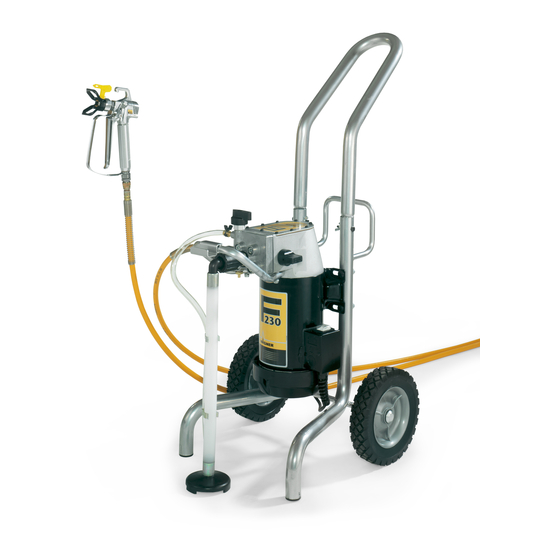
F230
Airless Sprayer
Owner's Manual • Betriebsanleitung • Manuel d'utilisateur
Manual de usuario • Manuale dell'utente • Gebruikshandleiding
Ejermanual • Användarmanual
English
Deutsch
Français
Español
Printed in the U. S. A.
GB
D
p. 2
Italiano
p. 14
Nederlands
p. 26
Dansk
p. 38
Svenska
0106 © 2006 Wagner. All rights reserved. Form No. 0508296A
F
E
I
NL
DK
p. 50
p. 62
p. 74
p. 86
S
Advertisement
Table of Contents

Subscribe to Our Youtube Channel
Related Manuals for WAGNER F230


Summary of Contents for WAGNER F230
- Page 1 English p. 2 Italiano p. 50 Deutsch p. 14 Nederlands p. 62 Français p. 26 Dansk p. 74 Español p. 38 Svenska p. 86 Printed in the U. S. A. 0106 © 2006 Wagner. All rights reserved. Form No. 0508296A...
-
Page 2: Table Of Contents
• The unit must be connected to an earthed object. Use the CUT! Injection can lead to amputation. See a physician green earthing wire to connect the unit to a water pipe, immediately. steel beam, or other electrically earthed surface. © Wagner. All rights reserved. -
Page 3: General Description
• Never leave this equipment unattended. Keep away from children or anyone not familiar with the operation of airless Capabilities .......Sprays a variety of oil-based and equipment. latex paints, primers, and stains • Do not spray on windy days. © Wagner. All rights reserved. -
Page 4: Preparing To Paint
If you do not, see the section on cleaning and servicing the outlet valve. 7. Turn the pressure control knob counterclockwise to the minimum pressure setting. 8. Move the motor ON/OFF switch to OFF. © Wagner. All rights reserved. -
Page 5: Mounting The Paint Hopper
NEVER trigger Trigger locked the gun unless the tip is completely (gun will not spray) turned to either the spray or the unclog position. ALWAYS engage the gun trigger lock before removing, replacing or cleaning tip. © Wagner. All rights reserved. -
Page 6: Spraying
Do not trigger the gun during the middle of a stroke. This will result in an uneven spray and tailing will appear or the paint will spatter out in blobs splotchy coverage. rather than in a fine spray. © Wagner. All rights reserved. -
Page 7: Cleanup
This will draw the remaining material in the suction tube clockwise to increase the pressure. through the pump, down the return hose and into the 6. Test the sprayer on a practice piece and begin spraying. material container. © Wagner. All rights reserved. - Page 8 19. Return the hopper filter to its position in the hopper. 20. Replace the hopper or suction set on the inlet valve. 21. Wipe the entire unit, hose, and gun with a damp cloth to remove accumulated material. © Wagner. All rights reserved.
-
Page 9: Maintenance
Check it every time you add paint. Remove the screen by pulling it out of the hopper with a pliers. Clean the screen with water or solvent and a soft-bristle brush, if necessary. © Wagner. All rights reserved. -
Page 10: Troubleshooting
PRIME/SPRAY valve and clean or replace it. NOTE: The electric motor should always be kept clean and dry. Paint acts as an insulator. Too much paint on the motor will cause the motor to overheat. © Wagner. All rights reserved. -
Page 11: Parts Listing
Suction set assembly......1 9810111 Wing nut..........2 9800108 Screw............2 9810113 Axle cap ..........2 0555126 Diaphragm pump, 220–240 VAC..1 0311200 Diaphragm pump, 100–120 VAC ---------- Pump head assembly ......1 9802533 Carriage bolt .........4 0278364 Pail hook ..........1 9802519 Screw............2 © Wagner. All rights reserved. -
Page 12: Diaphragm Pump
0047393 Retainer ............2 0270462 Fan (not shown)..........1 0278359 Gasket ............1 0270612 Fan cover (not shown)........1 0278341 Hydraulic cover ...........1 9800049 Screw............9 ---------- Power cord (not shown, see above)...1 0090031 Eccentric sleeve and bearing assembly ..1 © Wagner. All rights reserved. -
Page 13: Pump Head Assembly
(includes items 1 – 6) ......1 0047485 Outlet spring ..........1 0278361 Ball guide ............1 9871114 O-ring............1 0278335 Outlet fitting..........1 0278337 Pusher body..........1 0278250 Pusher stem assembly .......1 0278368 Pusher spring..........1 0156646 Seal.............1 0278340 Pusher washer..........1 © Wagner. All rights reserved.
Need help?
Do you have a question about the F230 and is the answer not in the manual?
Questions and answers