
Subscribe to Our Youtube Channel
Related Manuals for ZINEXTS ZiXpress 64 system


Summary of Contents for ZINEXTS ZiXpress 64 system
- Page 1 Zinexts Life Science Instruction Manual Automated Nucleic Acid Purification System ZiXpress 64 system Catalog No.: ZP01014 Rev. Date: 24.05.2022 Manual No. QW-IH01-07 Version: 1.2 For General Laboratory Use Only.
-
Page 2: Table Of Contents
2.3 Environment Requirements ......................2.4 Dimension and Weight ........................3. Instrument Overview ......................4. Installation ..........................4.1 Composition of the ZiXpress 64 system ..................4.2 Operating Environment / Conditions .................... 4.3 Initial Setting ..........................4.4 Notes for Transportation / Shipping ..................... -
Page 3: Introduction
96 Deep-Well Plate to enhance the lysis and elution efficiency. Applications ZiXpress 64 system purifies DNA and RNA from a variety of samples which are essential and broadly used in molecular biology, genetic screening, sequencing, food safety, forensic, etc. -
Page 4: Safety Information
For your safety and those of others, follow the guidelines provided in the following pages concerning the use of the ZiXpress 64 system. ZINEXTS LIFE SCIENCE CORP. will not be held liable for any errors, damage, or other unexpected events resulting from miscarried following safety guideline. -
Page 5: Important Instructions
◼ system. Also, refrain from bumping or knocking it. ◼ Repairs to the ZiXpress 64 system should be only performed by representatives / agents that are specifically authorized, and with original spare parts that are certified by the ZINEXTS LIFE SCIENCE CORP. - Page 6 Note: ◼ ◼ Reagent kits will be generally not supplied with the ZiXpress 64 system instrument. Please select your desired Reagent Kits and order them separately. About Samples Biohazard: Always wear appropriate gloves, a mask, and safety goggles etc.
-
Page 7: Intended Use & Specifications
This product and any of its accessories is for the extended use of nucleic acid extraction, purification isolation in molecular biology research laboratories and clinical diagnosis laboratories. Specifications Product ZiXpress 64 system Model Name Specifications Bench-top automated Nucleic Instrument Type Acid Extractor... -
Page 8: Dimension And Weight
Transportation Environment temperature: -20 - 55°C Relative humidity: < 80% Dimension & Weight Dimensions: 722 x 360 x 490 mm Weight: 38 kg EN61326-1 Safety EN60101-1, EN60101-2 Page 7... -
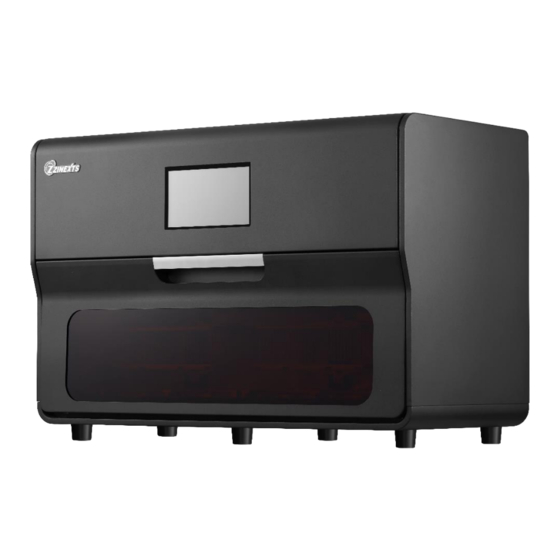
Page 9: Instrument Overview
INSTRUMENT OVERVIEW Front view Touch Panel Handler Door Window Rear view Fixing block sensor USB Port Power switch Rear cover Power inlet Page 8... - Page 10 Inside view Mixing Sleeves Track UV Lamp Magnetic Pillar Mixing Sleeves Reagent plate Temperature Control Page 9...
-
Page 11: Installation
Please make sure all components are free of damages as soon as you get the system. If any damage is found, please contact your local representative for support. Note: Zinexts Life Science’s global warranty does not cover transportation damages or improper handling and operation. Page 10... - Page 12 Extraction Kits Quantity: 2.2ml Deepwell 96 Plate x12 (plates) 8-Tip Comb x24 (pcs) Note: Extraction kits have to be purchased separately. Please contact your local representative / agent for further information. The contents of extraction kits are various. Refer to the Reagent Kit Handbook, enclosed in the reagent box, for further details.
-
Page 13: Operating Environment / Conditions
A location far from objects which generate strong magnetic fields, as motors, transformers, TV, audio speakers, magnets, etc. (Bringing the ZiXpress 64 system close to any type of magnetic field may cause a malfunction.) Warning: Do not use the ZiXpress 64 system in an environment where Page 12... - Page 14 It may cause injury or device failure. Do not use the ZiXpress 64 system in direct sunlight or close to a heating device. It may shorten the life of the ZiXpress 64 system, or cause trouble.
-
Page 15: Initial Setting
Improper handling of the movement of the ZiXpress 64 system will lead to instrument damages. For correct and safe use of the ZiXpress 64 system, install it in a location that is close to electrical outlet and has enough space for installation and operation from the main switch. - Page 16 (2) Connect power cord to the instrument. Power inlet (3) Remove the Fixing Block inside the instrument and place it in the Fixing Block Sensor Spot, following the guideline below: Plug in the power cord to the electric outlet Use a Phillips head screwdriver to release the red screws Remove the Fixing Block Place the Fixing Block in the upper part of the back...
-
Page 17: Notes For Transportation / Shipping
Notes for Transportation / Shipping ZiXpress 64 system When transporting / shipping the ZiXpress 64 system to a Transportation new location, perform the following tasks: 1. Insert Fixing Block (1) Put the Fixing Block to fix the Magnetic Pillar frame. -
Page 18: Functional Descriptions
3. Pack the ZiXpress 64 system instrument, including accessories in its original shipping box or some other equivalent parcel. Functional Descriptions Main Menu Home Light Light Protocol Setting Hibernate Edit Page 17... - Page 19 Protocol Edit After pressing , the icon will change into , and you can select “1” to “12” to edit your protocol. LED Light After pressing button, the icon will change into the instrument’s light will turn off. Page 18...
- Page 20 UV Light After pressing button, Press <30 minutes> to start a default 30 minutes decontamination process or press <User setting> to set a desired time. Settings After pressing button, you can do the instrument adjustment / check / test. After pressing button, the instrument will get into the Sleeping mode “sleeping mode’’.
-
Page 21: Getting Started
GETTING STARTED Preparation Biohazard: Always wear appropriate gloves, a mask, and safety goggles during any biohazardous operations in extraction process. Even when touching the device after any operation with a biohazard risk, wear appropriate gloves and a mask since the device may be contaminated. -
Page 22: Operation
(2) Connect the plug of the power cable to the outlet. (3) Turn the power switch on and wait for the Touch Panel to turn on and displaying “ZiXpress 64 system initializing”. The system will process self-testing, and then go to steady mode. - Page 23 (4) Open the door. (5) Set up the mixing sleeves on the mixing sleeve track. Caution: Make sure the sleeves have entered completely! Page 22...
- Page 24 (6) Remove carefully the aluminum foil sealing membrane on the reagent plate. Add samples to Well 1 and Well 7. (7) Place the reagent plate(s) into the instrument. (8) Close the door before starting the instrument! Page 23...
- Page 25 (9) Select protocol Select the pre-installed protocols, edit the pre-installed protocols or draft a protocol by yourself. This figure is the standard protocol in ZiXpress 64 system: Page 24...
- Page 26 (10) Press to start the extraction process. Note: The process time and remaining process time will be displayed on the screen. (11) While the extraction procedure is finished, transfer the extracted products located at Well 6 and Well 12 into nuclease-free tubes.
- Page 27 Pause & Restart (1) If you want to stop / pause the procedure during the Procedures operation, please press button. (2) To restart the procedure, press button Stop the Process (1) During the process, if you want to stop/pause the procedure, please press button.
- Page 28 (2) To stop the process, press button, (3) Press <Yes>, then the instrument will do the initializing. After Extraction (1) Transfer the extracted products located at Well 6 and Process Well 12 into nuclease-free tubes. Note: You can apply quality checking, do downstream study or storage them as what you expect.
-
Page 29: Protocol Editing
Protocol Editing Editing Menu (1) In the main menu, press button, the icon will change into , and then you can select “1” to “12” to edit your protocol. (2) Select desired procedure by press on the touch screen to edit, or create blank procedure. - Page 30 (3) Save a protocol, after enter the desired procedures, make sure the protocol number is not duplicated, and press <Save> to save the protocol. Editing Options Accept both letters and numbers. Protocol Name Duplicated protocol name is not accepted, maximum 10 characters. Choose the Well for customized Well procedure.
-
Page 31: Cleaning & Maintenance
◼ Clean the instrument body by removing dust gently with a dry, soft cloth. If the outside of the ZiXpress 64 system is heavily soiled, or if any samples that may cause infection are adhered to the outside of the ZiXpress 64 system, wipe with a soft paper tissue, soaked with 75% ethanol. -
Page 32: Troubleshooting
Routine Cleaning instrument User Bi-weekly body (outside) Cleaning instrument body (inside) User Daily Preventive Service Engineer Annually Add grease on Z axis TROUBLESHOOTING Problem Cause Solution Check AC power cord Power disconnected connections at both ends. Or use the correct cords. No display after Blown fuse Replace the fuse... -
Page 33: Contact Zinexts Life Science
Mail: info@zinexts.com Product of Origin: Taiwan (R.O.C.) Technical Support Zinexts Life Science - Service Center For technical problem and instrument maintenance please contact our service center: support@zinexts.com Before contacting the Technical Support, refer to “Troubleshooting” to check the problems. If the issue cannot be solved, contact your local representative / agent, or the Zinexts Life Science - Service Center. -
Page 34: Warranty Information
(ii) Any consumption spare parts including fuses, light bulbs, UV lights, LED lighting sets. For further information about the Warranty Policy and Extended Warranty offers, please contact your local representative / agent, or visit our website www.zinexts.com. Page 33... - Page 35 Zinexts Life Science Corp. www.zinexts.com 10F.-5, No.120, Qiaohe Rd., Zhonghe Dist., New Taipei City 235, Taiwan (R.O.C.) Tel: +886 2 2246 3579 Fax: +886 2 2243 8570 Mail: info@zinexts.com Page 34...
- Page 36 Revision History Location of Essence of Date changes changes New version P30. Maintainace Add grease on Z axis 2021/06/29 P33. 2022/05/13 Change warranty policy Page 35...
Need help?
Do you have a question about the ZiXpress 64 system and is the answer not in the manual?
Questions and answers