Table of Contents
Advertisement
Quick Links
Advertisement
Table of Contents

Subscribe to Our Youtube Channel
Related Manuals for ZINEXTS MagPurix 12A


Summary of Contents for ZINEXTS MagPurix 12A
- Page 1 Zinexts Life Science Instruction Manual Automated Nucleic Acid Purification System MagPurix 12A Catalog No.: ZP01005 Rev. Date: Sep 7, 2022 Manual No. IFU-MP01-01005 Version: 2.1 Obelis s.a. Bd Général Wahis 53 1030 Brussels Belgium Tel: +(32) 2 732-59-54 Fax: +(32)2 732-60-03...
-
Page 2: Table Of Contents
Page# INTRODUCTION ...........................3 SAFFETY INFORMATION ........................4 Installation ..........................9 1.1. Composition of the MagPurix 12A system ..............9 1.2 Contents of Reagent Kits .....................10 1.3 Operating Environment / Condition ...................11 1.4 Unpack the MagPurix 12A system ..................13 1.5 Overall View ..........................16 Getting Started ........................18 2.1Turning on the power ......................19... -
Page 3: Introduction
INTRODUCTION Thank you for purchase of the MagPurix 12A which is a fully automated, standalone robot that can purify nucleic acids the fast is within 40-55 minutes. With advanced magnetic bead separation technology, it enables you to have high quality extraction results. Moreover, the most user-friendly interface makes users free from troublesome parameter settings and maintenance. -
Page 4: Saffety Information
Important: “Important” shows the important notes for usage, as well as prohibited actions. Note: “Note” indicates the notes, procedures that should be obeyed and supplementary information for use. HOT SURFACE: www.ZINEXTS.com Page 4 Ver: 2.1... - Page 5 This symbol is used to label potentially hot instrument surfaces. This symbol is In vitro diagnostic medical device. For your safety and that of others, follow the guidelines provided in the following pages concerning the use of the MagPurix 12A system. www.ZINEXTS.com Page 5...
- Page 6 - Do not use the MagPurix 12A system with voltage other than the voltage specified on the device. - Do not use the MagPurix 12A system with a damaged power plug or a loose socket. - If there is dust on the prongs of the power plug or on the plug socket, remove it with a dry cloth.
- Page 7 Extraction should be performed in an appropriate laboratory or workplace. Note: The kits are not supplied with the MagPurix 12A system. Select the desired kit(s) and order it (them) separately. www.ZINEXTS.com Page 7...
- Page 8 Zinexts Service Center For technical problem and instrument maintenance please contact our service center: Zinexts Life Science Corp. www.zinexts.com 16F., No. 93, Sec. 1, Xintai 5th Rd., Xizhi Dist., New Taipei City 221416 , Taiwan...
-
Page 9: Installation
1.0 Installation 1.1. Composition of the MagPurix 12A system Check that the following are included in the package. Contact your local representative if you notice any missing part(s). Q’ty A. MagPurix Instrument B. Power Cord C. Sample Tube Rack D. Barcode Reader E. -
Page 10: Contents Of Reagent Kits
If any damage found, please contact your local representative for the instant support. Note: Zinexts’s global warranty does not cover the damages from the transportation or improper operation. 1.2 Contents of Reagent Kits A. Reagent Cartridge(s) B. -
Page 11: Operating Environment / Condition
Use the MagPurix 12A system in a location that meets the following conditions: The space for the allocation of the MagPurix 12A system must be remained 5-10 cm from instrument to side walls. A location where power can be provided. - Page 12 (Bringing the MagPurix 12A system close to any type of magnetic field may cause a malfunction) Warning: Do not use the MagPurix 12A system to a location where it is wet or can be splashed with water. It may cause a device failure, fire, or electric shock.
-
Page 13: Unpack The Magpurix 12A System
(1) Open the packing box and take out the instrument and related accessories. Important: The MagPurix 12A system has a weight of more than 60 kgs. It should be lift and moved by two persons. Hold the moving handler of the instrument from two sides to move it out from the box. - Page 14 Improper handling of the movement of the MagPurix 12A system will lead to instrument damages. For correct and safe use of the MagPurix 12A, install it in a location that is close to electrical outlet and has enough space for installation and operation of the mains switch.
- Page 15 Plug in the power cord to the instrument and connect to electric outlet Turn the power switch on. iii. Press “START” button. The piston module will going up, and you can release the fixing stuff. www.ZINEXTS.com Page 15 Ver: 2.1...
-
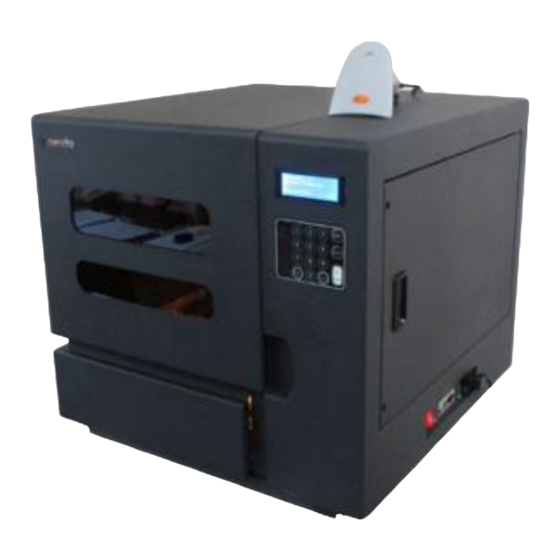
Page 16: Overall View
1.5 Overall View Front view with Door closed LCM Screen Door Control Pad Drawer Moving Handler Front view with Door opened UV Lamp Operational Area www.ZINEXTS.com Page 16 Ver: 2.1... - Page 17 Control pad is used for selection of functions and input of program and test codes. Turn on and off UV Light Pause or terminate the program Start the program / wake up from idle mode Cancel Number Confirmation / Previous Step buttons / Next Step www.ZINEXTS.com Page 17 Ver: 2.1...
-
Page 18: Getting Started
Before starting extraction, put on appropriate gloves, a mask, and safety goggles if required by the operation. In the operation from preparing samples to extraction completion, be careful not to contaminate the samples with sweat, saliva, etc. www.ZINEXTS.com Page 18 Ver: 2.1... -
Page 19: Turning On The Power
2.1Turning on the power (1) Make sure that the power cable are connected securely to the MagPurix 12A system. (2) Connect the plug of the power cable to the outlet. 2.2 Preparation The following preparations are required for extraction operation. -
Page 20: Extraction
(3) Open the drawer and remove the sample rack from the instrument. 1. Load Reagent Cartridges, and all plastics disposables (Reaction Chamber, Tip Holder, Piercing Pin, Filtered Tip and Sample Tube and Elute Tube. (Optionally supplied with some kit types) Insert the cartridges www.ZINEXTS.com Page 20 Ver: 2.1... - Page 21 How to pull apart reagent cartridges Slash open the dotted line with cutter. Insert Reaction Chambers www.ZINEXTS.com Page 21 Ver: 2.1...
- Page 22 Insert Tip Holder Insert Piercing Pins www.ZINEXTS.com Page 22 Ver: 2.1...
- Page 23 Insert Filtered Tips Note: 1. The positions of piercing pin and filtered tip; the 2 should be “EMPTY”. 2. Load one Reagent Cartridge and one set of plastic disposable per sample. www.ZINEXTS.com Page 23 Ver: 2.1...
- Page 24 - Set Cartridges in the order of the number from left to right. - Make sure that Cartridges are inserted in to the Cartridge Tray tightly. - You can load 1-12 cartridges on the tray depending on the number of samples that you wish to process. www.ZINEXTS.com Page 24 Ver: 2.1...
- Page 25 (4) Load Sample Tube and Elute Tube to Sample Rack on the bench Insert Sample Tube on to Sample Rack Insert Elute Tube on to Sample Rack www.ZINEXTS.com Page 25 Ver: 2.1...
- Page 26 Sample Tube. Please refer to the handbook of reagent kits for details. - Make sure the caps of Elute Tube are open as the figure shown above. (6) Place Sample Rack on the instrument platform www.ZINEXTS.com Page 26 Ver: 2.1...
- Page 27 (9) Follow the instructions displayed on LCM screen to double check the operating steps being completed before program running. (10) Push “Enter” to confirm. Instrument will start to run the protocol program automatically until whole processes are completed. www.ZINEXTS.com Page 27 Ver: 2.1...
-
Page 28: After Extraction Operation
(1) Take out the Elute Tubes (The extraction yields in them). Note: You can apply quality checking or do downstream study or storage them as what you expect. (2) Remove the Cartridges and plastic disposables from the instrument and then dispose of them. www.ZINEXTS.com Page 28 Ver: 2.1... -
Page 29: Cleaning &Maintaining The Magpurix 12A System
75% ethanol. Clean the instrument body by removing dust gently with a dry, soft cloth. If the outside of the MagPurix 12A system is heavily soiled, or if any samples that may cause infection are adhered to the outside of the MagPurix 12A system, wipe with a soft paper tissue, soaked with 75% ethanol. -
Page 30: Troubleshooting
Sample Tube, Elute manual. Tube) incorrectly loaded Note: you could not resume the protocol after stop on the MagPurix 12A and you may lose your samples. system Problem with motion Turn off the power and remove all samples and plastic sensors wares. - Page 31 Aliquot purified DNA and store at 4°C (short-term) or -20°C or degraded frozen and thawed (long-term). Avoid repeated freezing and thawing. DNA contaminated with Maintain a sterile environment while working (i.e. wear gloves DNases and use Dnase-free reagents). www.ZINEXTS.com Page 31 Ver: 2.1...
-
Page 32: Specifications
5.0 Specifications MagPurix 12A Model Benchtop automated nucleic acid extractor Instrument Type: 1 to 12 samples per batch Sample Processing: 100 –2000uL Sample Volume Handling: See purification kit manual for details Processing Time: 60°C to 70°C (assuming the room temperature of ~25°C) -
Page 33: Appendix
If the problems cannot be solved, contact your local representative, or the relative customer support. Notes for Transporting/Shipping the MagPurix 12A system When transporting/shipping the MagPurix 12A system to a new location, perform the following tasks: Warning: Before carrying the MagPurix 12A system, disconnect the plug from the outlet. - Page 34 Remove all attached parts (Sample Rack, Barcode Reader) from the MagPurix 12A system. After completing the above tasks, pack the MagPurix 12A system in its original shipping box or some other equivalent box. www.ZINEXTS.com Page 34 Ver: 2.1...
- Page 35 ※Instrument fixing stuff before Transport (1) Press the button “0123” (2) Press the button “2” – Eng. Menu www.ZINEXTS.com Page 35 Ver: 2.1...
- Page 36 (3) Press the button “3” - FIXING (4) Open the Front Door www.ZINEXTS.com Page 36 Ver: 2.1...
- Page 37 (5) Putting the Fixture on the Position of cartridge plate. (6) Close the Door (7) Press “Enter” button www.ZINEXTS.com Page 37 Ver: 2.1...
- Page 38 (8) Finish (9) After fixing stuff then you have to lock the X-axis by using 4MM hex tool in the RIGHT inside of bar. Tool: (4MM hex tool) Direction: Clockwise at least 3 turns www.ZINEXTS.com Page 38 Ver: 2.1...
- Page 39 Any consumption spare parts including fuses, light bulbs, UV lights, LED lighting sets. For further information about the Warranty Policy and Extended Warranty offers, please contact your local representative / agent, or visit our website www.zinexts.com. www.ZINEXTS.com Page 39 Ver: 2.1...
- Page 40 Zinexts Life Science Corporation www.zinexts.com 16F., No. 93, Sec. 1, Xintai 5th Rd., Xizhi Dist., New Taipei City 221416 , Taiwan( R.O,C) Tel: +886 2 2246 3579 Fax: +886 2 2243 8570 Mail: info@zinexts.com www.ZINEXTS.com Page 40 Ver: 2.1...
- Page 41 Revision History Location of changes Essence of changes 1.6.3 Footer Change footer from V1.6.3 to V1.8 Replacement/Optional Parts Front page Change address to Xizhi 6.0 Warranty Change warranty policy Front page Change manual number www.ZINEXTS.com Page 41 Ver: 2.1...
Need help?
Do you have a question about the MagPurix 12A and is the answer not in the manual?
Questions and answers