
Related Manuals for Ancheer AMA005874


Summary of Contents for Ancheer AMA005874
- Page 1 E-Bike PRODUCT INSTRUCTION MANUAL Caution : Please read the manual before your first ride!
-
Page 2: Table Of Contents
CONTENTS IMPORTANT SAFETY INSTRUCTION GENERAL INFORMATION BIKE USAGE INSTALLATION AND ADJUSTMENT METER OPERATION BATTERY AND CHARGING MAINTENANCE WARRANTY ATTACHMENTS WARNING... -
Page 3: Important Safety Instruction
IMPORTANT SAFETY INSTRUCTION WHEN USING THIS PRODUCT BASIC PRECAUTIONS SHOULD ALWAYS BE FOLLOWED, INCLUDING THE FOLLOWING: Things To Know Before Use ● Read all the instructions before using the product. ● To reduce the risk of injury, close supervision is necessary when the product is used near children. - Page 4 IMPORTANT SAFETY INSTRUCTION ● Try to avoid riding in severe weather such as heavy rain and snow. ● It is not allowed to exceed the maximum load of the vehicle body when riding (the maximum load is 120KG). ● It is suitable for people of 16+ years old and physically fit adults, and it is strictly forbidden to drive electric bicycles on the road by people under 16 years old.
-
Page 5: General Information
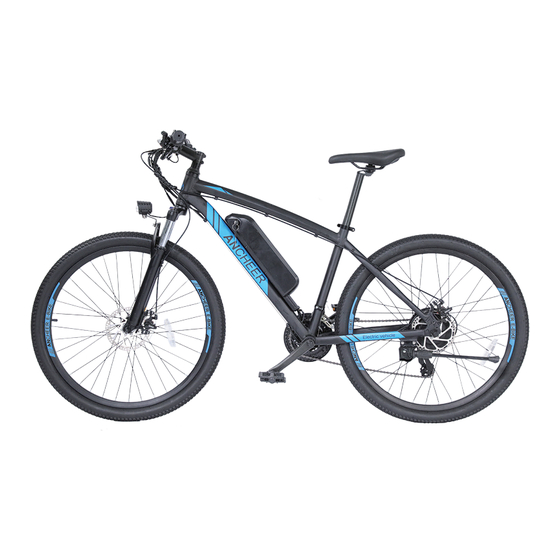
GENERAL INFORMATION 1. About ANCHEER Electric Bike ANCHEER electric bike is a leading icon of e-bikes. For years, ANCHEER has been not only dedicating to innovation, cutting-edge technology and premium materials, but also providing cost effective e-bikes, to satisfy riders' various needs of transportation and even desire of exploring sports &... - Page 6 GENERAL INFORMATION 3. Bike Components Rear Disc Brake Caliper Flywheel Tyre Front Fork Rear Derailleur Head Light/Front Light Chain Stem Front Derailleur Frame Chain Wheel Battery Crank Saddle Post/ Seat Tube Front Disc Brake Caliper Saddle Wheel Reflector Seat Post Clamp/ Seat Clamp Disc...
- Page 7 GENERAL INFORMATION Left Brake Lever Motor Left Grip Right Brake Lever Front Derailleur Handle Right Grip Meter Throttle/ Twister Pedal Rear Shifter Kickstand Handle Bar...
- Page 8 GENERAL INFORMATION 4. Tool List 0.20 inch (5mm) 0.16 inch (4mm) 0.12 inch (3mm) Phillips-Slotted 10-12 Open 13-15 Open Tool bag Allen Ke y Allen Ke y Allen Ke y Head Screwdriver End Wrenchr End Wrench 5. Standover Height For the sake of safety and comfortable riding, when the rider stands on the ground there should be clearance of 78cm/31in from ground to the crotch of the rider.
-
Page 9: Bike Usage
BIKE USAGE Before Riding ● Before riding the bike on the open road, try all the settings on the electric bike, and get used to various results in a safe and controllable environment. ● Please check the power circuit, lighting circuit, and test the brake system before cycling. ●... -
Page 10: Installation And Adjustment
INSTALLATION AND ADJUSTMENT Open the package of the bike, take out the electric bike and all the parts inside and use the tool to cut off the packing rope. Please follow our YouTube channel- ANCHEER SPORT, we have provided installation tutorial. - Page 11 INSTALLATION AND ADJUSTMENT Adjust the angle of the stem to ensure that the handlebar is level, and use the tool to lock one screw on top and two screws on the size. If you find the handlebar is not in the right direction, loosen the top screw, adjust the angle of the handlebar to keep it in horizontal direction, then tighten the top bolt.
- Page 12 INSTALLATION AND ADJUSTMENT 3. Install The Front Disc Brake Align the two screw holes of the front disc brake with the screw holes of the front fork, and tighten the screws clockwise. 4. Install The Front Wheel Flip the e bike upside down. Pad the handlebar with foam to protect the components on it from being scratched or broken.
- Page 13 INSTALLATION AND ADJUSTMENT Unscrew the adjustment nut from the skewer, remove outer spring and slide the skewer through the front wheel axle so the quick-release lever is on the same side of the chain. Figure 4.3 Slide the outer spring over the end of the skewer. Figure 4.3 Note: The smaller end of the spring should be in towards the wheel.
- Page 14 INSTALLATION AND ADJUSTMENT Quick release lever in the closed position Attention: Quick release Tighten the quick release lever in the open with the adjustment nut position only! A = B Figure 4.4 NOTE: Make sure the wheel is in the middle of the fork. Length A= lenght B Important! You should feel resistance when you close the quick-release lever that should leave a temporary impression on your fingers.
- Page 15 INSTALLATION AND ADJUSTMENT Brake Adjustment Ensure that the brake cables are properly inserted into the brake levers before aligning a mechanical disc brake. If the disc rotor is bent or damaged, replace the rotor first. ● If the brake is not sensitive, loosen the anchor bolt of the brake cable to shorten the brake distance of the brake cable and then tighten the bolt.
- Page 16 INSTALLATION AND ADJUSTMENT 6. Install Kickstand Unscrew the screw in the kickstand, and install the kickstand. Then tighten with tool. 7. Install The Headlight Loosen the screw on the fork with the hex key. Put the light in this position. Tighten the screw that secures the light.Then connect the plug when the arrow on the plug surface is aligned with the arrow.
- Page 17 INSTALLATION AND ADJUSTMENT 9. Install LCD Meter Loosen the screw on the back of the meter with the hex key, then install the meter on the right side of the handlebar.Tighten the screw, and connect the connector of the meter. 10.
- Page 18 INSTALLATION AND ADJUSTMENT 11. Adjust Angle Of Brake Lever, Meter, Gear Shifter, Throttle And Louder Controller On Handlebar, Then Tightens Them With Tools. Shifting Recommendations In order to increase the range, we recommend shifting according to the speed. ● For starting and low-speed riding, it is best to use a low-speed gear. ●...
-
Page 19: Meter Operation
METER OPERATION 1. Product Name Intelligent LCD display for e-bike. 2. Appearance And Dimensions Fig. 2-1 Picture of Display Fig. 2-2 Fig. 2-3 Top View of Display Dimensions Side View of Display Dimensions... - Page 20 METER OPERATION 3. Meter Function Function Overview Display provides a variety of functions to meet the riding needs of users, including: ● Battery level indicator ● Assist level adjustment and indication ● Headlight indicator ● Speed indicator (including real-time speed, maximum speed (MAXS) and average speed (AVG)) ●...
- Page 21 METER OPERATION 4. General Operation Power on/off By pressing and holding the button , the display will start to work and the working power supply of the controller will be turned on. In the power-on state, by pressing and holding the button , your e-bike will be powered off.
- Page 22 METER OPERATION Headlight on/off By pressing and holding the button , the display backlight will turn less bright. By pressing and holding the button again, the display backlight will resumes the luminance. Fig. 4-2 Headlight-on Indicator Interfac Assist level selection By pressing the button , the e-bike assist level will be switched to change the motor output power.
- Page 23 METER OPERATION Battery level indicator The battery level indicator consists of five segments. When the battery is fully charged, the five segments will be all on. In case of undervoltage, the outline of the battery indicator will flash, which means the battery has to be charged immediately.
- Page 24 METER OPERATION 5. General Setting ■ All parameters can only be set when your e-bike stops. The steps for general setting are as follows: In the power-on state, when the display shows the speed of 0, Trip distance reset Press and hold the buttons at the same time for more than 2 seconds to reset the mileage.
- Page 25 METER OPERATION ❷ Press the button to switch the selection interface of general setting options, and press the button to enter the parameter modification interface; ❸ Press the button for parameter selection; ❹ Press the button to save the parameter and return to the selection interface of custom setting options;...
-
Page 26: Battery And Charging
BATTERY AND CHARGING Charging: Safe Operation Guide ● Please follow the instructions for use, otherwise the consequences are at his own risk. Please use the original special charger. It is strictly prohibited to use other chargers. ● Pay attention to the battery type and applicable voltage that the charger can charge, and it is strictly forbidden to mix them. - Page 27 BATTERY AND CHARGING ● The battery and battery charger contain hazardous materials. Always keep the battery and battery charger away from children, animals, or persons incapable of understanding the potential hazards. ● A damaged battery or battery charger (e.g. cable, plug or housing) may result in leakage of hazardous materials or be a potential source of sparking and fire.
- Page 28 BATTERY AND CHARGING ● When not in use for a long time, keep the battery in a cool and dry place, and charge the battery for two hours a month. Reminder Charge a new battery 4 hours before you use it in your product for the first time. If the battery is dropped or damaged due to a bicycle accident, there may be a danger of electrolyte leakage.
-
Page 29: Maintenance
MAINTENANCE ● The front and rear wheels of the vehicle should be located in the center of the front fork or frame. ● After riding, please store the bike in a place without sunlight and rain. ● Water showering is forbidden, and the surface of the bike body can be wiped with a semi-dry cloth. -
Page 30: Warranty
WARRANTY One-Year Limited Hardware Warranty Your electric bike includes a One Year Limited Hardware Warranty. ANCHEER provides warranty service for the electric bikes. If there is a hardware defect and a valid claim is received during the warranty period, we will resend new parts within the scope permitted by law. -
Page 31: Attachments
ATTACHMENT Technical Parameters Performance index Project Parameter Vehicle Size 1760*630*1000mm Wheel Size 27.5*1.95 Inches Frame Material Aluminium Alloy Basic Parameters Maximum Load 265 lbs (120KG) Vehicle Weight 49 lbs (22KG) Maximum Speed 20 mph (32km/h) Rear Derailleur 7-Speed Performance Parameters Front Derailleur 3-Speed Working Temperature... - Page 32 ATTACHMENT Remarks: ● The amount of battery remaining, load of the bike(weight of rider and cargo), tire pressure, road environment, chain and wheel axle lubrication, etc. will affect the maximum speed; ● Riding habits, temperature, load, tire pressure, road environment and other factors will affect the riding range.
- Page 33 Operation General ● Only use the e-bike and the drive assist system for safe, recreational riding. Use of the e-bike for a purpose it was not intended for is dangerous and could result in property damage, serious injury or death. Always follow the instructions for intended use and limitations.
- Page 34 Scratches, cracks, fraying and discoloration are signs of stress caused fatigue and indicate that a part is at the end of its useful life and needs to be replaced. Product life is often related to the kind of riding you do and to the treatment to which you submit the bicycle.
- Page 35 ● Although many catalogs, advertisements and articles about bicycling depict riders engaged in extreme riding, this activity is extremely dangerous, increases your risk of injury or death, and increases the severity of any injury. Remember that the action depicted is being performed by professionals with many years of training and experience.
- Page 36 WARNING! The shorter the brake lever reach, the more critical it is to have correctly adjusted brakes, so that full braking power can be applied within available brake lever travel. Brake lever travel insufficient to apply full braking power can result in loss of control, which may result in serious injury or death.
- Page 37 E Bike Input: DC 54.6V, 3A max Max Speed: 20 mph (32km/h) Power: 500W Model: AMA005874 Dongguan XiaoBai Intelligent Mobility Co., Ltd Made in China support@iancheer.com ANCHEER Customer Service Tel: +1 626 688 9296 Monday-Friday 9:00-12:00 AM PST 14:00-18:00 PM PST...
Need help?
Do you have a question about the AMA005874 and is the answer not in the manual?
Questions and answers
how do you turn on the headlight on model: AMAK00008
I need a new controller for AMA005874