Advertisement
Quick Links
Advertisement

Related Manuals for Traeger BAC331


Summary of Contents for Traeger BAC331
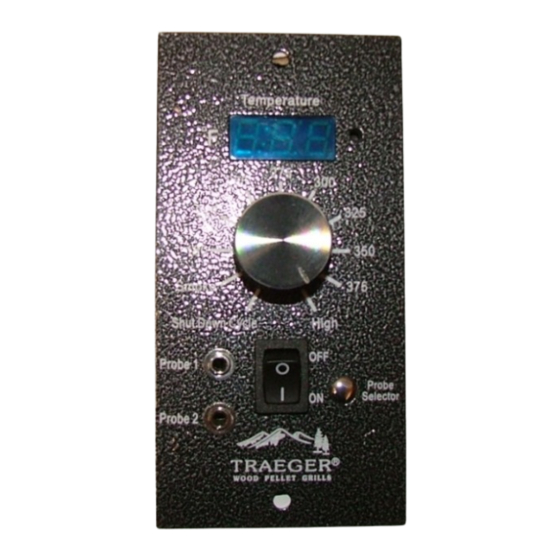
- Page 1 Handcrafted Wood Pellet Grills (BAC331) Digital Thermostat Kit With Meat Probes Installation Manual Step-By-Step Instructions Installing Digital Thermostat Kits Traeger Wood Pellet Grills Models BBQ020, BBQ055, BBQ070, BBQ07E, BBQ075’ BBQ400, BBQ150 DOC121 REV B...
- Page 2 INTRODUCTION Congratulations on your purchase of this Traeger Digital Thermostat Kit, BAC331. Once installed, the Digital Thermostat Kit will add a new level of control to your Grill and provide you with delicious food and years of cooking enjoyment. When you un-box the Digital Thermostat Kit, make sure you have, and can identify all of...
-
Page 3: Installation Instructions
INSTALLATION INSTRUCTIONS REMOVING THE EXISTING SMOKER CONTROL: 1) Make sure the Switch/Dial is in the OFF position. Disconnect the Power Cord from the electrical outlet. 2) Review the Digital Control Wiring Diagram to familiarize yourself with the color coding of the wiring connections. Disconnect the wiring from the Smoker Control by separating the 4 Molex Connectors found on the underside of the Pellet hopper. - Page 4 WIRING AND MOUNTING THE DIGITAL CONTROL: 1) Locate the Green Terminal Block on the back of the Digital Control in the upper right corner. Using a small screwdriver, loosen the two screws to open the clamping jaws enough to insert the RTD Wire ends. 2) Insert a bare wire end on one of the RTD Wires into the clamping jaws on one post of the Terminal Block.
- Page 5 Replace the Grease Drain Pan and the Porcelain Grill, connect the Power Cord to an appropriate, grounded electrical outlet and you are ready to go. Meat Probe Grommet Installation (OPTIONAL) The controller kit has a silicone grommet that can be installed to run the meat probes through the left side of the barrel.
-
Page 6: Initial Firing Instructions
Look to see if the Hot Rod is getting hot. DO NOT TOUCH IT! Turn the Switch to off and the Dial Knob to OFF/SHUT DOWN CYCLE. 4) Fill the Pellet Hopper with TRAEGER BBQ PELLETS. WARNING! USE ONLY TRAEGER BRAND BBQ PELLETS, which are specifically made to work in our Grills. -
Page 7: Section Three: Subsequent Start-Up
SECTION THREE: SUBSEQUENT START-UP Open the door then turn the Switch to ON and Temperature Dial to SMOKE. In approximately 2 minutes you will notice whitish-gray smoke coming out of the Grill as the Pellets ignite. After assuring the Pellets have ignited, close the Door and set the Temperature Dial to any cooking setting desired. - Page 8 NOTE TO GRILL OWNERS Now that your Traeger Pellet Grill is equipped with a Digital Thermostat Control, this handy conversion chart will help you determine where to set the Thermostat when the recipes call for “Smoke”, “Medium” or “High” settings with the 3-Speed Smoker Control.