Table of Contents
Advertisement
Quick Links
Advertisement
Table of Contents

Subscribe to Our Youtube Channel
Summary of Contents for Weber EndoLight
- Page 1 User Guide by weber medical GmbH...
-
Page 2: Table Of Contents
Guidelines, regulations and standards 3. Your EndoLight® Material Diodes Display Battery 4. Setup Charge your EndoLight® Put your EndoLight® on Additional adapter Function Overview Turn on Select mode Select intensity and start session Turn off Change the wristband 5. Recommendations for use 6. -
Page 3: General Information
1. General information Your EndoLight® From now on, the EndoLight® is your daily companion, enhancing your well-being on all levels. You can wear it anytime and anywhere: At home, in the office, at the gym, in a café, while traveling or on the go. -
Page 4: Intended Use
(LLLT). It is worn around the left wrist for a duration of 30 min/day. The EndoLight® has 7 laser diodes and one LED diode that are grouped in two light units. They are positioned so that the light hits the main arteries in the wrist (Arteria Ulnaris and Arteria Radialis) for an effect on the entire body. -
Page 5: General
Safe use of the EndoLight® is the primary responsibility of the user. If the EndoLight® appears to be operating incorrectly, please refer to the troubleshooting guide. Contact us if the problem persists. - Page 6 Cleaning and care must not be carried out by children without supervision. The EndoLight® must not be used as a toy. If the device is used by children or in their vicinity, carefully supervise the situation. Children cannot always correctly recognize possible dangers.
-
Page 7: Type Label
To prevent the cable from breaking, roll it up after use instead of folding the cable. Disposal When the EndoLight® has reached the end of life, do not dispose of in general waste, take it to an e-waste recycler. Dispose of the EndoLight® and the battery separately from household waste and in accordance with the applicable environmental laws and regulations. -
Page 8: Guidelines, Regulations And Standards
Emission EN 61000-6-3:2007 + A1:2011 • Immunity EN 61000-6-1:2007 • EN 55032:2015 + A11:2020 FCC CFR 47 part 15 subpart B ICES-003:2016 updated April 2019 The EndoLight® is RoHS 3 compliant and contains no toxic chemicals. Graphic 1: CE Declaration of Conformity... -
Page 9: Your Endolight
If the original wristband is too large for you, you can replace it with the smaller one, which is included with the EndoLight®. Please refer to chapter 4 on further information on how to change the wristband. The buckle that fastens the wristband is made of stainless steel. -
Page 10: Display
Display The EndoLight® features an IPS LCD panel. Battery The EndoLight® is powered by a rechargeable lithium-ion battery. 4. Setup Charge your EndoLight® Fully charge your EndoLight® before first use: •... -
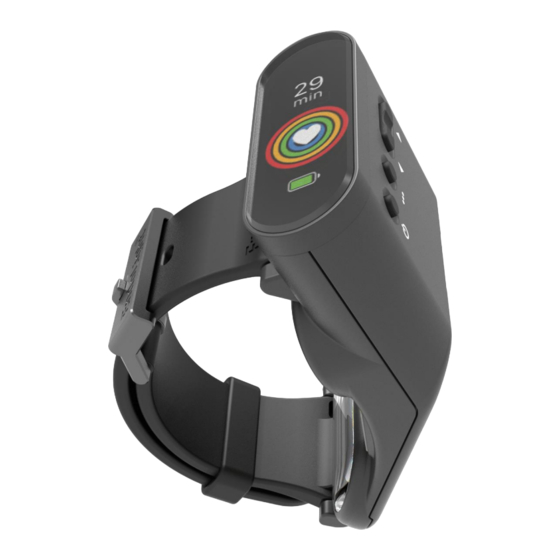
Page 11: Put Your Endolight® On
(chapter 4). Graphic 7: EndoLight® at wrist Make sure the diodes are resting on your skin. The EndoLight® is equipped with a contact sensor and is only activated when contact with skin is made. The EndoLight® must not be too tight so as not to hinder blood circulation (tight, but not constricting). -
Page 12: Function Overview
Turn on Briefly press the On/Off button to turn on. Select mode The EndoLight® has the following three operating modes that you can choose based on your wellness goals: Recharge: Activates the green diode and both red and infrared diodes... -
Page 13: Select Intensity And Start Session
The selection applies to all diodes simultaneously. Individual diodes cannot be selected separately. Turn off After 30 minutes the EndoLight® beeps three times before turning off automatically. Alternatively, you can end the session early by pressing and holding the On/Off button. -
Page 14: Recommendations For Use
6. Storage and cleaning Store your EndoLight® in the provided storage case when not in use to prevent dust and debris getting inside the device. Perspiration can develop during the session. We recommend wiping the surfaces after use with the provided cleaning cloth. -
Page 15: Firmware Update Procedure
8. Firmware update procedure If a firmware update becomes necessary, please follow the steps listed below. Boot Version: 1.00.00.04 Main Version: 1.00.01.04 Firmware Erase: 1. Power off the device. 2. Press and hold down both arrow buttons and On/Off button. 3. -
Page 16: Troubleshooting
If troubleshooting does not solve the problem, please contact customer service. 10 . Warranty and guarantee Warranty We grant you a 24-month warranty. This covers manufacturing defects in your EndoLight® from the date of purchase that were already present at the time of purchase. Guarantee... -
Page 17: Quality System - Serial Number
During the guarantee period defective devices or device parts can be sent to one of our service addresses. Repair or replacement of the EndoLight® is at the discretion of the manufacturer. Before returning a device, please contact us and have your purchase receipt or delivery note ready. -
Page 18: Product Specifications
Tel.: +49 5273 3894506 Email: info@wmedicalsystems.com Website: www.wmedicalsystems.com If you require any help with the setup, use or maintenance of your EndoLight®, or to report unexpected operation or events, please contact the general service address: info@wmedicalsystems.com 13. Product specifications Diode color...
Need help?
Do you have a question about the EndoLight and is the answer not in the manual?
Questions and answers