Table of Contents
Advertisement
Quick Links
Advertisement
Table of Contents

Related Manuals for Indu-Sol PROmesh P10X


Summary of Contents for Indu-Sol PROmesh P10X
- Page 2 Indu-Sol GmbH Blumenstraße 3 D-042626 Schmölln Phone: +49 (0)34491 / 58 18 0 +49 (0)34491 / 5818-99 Fax: Email: info@indu-sol.com Web: https://www.indu-sol.com Our technical support team is available at +49 (0)34491 / 58 18 14, weekdays between 7:30 – 16:30 (CET).
-
Page 3: Revision Overview
No claims can be derived from the specifications, figures, or descriptions in this documentation. Any kind of reproduction, subsequent editing, or translation of this document, as well as excerpts from it, requires the written consent of Indu-Sol GmbH. All rights under copyright law are expressly reserved for Indu-Sol GmbH. -
Page 4: Table Of Contents
Table of Contents Table of Contents Revision Overview Table of Contents General Information Overview of the PROmesh P10X – Function Scope Scope of Supply Safety Notices Connections and Status Indicators on the Device Device Connections Installation and Integration Connection of Power Supply and Error Relay LED Displays Network Integration &... - Page 5 Table of Contents Quality of Service VLAN Bandwidth Control Redundancy RSTP 3.10 System Configuration Device Information IP Configuration Password Time Setting SNMP Access Time Backup Recovery Firmware Update Factory Settings Reboot 3.11 Support Troubleshooting Advice Technical Specifications PROmesh P10X – User Manual...
-
Page 6: General Information
Simple Network Time Protocol (SNTP) Simple Mail Transfer Protocol (SMTP) Web interface access via HTTP/HTTPS Simple Network Management Protocol (SNMP), v1, v2c, v3 Update, save, and backup the system configuration via web interface, TFTP PROmesh P10X – User Manual... -
Page 7: Scope Of Supply
Check that it is in perfect condition externally before commissioning of the device. If any damage is suspected, return the PROmesh P10X to your supplier immediately and do not operate the unit. Our technical support team will be happy to answer any questions you may have. -
Page 8: Connections And Status Indicators On The Device
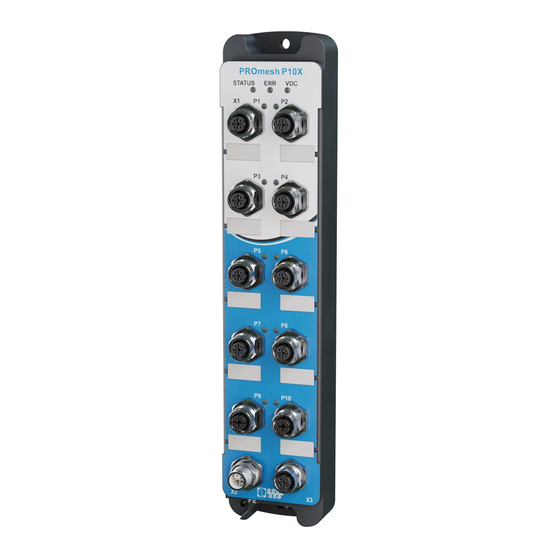
2 Connections and Status Indicators on the Device Device Connections X1 data ports 8x M12 D-coded Power supply and alarm contact FE connection +24V (+24V) 2x M12 X-coded X3 Console port Figure 1: Device connections PROmesh P10X – User Manual... -
Page 9: Installation And Integration
2.2 Installation and Integration The PROmesh P10X is designed for use in the open field (IP67 range). It may be installed by wall mounting. There are recesses for M5 screws at the top and bottom of the housing with which the PROmesh P10X can be attached to a wall. -
Page 10: Connection Of Power Supply And Error Relay
Do not mount the PROmesh P10X switches directly adjacent to any heat-generating devices and protect the switch from direct sunlight to avoid unwanted heating. Protect the PROmesh P10X from any additional heat radiation and observe the permitted storage and operating temperature range. -
Page 11: Led Displays
There are three diagnostic LEDs on the front panel of the switch. Each of the 10 data ports also has a status LED. The LEDs display the most important diagnostic information about the device and connection status of the PROmesh P10X in your PROFINET network (see Table 1). Status Meaning... -
Page 12: Network Integration & Commissioning
Ports 1-8 are equipped with M12 D-coded ports, ports 9-10 with M12 X-coded ports. Media Connection The PROmesh P10X offers the possibility to connect M12 D-coded connectors (medium copper) on ports 1-8 and M12 X-coded connectors (medium copper) on ports 9-10. -
Page 13: Network Topologies & Redundancy
IEC 62439 standard, thereby enabling deterministic reconfiguration of information forwarding in simple redundancy (ring topologies, see figure 7). This enables reconfiguration times of up to 200 ms, depending on the size of your system. PROmesh P10X – User Manual... -
Page 14: Web Application
Gateway: 0.0.0.0 Username: admin Password: admin Make sure to change the factory-set password when logging in for the first time. You are responsible for documenting this password and protecting it from unauthorised access. PROmesh P10X – User Manual... - Page 15 Web Application You can easily set your intended user addresses with the Indu-Sol ServiceTool. This is part of the scope of delivery or can be downloaded for free via the following link: https://www.indu-sol.com/servicetool Our software is updated regularly. Please ensure that you have the latest version.
-
Page 16: System Login
No error: The communication works without any errors. Warning: At least one communication error (discards, error) has occurred on the corresponding port, which has not yet led to a failure. The cause of these events should be located and corrected. PROmesh P10X – User Manual... -
Page 17: Start
It is possible to switch between the display of the peak value (peak) and the effective value (RMS) or this. This information makes interference currents visible at an early stage, which can lead to direct communication disturbances. The top-hat rail must have been grounded properly in order to measure the leakage current correctly. PROmesh P10X – User Manual... - Page 18 Selection in the menu bar allows you to call up the individual pages and make settings there. The displayed menu items are subdivided into further subitems. Message window Port statistics Leakage current Figure 7: Start PROmesh P10X – User Manual...
-
Page 19: System Information
3.6 Diagnosis The diagnosis page provides an overview of the status of configured alarm triggers (alarm trigger configured or not) for the individual diagnostic data acquired by the PROmesh P10X. The status for topology determination and port mirroring is also displayed. - Page 20 It is not recommended to set the threshold below 30%. The alarms menu can be used to define alarms for the line quality value, which send messages via relay, SNMP, PROFINET, or email when a threshold value is undershot. PROmesh P10X – User Manual...
-
Page 21: Leakage Current
In the main overview of the network statistics, the following information is provided for each port: Received data packets Data packets sent Mains load per second Mains load per millisecond Errors (destroyed telegrams) PROmesh P10X – User Manual... - Page 22 The line Packets up to bytes gives information about the number of packets in different sizes. This records the number of packets received up to 63, 127, 255, 511, 1023, or 1518 bytes in size. PROmesh P10X – User Manual...
-
Page 23: Neighbourhood Detection
Port mirroring is a method of simultaneously directing traffic from one port (source) to a second port (destination) in networks for inspection. This means that the received and sent packets of the source port are duplicated to the monitoring port. PROmesh P10X – User Manual... -
Page 24: Alarms/Messages
Email addresses PROFINET If one of the alarms set up is detected and triggered, the software will forward the event to the corresponding alarm receiver and document the event as a log message. PROmesh P10X – User Manual... - Page 25 The associated recipients can be selected in the lower part of the pop-up and linked to the alarm trigger in this way when the alarms are set up and edited, provided that the alarm recipients have already been defined. PROmesh P10X – User Manual...
-
Page 26: Messages
“File” from media type, and save the settings using the Apply button. Check if the server is reachable and saves the messages in a file. PROmesh P10X – User Manual... -
Page 27: Profinet
Clicking the edit button takes you directly to the various pages to make further settings there. Port Configuration The table provides an overview of the current configuration of the individual ports. The columns Enabled, Autonegotiation, Flow Control, and Designation can also be edited. PROmesh P10X – User Manual... - Page 28 Designation: You can give the ports names in this column. The names are displayed throughout the configuration and facilitate the selection of the correct settings as well as diagnosis in the event of an error. Click the port name to edit the name in the line. PROmesh P10X – User Manual...
-
Page 29: Quality Of Service
Voice over IP (VoIP), or audio data over normal data transfer, for example. Adjust the settings to your requirements. QoS mode: Port-based only: Priorities are based only on the priority of the ports. PROmesh P10X – User Manual... -
Page 30: Vlan
A virtual LAN (VLAN) is a logical group of network nodes. It allows the isolation of a network part. Any traffic from network members of a VLAN group is transferred only within the VLAN group. Figure 15: VLAN PROmesh P10X – User Manual... - Page 31 Tagged: All output data packets of this port are tagged with a VLAN tag of the associated ID. Multiple VLAN IDs can be sent via this port Port name: This displays the port name assigned in the port configuration menu. PROmesh P10X – User Manual...
-
Page 32: Bandwidth Control
VLANs except that the default VLAN cannot be deleted. This situation differs in the management VLAN. The PROmesh P10X can only be accessed via the management VLAN. At least one port must be stored in the management VLAN for this reason. Otherwise, the switch is no longer accessible. -
Page 33: Redundancy
In the event of an error, communication can take place via the previously deactivated path after a very short recovery time. PROmesh P10X – User Manual... -
Page 34: Rstp
Configure the protocol for your application: Forward delay: The time a port waits before switching from the RSTP learning and listening state to the forwarding state. Enter a value between 4 and 30 seconds. PROmesh P10X – User Manual... - Page 35 “Forward Delay Time” and use the formula 2 * (Forward Delay Time – 1) of the above rule to calculate the upper limit of the Maximum Age. Then select a Maximum Age between 6 and 40 seconds, which lies between the previously calculated limits. PROmesh P10X – User Manual...
- Page 36 The designated costs are calculated by the RSTP and displayed here. Edge port: Specifies a port directly connected to an end device and not to another bridge (a switch). These ports cannot cause loops and therefore immediately switch to Forwarding mode. PROmesh P10X – User Manual...
-
Page 37: System Configuration
This page is to provide a concise view of the system configuration menu to help you understand how the unit works and where action is needed. You can switch directly to the corresponding protocols and functions in order to make the other settings there with the respective edit button. PROmesh P10X – User Manual... -
Page 38: Device Information
The IP configuration can be performed either by the PROFINET controller, automatically using the Dynamic Host Configuration Protocol (DHCP) or manually. When the address is assigned automatically, the IP may change after a device restart, depending on the settings of the DHCP server. PROmesh P10X – User Manual... -
Page 39: Password
Apply button. The device can no longer be reached via the default IP because now has a new IP address. Please contact your network administrator or use an appropriate tool (Indu-Sol ServiceTool) to obtain the new IP address. Manual If your network does not have a DHCP server or you want to make the settings manually, deactivate the “automatic (DHCP)”... -
Page 40: Time Setting
SNTP server IP address (redundant): Furthermore, a redundant time server can be stored optionally. Update interval: Set here the update interval with which the internal time of the device is updated. Time zone: Select your valid time zone. PROmesh P10X – User Manual... - Page 41 The device time cannot be entered manually if you cannot use an NTP server. Select the calendar button and choose the desired date for this. Figure 21: Manual time settings Notice: A device time assigned manually will be reset every time the device restarts. PROmesh P10X – User Manual...
-
Page 42: Snmp
You can set a time between 3 and 30 minutes. The default setting is 10 minutes. Save your settings with the “Apply” button. Backup This menu item allows you to back the current configuration of the device up in a file. The backup can be saved as a download. PROmesh P10X – User Manual... -
Page 43: Recovery
Firmware Update Here you can update the firmware of the device. Please only use firmware versions that you have received from Indu-Sol and that have been developed for the PROmesh switches. Figure 22: Firmware update The firmware file is either provided by a TFTP server or uploaded to the device. Before updating, check that you have selected the correct firmware image. -
Page 44: Factory Settings
Click the “Reset to default” button for this and confirm it in the window that opens. Notice: The device must then be rebooted. Reboot A reboot of the switch can be performed here. Pressing the reboot button will exit the switch software and reboot the device. PROmesh P10X – User Manual... -
Page 45: Support
The support section contains relevant contact information in case of any uncertainties regarding the product. Manufacturer Please contact the device manufacturer Indu-Sol if you have serious problems with the configuration of the switch or if questions arise that are not answered in the data sheet or in the operating instructions. License information The linked license.txt file contains information regarding the “Open-Source Software”... -
Page 46: Troubleshooting Advice
If in doubt, disconnect redundant network structures and reset the PROmesh P10X switch to factory defaults. Make your settings again bit by bit and observe where the error occurs if the communication works afterwards. PROmesh P10X – User Manual... -
Page 47: Technical Specifications
Port mirror RX packets only or TX and RX packets Firmware update TFTP server, from local PC Bandwidth contr. Incoming and outgoing DHCP client function to obtain an IP address from the DHCP DHCP client server PROmesh P10X – User Manual...
Need help?
Do you have a question about the PROmesh P10X and is the answer not in the manual?
Questions and answers