Table of Contents
Advertisement
Quick Links
DISCLAIMER OF WARRANTIES:
THERE ARE NO WARRANTIES WHICH EXTEND BEYOND THE
DESCRIPTION ON THE FACE OF THE MANUFACTURER LIMITED
WARRANTY. THE MANUFACTURER EXPRESSLY EXCLUDES ALL
OTHER WARRANTIES, EXPRESS OR IMPLIED, REGARDING ITS
PRODUCTS; INCLUDING ANY IMPLIED WARRANTIES OF
MERCHANTABILITY, FITNESS FOR A PARTICULAR PURPOSE OR
NONINFRINGEMENT. THIS DISCLAIMER OF WARRANTIES SHALL
APPLY TO THE EXTENT ALLOWED UNDER LOCAL LAWS IN THE
COUNTRY PURCHASED IN WHICH LOCAL LAWS DO NOT ALLOW OR
LIMIT THE EXCLUSION OF THE IMPLIED WARRANTIES.
ii
Advertisement
Table of Contents

Related Manuals for EPOX ProNiX EP-9NPAJ


Summary of Contents for EPOX ProNiX EP-9NPAJ
- Page 1 DISCLAIMER OF WARRANTIES: THERE ARE NO WARRANTIES WHICH EXTEND BEYOND THE DESCRIPTION ON THE FACE OF THE MANUFACTURER LIMITED WARRANTY. THE MANUFACTURER EXPRESSLY EXCLUDES ALL OTHER WARRANTIES, EXPRESS OR IMPLIED, REGARDING ITS PRODUCTS; INCLUDING ANY IMPLIED WARRANTIES OF MERCHANTABILITY, FITNESS FOR A PARTICULAR PURPOSE OR NONINFRINGEMENT.
- Page 2 80 Port Frequently Asked Questions Below is a list of some basic POST Codes, possible problems and solutions. For more detailed information about POST Codes, refer to Appendix C in this manual. P O ST C O D E P r o bl e m So l uti o n FFh o r CFh 1 .B IO S c hip inse rte d...
-
Page 3: Table Of Contents
Table of Contents Page Section 1 Introduction Package Contents ............1- 1 Mainboard Features ........... 1- 2 System Block Diagram ..........1- 6 Section 2 Specification Mainboard Specification ..........2- 1 Section 3 Installatio Mainboard Layout ............. 3- 1 Easy Installation Procedure ........3- 2 CPU Insertion ............. - Page 4 PNP/PCI Configuration ..........4- 13 PC Health Status ............4- 15 Power BIOS Features ..........4- 17 Defaults Menu ............4- 19 Supervisor/User Password Setting ......4- 20 Exit Selecting .............. 4- 21 Section 5 RAID Configuration Introduction ............... 5- 1 NVidia RAID Features ..........
- Page 5 Page Left Blank...
-
Page 6: Introduction
Introduction Section 1 INTRODUCTION 1-1 Package Contents Powerpack items (Optional) Contents H. Mini heatsink A. Mainboard I. Tool Pen B. User’s manual C. Floppy drive cable Optional Items D. HDD drive cable J. Game & COM bracket cable K. IEEE 1394 two ports cable E. -
Page 7: Mainboard Features
Introduction 1-2 Mainboard Features Brief Introduction Socket 939 Socket 939-based motherboards are designed to provide performance enhance- ments for AMD Athlon 64/ Athlon 64 FX processor-based systems, and it also expected to be the next-generation of platform innovations. For more information about all the new features Athlon Processor deliver, check out the AMD website at http://www.amd.com Chipset... - Page 8 Introduction Serial ATA II (Optional) The second generation SATA interface with double the transferring speed up to 300MB/sec. It supports NCQ to provide faster reading speed for your storage devices. Hot-plug has also become its standard function to plug/unplug whenever you want. Serial ATA Support Serial ATA, an evolutionary replacement for Parallel ATA IDE storage interface.
- Page 9 Introduction NV Firewall An unprecedented addition design for nForce product, provide high performance & enhanced reliability of PC security solution to the users. The features would be more advanced than many stand-alone firewalls can provide! Page 1-4...
- Page 10 Introduction Special Features BIOS Features: & Magic Health Reports your system hardware status for every boot-up to help detect faults early. Monitor hardware status including CPU temperature, CPU/Memory/ Chipset voltage, fan RPM speed for chassis fan, CPU fan & Power supply fan. &...
-
Page 11: System Block Diagram
Introduction 1-3 System Block Diagram Page 1-6... -
Page 12: Specification
Specification Section 2 SPECIFICATION Mainboard Specification Processor Š Support Socket-939 based AMD Athlon-64/ Athlon-64 FX up to 4000+ with 2.0GTs Hyper Transport Chipset Š nVidia nForce4 Ultra or nForce4 Chipset Main Memory Š Four 184-pin DDR SDRAM DIMM sockets Š Support single-sided or double-sided 2.5v DDR-266/333/ 400 DIMMs with dual channel architecture in 128/256/512Mb technologies Š... - Page 13 Specification S-ATA RAID Š S-ATA II ---> Four S-ATA ports with up to 300MBps bandwidth from nForce4 Ultra with RAID 0, 1, 0+1, JBOD support, or Š S-ATA ---> Four S-ATA ports with up to 150MBps bandwidth from nForce4 with RAID 0, 1, 0+1, JBOD support Š...
- Page 14 Specification BIOS Š Flash EEPROM with Award Plug&Play BIOS Š Support ACPI S3 (Suspend To RAM) mode in ACPI compliant O/S Š Support EZ Boot for fast bootable device selection Š Support Magic Health for system hardware status report during system boot-up Peripheral Interfaces ) ) ) ) )
- Page 15 Specification Front Panel Controller Š Supports Reset & Soft-Off switches Š Supports HDD & Power LEDs Š Supports PC speaker Š Supports Front Panel Audio connector Special Features Š Support KBPO function – Keyboard power on, turn on the computer from keyboard Š...
-
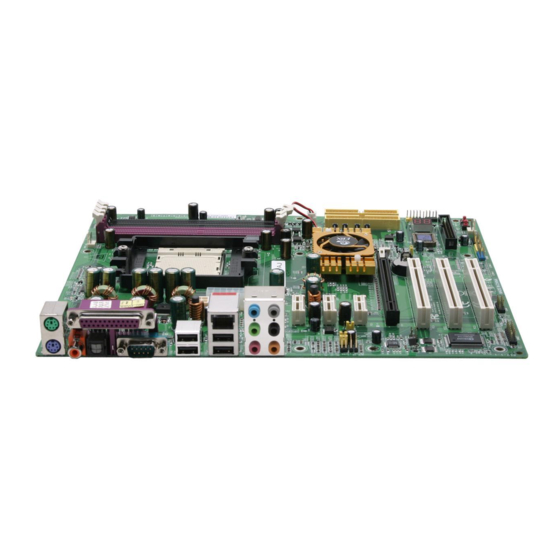
Page 16: Installation
Installation Section 3 INSTALLATION Mainboard Layout Note: Depending on the model you purchased, some components are optional and may not be available. Page 3-1... -
Page 17: Easy Installation Procedure
Installation Easy Installation Procedure The following must be completed before powering on your new system: 3-1. CPU Installation 3-2. Jumper Settings 3-3. System Memory 3-4. Expansion Slots 3-5. Device Connectors 3-1 CPU Installation <Figure 2> <Figure 1> Step 1 Step 2 Open the socket by raising the actuation Align pin 1 on the CPU with pin 1 on lever. - Page 18 Installation <Figure 3> <Figure 4> Step 3 Step 4 Close the socket by lowering and Insert the heatsink as shown above. locking the actuation lever. Press the clips in the direction of the arrows shown in Figure 4 to secure the Apply thermal compound to the top of assembly to the CPU socket.
- Page 19 User’ User’ s s s s s User’ User’ User’ Manual Manual Manual Manual Manual nVIDIA nVIDIA nForce nVIDIA nForce nForce nForce4 4 4 4 4 Ultra / Ultra / Ultra / Ultra / nVIDIA nVIDIA nVIDIA nForce nVIDIA nForce nForce nForce4 4 4 4 4 nVIDIA...
Need help?
Do you have a question about the ProNiX EP-9NPAJ and is the answer not in the manual?
Questions and answers