
Related Manuals for Franke FDW 614 D6P DOS E


Summary of Contents for Franke FDW 614 D6P DOS E
- Page 1 FDW 614 D6P DOS E User manual Dishwasher Manuel d‘utilisation Lave-vaisselle Istruzioni per l‘uso Lavastoviglie Kullanım kılavuzu Bulaşık makinesi...
- Page 2 LANGUAGES USER MANUAL ..................................3 MANUEL D‘UTILISATION ..............................14 ISTRUZIONI PER L‘USO ................................. 25 KULLANIM KILAVUZU ................................36 47 ......................................
-
Page 3: Table Of Contents
TABLE OF CONTENTS OVERVIEW ........................................4 FIRST TIME USE .......................................5 PROGRAMS TABLE ....................................6 OPTIONS AND FUNCTIONS ................................7 LOADING THE RACKS ...................................8 DAILY USE .........................................9 ADVICE AND TIPS ....................................9 CARE AND MAINTENANCE ................................10 INSTALLATION ...................................... 11 TROUBLESHOOTING ..................................12 SUPPORT........................................ 13... -
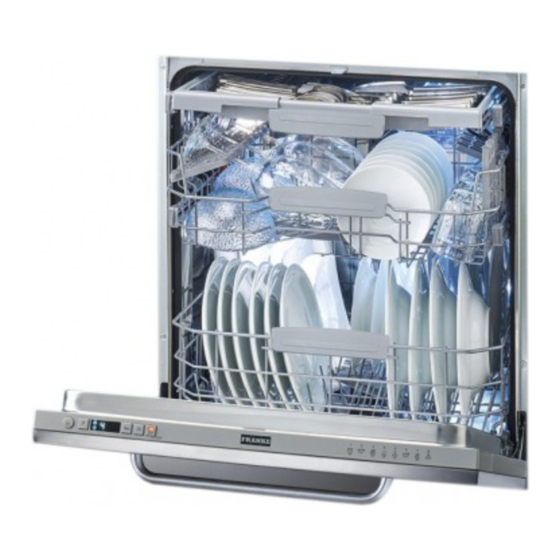
Page 4: Overview
USER GUIDE Before using the appliance carefully read Safety Instructions guide. OVERVIEW 1. Upper rack 2. Foldable flaps 3. Upper rack height adjuster 4. Upper spray arm 5. Lower rack 6. Cutlery basket 7. Lower spray arm 8. Filter Assembly 9. -
Page 5: First Time Use
FIRST TIME USE SALT, RINSE AID AND DETERGENT After installation, remove the stoppers from the racks and the retaining elastic elements from the upper rack. FILLING THE SALT RESERVOIR The use of salt prevents the formation of LIMESCALE on the dishes The factory sets the default value for the water hardness and on the machine’s functional components. -
Page 6: Programs Table
PROGRAMS TABLE Duration of wash Water Energy Available Program program consumption consumption options *) 1. Eco 50° 2:45 12.0 0.95 2. Intensive 65° 2:30 15.0 1.50 3. Mixed 55° 2:00 15.0 1.35 4. Rapid 30’ 50° 0:30 0.50 5. Sanitizing 65°... -
Page 7: Options And Functions
OPTIONS AND FUNCTIONS OPTIONS can be selected directly by pressing the corresponding button (see CONTROL PANEL). If an option is not compatible with the selected program see PROGRAMS TABLE, the corresponding LED flashes rapidly 3 times and beeps will sound. The option will not be enabled. HALF LOAD TABLET (Tab) If there are not many dishes to be washed, a half load cycle... -
Page 8: Loading The Racks
LOADING THE RACKS UPPER RACK Load delicate and light dishes: FOLDABLE FLAPS WITH ADJUSTABLE POSITION glasses, cups, saucers, low salad The side foldable flaps can be fold or unfold to optimize bowls. the arrangement of crockery inside the rack. Wine glasses can be placed safely in the foldable flaps by inserting the stem of each glass into the corresponding slots. -
Page 9: Daily Use
DAILY USE 1. CHECK WATER CONNECTION The machine will switch off automatically during certain extended Check that the dishwasher is connected to the water supply periods of inactivity, in order to minimise electricity consumption. and that the tap is open. If the crockery is only lightly soiled or if it has been rinsed with water before being placed in the dishwasher, reduce the amount 2. -
Page 10: Care And Maintenance
CLEANING AND MAINTENANCE Always unplug the appliance when cleaning it and when performing maintenance work. Do not use flammable liquids to clean the machine. CLEANING THE DISHWASHER CHEKING THE WATER SUPPLY HOSE Any marks on the inside of the appliance may be removed Check the inlet hose regularly for brittleness and cracks. -
Page 11: Installation
WATER SOFTENING SYSTEM Water softener automatically reduces water hardness, consequently Regeneration process starts in final rinse and finishes in drying phase, preventing scale buildup on heater, contributing also to better cleaning before cycle ends. efficiency. • Single regeneration consumes: ~3.5L of water; This system regenerates itself with salt, therefore it is required •... -
Page 12: Troubleshooting
TROUBLESHOOTING In case your dishwasher doesn’t work properly, check if the problem can be solved by going through the following list. For other errors or issues please contact authorized After-sales Service which contact details can be found in the warranty booklet. The manufacturer ensures the availability of spare parts for at least 10 years after production date of this appliance. -
Page 13: Support
SUPPORT In the event of any operation problems, contact a Franke Technical Service Centre. Never use the services of unauthorized technicians. Specify: – the type of fault – the appliance model (art./Code) – the serial number (S.N.) on the rating plate. - Page 14 SOMMAIRE APERÇU ........................................15 PREMIÈRE UTILISATION ..................................16 TABLEAU DES PROGRAMMES ................................. 17 OPTIONS ET FONCTIONS ................................. 18 CHARGEMENT DES PANIERS ................................19 UTILISATION QUOTIDIENNE ................................20 AVIS ET CONSEILS ....................................20 NETTOYAGE ET MAINTENANCE ..............................21 INSTALLATION ...................................... 22 DÉPANNAGE ......................................
-
Page 15: Aperçu
MODE D’EMPLOI Avant d’utiliser l’appareil, lisez attentivement les Consignes de sécurité. APERÇU 1. Panier supérieur 2. Volets pliables 3. Bouton de réglage de la hauteur du panier supérieur 4. Bras d’aspersion supérieur 5. Panier inférieur 6. Panier à couvert 7. Bras d’aspersion inférieur 8. -
Page 16: Première Utilisation
PREMIÈRE UTILISATION SEL, LIQUIDE DE RINÇAGE, ET DÉTERGENT Après l’installation, enlevez les boulons d’arrêt sur les paniers et les éléments élastiques qui retiennent le panier supérieur. REMPLIR LE RÉSERVOIR DE SEL L’utilisation de sel empêche la formation de CALCAIRE sur la vaisselle L’usine règle la valeur par défaut de la dureté... -
Page 17: Tableau Des Programmes
TABLEAU DES PROGRAMMES Consomma- Durée du pro- Consomma- tion gramme de la- tion d’eau Programme Options disponibles vage d’énergie (l/cycle) (h:min) (kWh/cycle) 1. Éco 50° 2:45 12,0 0,95 2. Intensif 65° 2:30 15,0 1,50 3. Mixte 55° 2:00 15,0 1,35 4. -
Page 18: Options Et Fonctions
OPTIONS ET FONCTIONS Les OPTIONS peuvent être sélectionnées directement en appuyant sur la touche correspondante (voir PANNEAU DE COMMANDE). Si une option n’est pas compatible avec le programme sélectionné (voir TABLEAU DES PROGRAMMES), le voyant correspondant clignote 3 fois et un bip se fait entendre. La fonction n’est pas activée. DEMI-CHARGE PASTILLE S’il n’y a pas beaucoup de vaisselle à... -
Page 19: Chargement Des Paniers
CHARGEMENT DES PANIERS PANIER SUPÉRIEUR Chargez la vaisselle délicate VOLETS PLIABLES AVEC POSITIONS AJUSTABLES et légère: verres, tasses, Les volets pliables latéraux peuvent soucoupes, saladiers bas. être pliés ou dépliés afin d’optimiser la disposition de la vaisselle à l’intérieur du rack. Les verres de vin peuvent être placés de façon sécuritaire dans les volets pliables en insérant le pied... -
Page 20: Utilisation Quotidienne
UTILISATION QUOTIDIENNE 1. VÉRIFIER LE BRANCHEMENT DE L’EAU L’appareil s’éteint automatiquement durant des périodes Assurez-vous que l’appareil est raccordé à un réseau d’alimentation d’inactivité prolongées pour réduire la consommation d’énergie. et que le robinet de l’eau est ouvert. Si la vaisselle est légèrement sale ou si elle a été rincée avec à l’eau avant d’être placée dans le lave-vaisselle, réduisez la quantité... -
Page 21: Nettoyage Et Maintenance
NETTOYAGE ET MAINTENANCE Toujours débrancher l’appareil pour le nettoyer et effectuer de l’entretien. N’utilisez pas de liquides inflammables pour nettoyer l’appareil. NETTOYER LE LAVE-VAISSELLE VÉRIFIER LE TUYAU D’ALIMENTATION D’EAU Les marques sur les côtés de l’appareil peuvent Vérifiez régulièrement le tuyau d’arrivée pour déceler de la friabilité être enlevées en utilisant un linge humide, de l’eau, et des fissures. -
Page 22: Installation
SYSTÈME ADOUCISSEUR D’EAU L’adoucisseur d’eau réduit automatiquement la dureté de l’eau, un niveau de dureté de l’eau réglé à 3. en empêchant ainsi la formation de calcaire sur la résistance, Le processus de régénération débute lors du rinçage final et se ter- et en contribuant également à... -
Page 23: Dépannage
DÉPANNAGE Si votre lave-vaisselle ne fonctionne pas correctement, vérifiez si le problème peut être résolu en suivant la liste ci-après. Pour d’autres erreurs ou problèmes, contactez le Service après-vente agréé dont les coordonnées peuvent être trouvées dans le livret de garantie. Le fabricant assure la disponibilité... -
Page 24: Assistance
ASSISTANCE En cas de problèmes de fonctionnement, contacter un Centre de maintenance technique Franke. Ne faites jamais appel aux services de techniciens non-agréés. Communiquez: – le type de panne – le modèle d'appareil (art./Code) – le numéro de série (S.N.) Lorsque vous communiquez avec le Service Après-vente, vous devez donner les codes affichés sur la plaque... - Page 25 SOMMARIO DESCRIZIONE GENERALE ................................26 PRIMO UTILIZZO ....................................27 TABELLA DEI PROGRAMMI ................................28 OPZIONI E FUNZIONI ..................................29 CARICAMENTO DEI CESTELLI ................................. 30 USO QUOTIDIANO ....................................31 AVVISI E CONSIGLI ....................................31 PULIZIA E MANUTENZIONE ................................32 INSTALLAZIONE ....................................33 RISOLUZIONE DEI PROBLEMI................................
-
Page 26: Descrizione Generale
GUIDA UTENTE Prima di utilizzare l’apparecchio, leggere attentamente le Istruzioni per la sicurezza. DESCRIZIONE GENERALE 1. Cestello superiore 2. Sponde ribaltabili 3. Regolatore altezza cestello superiore 4. Braccio aspersore superiore 5. Cestello inferiore 6. Cestello portaposate 7. Braccio aspersore inferiore 8. -
Page 27: Primo Utilizzo
PRIMO UTILIZZO SALE, BRILLANTANTE E DETERSIVO Dopo aver completato l’installazione, togliere i fermi dai cestelli e gli elementi elastici di ritegno dal cestello superiore. RIFORNIMENTO DEL SERBATOIO DEL SALE L’uso di sale previene la formazione di CALCARE sulla superficie dei Il valore predefinito per la durezza dell’acqua viene impostato in fabbrica. -
Page 28: Tabella Dei Programmi
TABELLA DEI PROGRAMMI Durata Consumo Consumo Opzioni programma Programma d'acqua energetico disponibili di lavaggio (litri/ciclo) (kWh/ciclo) (h:min) 1. Eco 50° 2:45 12,0 0,95 2. Intensivo 65° 2:30 15,0 1,50 3. Misto 55° 2:00 15,0 1,35 4. Rapido 30’ 50° 0:30 0,50 5. -
Page 29: Opzioni E Funzioni
OPZIONI E FUNZIONI È possibile selezionare le varie OPZIONI premendo direttamente il tasto corrispondente (vedi PANNELLO COMANDI). In caso di opzione non compatibile con il programma selezionato (vedere la TABELLA DEI PROGRAMMI), il LED corrispondente lampeggia 3 volte in rapida successione ed emette i previsti segnali acustici. -
Page 30: Caricamento Dei Cestelli
CARICAMENTO DEI CESTELLI CESTELLO SUPERIORE Riporvi i piatti poco resistenti e le REGOLAZIONE IN ALTEZZA DEL CESTELLO SUPERIORE stoviglie delicate: vetri, tazze, piattini, È possibile regolare del cestello superiore nel senso dell’altezza: insalatiere dai bordi bassi la posizione rialzata consente di sfruttare al massimo il cestello inferiore per riporvi le stoviglie di dimensioni ingombranti, mentre la posizione ribassata consente di utilizzare le sponde ribaltabili creando lo spazio che esse... -
Page 31: Uso Quotidiano
USO QUOTIDIANO 1. VERIFICA DEL COLLEGAMENTO ALLA RETE IDRICA La macchina si disattiva automaticamente nel corso di determinati periodi di inattività prolungata, al fine di ridurre al minimo Verificare che la lavastoviglie sia collegata alla rete idrica e che il consumo di elettricità. il rubinetto dell’acqua sia aperto. -
Page 32: Pulizia E Manutenzione
PULIZIA E MANUTENZIONE Prima di eseguire gli interventi di manutenzione, scollegare sempre l’apparecchio dall’alimentazione elettrica. Non utilizzare liquidi infiammabili per la pulizia dell’apparecchio. PULIZIA DELLA LAVASTOVIGLIE CONTROLLO DEL TUBO DI ALIMENTAZIONE IDRICA È possibile eliminare qualsiasi segno all’interno Controllare periodicamente l’integrità del tubo di carico. Se fosse dell’apparecchio con l’ausilio di un panno inumidito danneggiato, sostituirlo con un tubo nuovo reperibile presso il Servizio con acqua e aceto. -
Page 33: Installazione
SISTEMA DI ADDOLCIMENTO DELL’ACQUA L’addolcitore riduce automaticamente la durezza dell’acqua, impeden- Il processo di rigenerazione inizia durante il risciacquo finale e termina do la formazione di calcare sulla serpentina e contribuendo a migliora- nella fase di asciugatura, prima del termine del ciclo. re l’efficienza di lavaggio. -
Page 34: Risoluzione Dei Problemi
RISOLUZIONE DEI PROBLEMI Se la lavastoviglie non funziona correttamente, provare a risolvere il problema consultando l’elenco sotto riportato. Per errori o problemi di altro tipo, contattare un Servizio Assistenza Tecnica autorizzato; i dati di contatto sono riportati nel libretto di garanzia. Il produttore garantisce la disponibilità... -
Page 35: Assistenza
ASSISTENZA In caso di problemi operativi, contattare un Centro Assistenza Tecnica Franke. Non rivolgersi a tecnici non autorizzati. Comunicare: – il tipo di difetto – il modello di apparecchio (codice art.) – il numero di serie (S.N. sulla targhetta matricola),... - Page 36 İÇINDEKILER GENEL BAKIŞ ....................................... 37 İLK KULLANIM ...................................... 38 PROGRAMLAR TABLOSU .................................. 39 SEÇENEKLER VE İŞLEVLER ................................40 RAFLARI DOLDURMA ..................................41 GÜNLÜK KULLANIM ................................... 42 ÖNERİ VE İPUÇLARI .................................... 42 BAKIM VE TEMIZLIK .................................... 43 KURULUM ......................................44 SORUN GİDERME ....................................45 DESTEK ........................................
-
Page 37: Genel Bakiş
KULLANIM KILAVUZU Cihazı kullanmadan önce, Güvenlik Talimatlarını dikkatli şekilde okuyunuz. GENEL BAKIŞ 1. Üst raf 2. Katlanır kanatlar 3. Üst raf yükseklik ayarlayıcısı 4. Üst püskürtme kolu 5. Alt raf 6. Çatal-bıçak sepeti 7. Alt püskürtme kolu 8. Filtre Donanımı 9. -
Page 38: İlk Kullanim
İLK KULLANIM TUZ, PARLATICI VE DETERJAN Montajdan sonra, raflardan durdurucuları ve üst raftan tutucu elastik elemanları çıkarın. TUZ HAZNESİNİN DOLDURULMASI Tuz kullanılması, bulaşıklarda ve makinenin işlevsel bileşenlerinde • P düğmesini bip sesi duyana kadar 5 saniye basılı tutun. KİREÇ kalıntıları meydana gelmesini önler. •... -
Page 39: Programlar Tablosu
PROGRAMLAR TABLOSU Enerji üketimi Program (kWh/çevrim) (saat:dk) 1. Eko 50° 2:45 12,0 0,95 2. Yoğun 65° 2:30 15,0 1,50 3. Karışık 55° 2:00 15,0 1,35 4. Hızlı 30’ 50° 0:30 0,50 5. Sterilizasyon 65° 1:40 11,5 1,30 6. Ön Yıkama 0:10 0,01 EKO program verileri, Avrupa Standardı... -
Page 40: Seçenekler Ve İşlevler
SEÇENEKLER VE İŞLEVLER SEÇENEKLER, doğrudan ilgili düğmeye basılarak seçilebilir (bkz. KONTROL PANELİ). Bir seçeneğin seçilen programla uyumlu olmaması durumunda (bkz. PROGRAMLAR TABLOSU), ilgili LED hızlı bir şekilde 3 kez yanıp söner ve bip sesi duyulur. Seçenek etkinleştirilmez. YARIM YÜK TABLET (Tab) Yıkanması... -
Page 41: Raflari Doldurma
RAFLARI DOLDURMA ÜST RAF Hassas ve hafif tabakları AYARLANABİLİR KONUMLU KATLANIR KANATLAR yerleştirin: bardak, kupa, fincan Raftaki mutfak malzemelerinin tabağı, alçak salata kaseleri. ideal şekilde düzenlenebilmesi için yan katlanabilir kanatlar katlanmış ya da açık konuma getirilebilir. Şarap kadehleri, her bir kadehin sap kısmı... -
Page 42: Günlük Kullanim
GÜNLÜK KULLANIM 1. SU BAĞLANTISINI KONTROL EDİN Makine, elektrik tüketimini en aza indirmek için, uzun süre atıl durumda kaldığında otomatik olarak kapanacaktır. Bulaşık makinesinin su şebekesine bağlı olduğunu ve musluğun Bulaşıklar az kirli veya bulaşık makinesine yerleştirilmeden önce sudan açık olduğunu kontrol edin. geçirilmiş... -
Page 43: Bakim Ve Temizlik
BAKIM VE TEMIZLIK Cihazınızı temizlerken ve bakım işlemleri gerçekleştirirken daima fişini çekin. Makineyi temizlemek için yanıcı sıvılar kullanmayın. BULAŞIK MAKINESININ TEMIZLENMESI SU BESLEME HORTUMUNUN KONTROLÜ Cihazın iç kısmında oluşan izler, su ve az miktarda sirke ile Giriş hortumunu kırılgan ve çatlak olup olmadığına dair düzenli olarak nemlendirilmiş... -
Page 44: Kurulum
SU YUMUŞATMA SİSTEMİ Su yumuşatıcısı, suyun sertliğini otomatik olarak azaltarak, sonuçta Yenileme işlemi, son durulamada başlar ve kurutma aşamasında, çevrim ısıtıcıda kireç birikmesini önler ve daha iyi bir temizleme verimliliğine sona ermeden önce biter. de katkıda bulunur. • Tek bir yenileme işleminde tüketim: ~3,5 L su; Bu sistem kendini tuzla yeniler, dolayısıyla tuz haznesi boşaldığında •... -
Page 45: Sorun Gi̇derme
SORUN GİDERME Bulaşık makinenizin düzgün çalışmaması durumunda, aşağıdaki listenin üzerinden geçerek sorunun çözülüp çözülemeyeceğini kontrol edin. Diğer hatalar ya da sorunlar için, iletişim ayrıntılarına garanti kitapçığından ulaşabileceğiniz yetkili Satış sonrası Servisle iletişime geçiniz. Üretici, bu cihazın üretim tarihinden itibaren en az 10 yıl yedek parça kullanılabilirliğini sağlar. SORUNLAR OLASI NEDENLER ÇÖZÜMLER... -
Page 46: Destek
DESTEK Herhangi bir işletim sorunu söz konusu olursa, bir Franke Teknik Servis Merkeziyle iletişime geçin. Kesinlikle yetkisiz teknisyenlerden servis hizmeti almayın. Vermeniz gereken bilgiler: – arızanın türü; – ürün modeli (Art./Cod.); – seri numarası (S.N.). Bu bilgi garanti belgesindeki bilgi levhasında verilmiştir. - Page 47 .FRANKE (S.N Built-in dishwasher / FDW XXX XXX XXX XXXXXXXXXXXX xxxxxxxxxxxx xxxxxxxxxxxx I.C. FDW XXX XXX XXX [BAR-CODE AREA] XXXXXXXXXXXX FXXXXXX RMMDDXXXX XXXXXXXXXXXX Made in Poland / XXX.XXXX.XXX Energy efficiency class for RF A Safety class I [CERTIFICATION AREA] XXX-XXX V ~XX Hz X,XX ÷ X MPa...
- Page 48 .(77 .(77 12 9...
- Page 49 • • 0.005 • ............... . . “...
- Page 50 ............
- Page 51 ................
- Page 52 • •...
- Page 53 ................
- Page 54 0,95 12,0 2:45 1,50 15,0 2:30 1,35 15,0 2:00 0,50 0:30 1,30 11,5 1:40 0,01 0:10 .EN 60436:2020 ‘30...
- Page 55 • • • • • Clark° fH° dH° 7 - 0 10 - 0 6 - 0 14 - 8 20 - 11 11 - 7 20 - 15 29 - 21 16 - 12 42 - 21 60 - 30 34 - 17 62 - 43 90 - 61...
- Page 56 Service: 0000 000 00000 6 7 8...
- Page 57 ................................................................................................................................................................................................................................................................................................................................
- Page 60 400011513352 0 /2021 s EN - FR - IT - TR - AR...
Need help?
Do you have a question about the FDW 614 D6P DOS E and is the answer not in the manual?
Questions and answers