Advertisement
B
B
A
A
1. Confirm all parts/hardware are included
2. A) Measure the width 'X' of the wall. B) Attach the L-Brackets to the support channels located on the underside of the Shelf at
distance 'X' using the Self-Tapping Screws provided. Note: The bolts located on the underside of the double Shelf must be
loosened before attaching the L-Brackets. This will require a 3/4" wrench or socket. Do NOT remove the bolts. Once
the L-Brackets have been attached, retighten bolts.
A)
X
B
W
A
L
L
3. Place pass-thru shelf on the wall. Assistance will be needed. Attach pass-thru shelf to the wall using the Wall Screws provided.
A
2
2
ASSEMBLY INSTRUCTIONS
ASSEMBLY INSTRUCTIONS
PASS THROUGH SHELVES - 18" W
PASS THROUGH SHELVES - 18" W
PTS-1848
PTS-1860
PTS-1848
PTS-1872
PTS-1860
PTS-1872
A
A
B
B
Item
Item #
PARTS INCLUDED
A
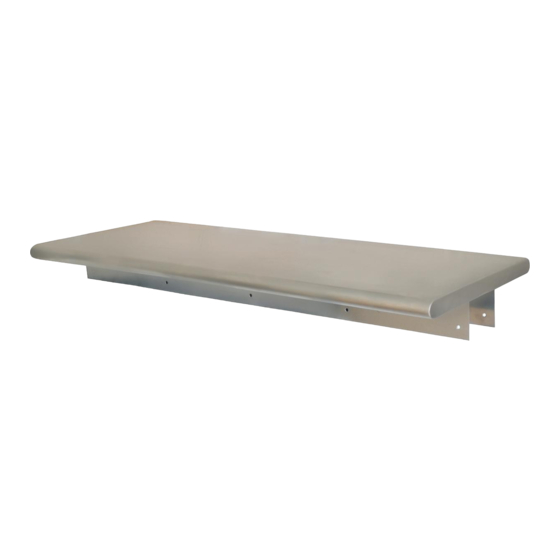
Shelf
Item
Item #
B
L-Bracket
A
Shelf
Self-Tapping Screw
C
B
L-Bracket
D
Self-Tapping Screw
Wall Screw
C
D
Wall Screw
*Note: 60" long units have a qty of 12 Self-Tapping & Wall Screws
72" long units have a qty of 14 Self-Tapping & Wall Screws
*Note: 60" long units have a qty of 12 Self-Tapping & Wall Screws
72" long units have a qty of 14 Self-Tapping & Wall Screws
Tools Required:
Socket for Self-Tapping Screws: 5/16" or 8mm
Tools Required:
Socket for Self-Tapping Screws: 5/16" or 8mm
Phillips drill bit for Wall Screws
2
Phillips drill bit for Wall Screws
Drill for installing Self-Tapping & Wall Screws
Drill for installing Self-Tapping & Wall Screws
2
2
B)
W
A
L
L
2
PTS-1848-2
PTS-1860-2
PTS-1848-2
PTS-1872-2
PTS-1860-2
PTS-1872-2
Qty
Description
1
Qty
Description
2
1
#10-16 x 1" Self-Tapping Screw
*10
2
*10
#10-16 x 1" Self-Tapping Screw
#10-12 x 2" Screw
*10
*10
#10-12 x 2" Screw
X
X
Bolts, Qty of 4
1
1
A
A
B
B
1
1
1
Support Channels
Support Channels
W
A
L
L
1
B
B
A
A
B
A
Advertisement
Table of Contents

Subscribe to Our Youtube Channel
Related Manuals for BK RESOURCES PTS-1848


Summary of Contents for BK RESOURCES PTS-1848
- Page 1 ASSEMBLY INSTRUCTIONS ASSEMBLY INSTRUCTIONS PASS THROUGH SHELVES - 18" W PASS THROUGH SHELVES - 18" W PTS-1848 PTS-1848-2 PTS-1860 PTS-1860-2 PTS-1848 PTS-1848-2 PTS-1872 PTS-1872-2 PTS-1860 PTS-1860-2 PTS-1872 PTS-1872-2 PARTS INCLUDED Description Item Item # PARTS INCLUDED Shelf Description Item Item #...
- Page 2 ASSEMBLY INSTRUCTIONS ASSEMBLY INSTRUCTIONS PASS THROUGH SHELVES - 24" W PASS THROUGH SHELVES - 24" W PTS-2448 PTS-2448-2 PTS-2460 PTS-2460-2 PTS-2448 PTS-2448-2 PTS-2472-2 PTS-2472 PTS-2460-2 PTS-2460 PTS-2472 PTS-2472-2 PARTS INCLUDED Description Item Item # PARTS INCLUDED Shelf Description Item Item # Angle Bracket Shelf Self-Tapping Screw...
Need help?
Do you have a question about the PTS-1848 and is the answer not in the manual?
Questions and answers