
Subscribe to Our Youtube Channel
Related Manuals for DENTSPLY Cavitron Plus


Summary of Contents for DENTSPLY Cavitron Plus
- Page 1 Cavitron Plus ® ™ Cavitron Plus ® ™ Ultrasonic Scaler Ultrasonic Scaler Installation and Service Manual Please read carefully and completely before operating unit.
-
Page 3: Table Of Contents
TABLE OF CONTENTS SYSTEm SETup, OpErATION ANd TEChNIQuES FOr uSE 8 1 .Handpiece .Setup . . . . . . . . . 11 8 2 .Patient .Positioning . . . . . . . . 12 INTrOduCTION . -
Page 4: Introduction
Ultrasonic Scaler to ® ™ and reliability you’ve come to expect from Cavitron brand your practice represents a wise investment in good dentistry. ultrasonic systems. For over four decades, dental professionals have preferred The Cavitron Plus Ultrasonic Scaler is UL/ULc certified the clinical benefits and labor-saving advantages inherent in and approved. The Cavitron Plus Ultrasonic Scaler is Cavitron ultrasonic scalers. Clinical studies and independent classified by Underwriters Laboratories Inc. with respect to research have proven that no other method of supra- and electric shock, fire, mechanical hazards in accordance with subgingival calculus removal can surpass the speed, IEC 60601 Standard. The Cavitron Plus Ultrasonic Scaler efficiency, and versatility of ultrasonic scaling. complies with Part 15 of the FCC Rules. Operation is subject to the following two conditions: 1) this device may not cause DENTSPLY Professional is an ISO 13485 registered company. harmful interference, and 2) this device must accept any All DENTSPLY Professional medical devices sold in Europe are interference received, including interference that may cause CE marked in conformance with Council Directive 93/42/EEC. undesired operation. Cavitron Plus base FCC certification/ registration number: FCC ID: TF3-DPD73227323; IC: 4681B- Website: www.professional.dentsply.com 73227323. Cavitron Plus foot control FCC certification/ registration number: FCC ID: TF3-DPD81675; IC: 4681B- Rx Only: This product is intended for use by qualified dental 81675. The term IC before the certification/registration professional healthcare providers. number signifies that the Industry Canada technical specifications were met. prOduCT OvErvIEw TEChNICAL SuppOrT The Cavitron Plus Ultrasonic Scaler is a precision engineered and manufactured instrument. It contains controls and For technical support and repair assistance in the U.S., call... -
Page 5: Indications For Use
SECTION 4: precautions SECTION 3: warnings 4.1 System precautions • Persons fitted with cardiac pacemakers, defibrillators and other active implanted medical devices, have been • Do not place the system on or next to a radiator or cautioned that some types of electronic equipment other heat source. Excessive heat may damage the might interfere with the operation of the device. system’s electronics. Place the system where air is free Although no instance of interference has ever been to circulate on all sides and beneath it. reported to DENTSPLY, we recommend that the handpiece and cables be kept 6 to 9 inches (15 to 23 • The system is portable, but must be handled with care cm) away from any device and their leads during use. when moving. • Equipment flushing and dental water supply system There are a variety of pacemakers and other medically maintenance are strongly recommended. See Section 9: implanted devices on the market. Clinicians should contact the device manufacturer or the patient’s System Care. physician for specific recommendations. This unit • Close manual shut-off valve on the dental office water complies with IEC 60601 Medical Device Standards. -
Page 6: Infection Control
• Like bristles of a toothbrush, ultrasonic insert tips “wear” regulation may require this device to be connected to with use. Inserts with just 2 mm of wear lose about 50% a centralized water control device. The Cavitron ® of their scaling efficiency. In general, it is recommended DualSelect Dispensing System may be installed to allow ™ that ultrasonic inserts be discarded and replaced after this unit to operate as a closed water system. one year of use to maintain optimal efficiency and avoid breakage. A DENTSPLY Professional Insert Efficiency Indicator is enclosed for your use. SECTION 6: • If excessive wear is noted, or the insert has been bent, Installation Instructions reshaped or otherwise damaged, discard the insert immediately. • Ultrasonic insert tips that have been bent, damaged, or If the installation of your Cavitron Plus System is performed reshaped are susceptible to in-use breakage and should by someone other than trained DENTSPLY Professional be discarded and replaced immediately. Distributor personnel, care should be taken to observe the following requirements and recommendations. • Retract the lips, cheeks and tongue to prevent contact with the insert tip whenever it is placed in the patient’s 6.1 water Line requirements mouth. •... -
Page 7: 3 .Unpacking .The .System
6.3 unpacking the System 6.5 power Cord Connection • Verify the Main Power ON/OFF switch, located at the center front underside of the System, is set to the OFF (O) position before proceeding. Carefully unpack your Cavitron Plus System and verify that all components and accessories are included: 1. Cavitron Plus Scaler with handpiece ® ™ cable assembly with swivel 2. Detachable AC Power Cord 3. Wireless Foot Control 4. “AA” Batteries (4-Pack) 5. Auxiliary Cable for Foot Control • Insert the AC power cord into the power input on the 6. Water Line Assembly (Blue) with Filter and back of the System. Quick Disconnect • Insert the pronged plug into an AC wall outlet. 7. Additional Water Line Filter 8. Steri-Mate Detachable Sterilizable Handpiece ®... -
Page 8: 7 .Foot .Control .Battery .Installation
• To remove the water line from the Cavitron Plus System, 6.8 Foot Control Synchronization turn off the dental office water supply. Disconnect the water supply line from the dental office water supply. If The wireless foot control supplied with your system has been a quick-disconnect connector is attached to the end of factory synchronized with the base unit. Should a replacement the hose, relieve the water pressure by pressing the tip foot control be necessary, synchronization will be required of the connector in an appropriate container and allow prior to system operation. Perform the following steps to water to drain. To remove the hose from the system, synchronize the foot control with the base unit. push on the outer ring of the system’s water inlet and gently pull out the water line. 1. Turn the Main Power switch located at the center front underside of the system to the OFF (O) position. 2. Install a new set of “AA” batteries into the foot control Press ring to release water supply tube. -
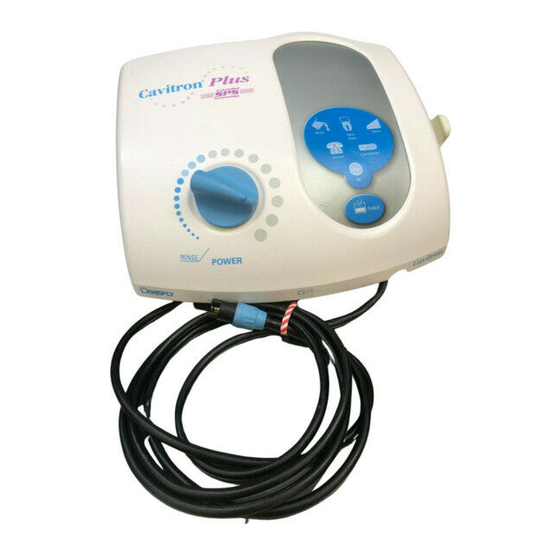
Page 9: 1 .System .Controls
SECTION 7: Cavitron plus Scaler description 7.1 System Controls Ultrasonic Power Level Control Turn knob to select the ultrasonic power level for operation. Turning the knob clockwise increases the distance the insert tip moves (stroke) without changing the frequency; turning the knob counterclockwise decreases the distance the insert tip moves (stroke) without changing the frequency. The Blue Zone is a low-power range for effective subgingival debridement and improved patient comfort during definitive therapy. Handpiece Operates all R inse Cavitron 30K ® ™ Turn ultrasonic power level control knob fully counterclockwise until a “click” is heard. Rinse Ultrasonic inserts mode is for use during an ultrasonic scaling procedure when lavage is desired with minimal and transmits cavitation. power and lavage from the system to i nsert. Diagnostic... -
Page 10: 2 .Diagnostic .Display .Indicators .And . . . . . . . . .Controls
7.2 diagnostic display Indicators and Controls Blue Zone Indicator L ights when the Power Level Control is positioned in t he Blue Zone of the power scale. Ideal for effective subgingival debridement and g reater patient comfort. Rinse Indicator L ights when the Power Level Control is turned Boost Indicator fully counterclockwise. L ights when the Rinse mode provides Boost Mode has lavage to flush the been activated. procedural area with negligible tip movement. Low Battery Indicator L ights when the foot Service Indicator control battery power Lights when the system is is a pproaching end of... -
Page 11: 3 .Handpiece ./ .Cable
7.3 handpiece / Cable Lavage Control Turn the Lavage Control to select flow rate during system operation. Clockwise increases flow at insert tip, counterclockwise decreases flow. The flow rate through the handpiece also determines the temperature of the lavage. Lower flow rates produce warmer lavage. Higher flow rates produce cooler lavage. Steri-Mate ® Handpiece If the handpiece becomes warm, increase the flow rate. With experience, the Dental Healthcare Professional will be able to determine the best flow rate setting for optimum operating efficiency and patient comfort. Swivel Feature Reduces cable drag as handpiece rotates during procedures. Steri-Mate Grip Accessory (not shown) The Steri-Mate Grip provides an ergonomic and comfortable grasp of the handpiece. The grip is sterilizable and is available in several different colors as an accessory for your Steri-Mate Handpiece. See installation instructions provided with the grip. 7.4 Cavitron 30K ultrasonic Inserts The many styles of Cavitron and Cavitron Bellissima 30K Ultrasonic Inserts are easily interchangeable for various procedures and applications. See enclosed literature for specific information. O-Ring Connecting Body Provides seal for handpiece coolant. -
Page 12: 5 .Wireless .Foot .Control .Information
3. Auxiliary Foot Control Cable placing it into the handpiece. Fully seat insert with a 4. Cavitron 30K Ultrasonic Inserts gentle push-twist motion. DO NOT FORCE. 5. Cavitron DualSelect Dispensing system 6. Cavitron Steri-Mate Sterilizable Handpiece 7. Cavitron Steri-Mate Grip (Available in a variety of colors) 7.6.2 user replaceable part Kits 1. Cavitron Insert Replacement O-ring 12/Packs PN: 62351 (black) for plastic and Bellissima inserts PN: 62605 (green) for metal grips and prophy 2. Steri-Mate Handpiece Cable O-ring, PN: 79357 3. Lavage (Water) Filter, 10/Pack, PN: 90158 • Turn the Lavage Control to select flow rate during For detailed information, contact your local DENTSPLY system operation. Clockwise increases flow at insert tip, Professional Representative or authorized DENTSPLY counterclockwise decreases flow. The flow rate through Professional Distributor. the handpiece also determines the temperature of the lavage. Lower flow rates produce warmer lavage. Higher flow rates produce cooler lavage. If the handpiece becomes warm, increase the flow rate. With experience the Dental Healthcare Professional will be able to determine the best flow rate setting for optimum operating efficiency and patient comfort. -
Page 13: 2 .Patient .Positioning
8.2 patient positioning 8.4 patient Comfort Considerations Reasons for sensitivity For optimal access to both the upper and lower arches, the backrest of the chair should be adjusted as for other dental procedures. This assures patient comfort and clinician • Incorrect tip placement. The point should never be visibility. directed toward tooth root surfaces. • Not keeping tip in motion on tooth. Do not allow the Have the patient turn his/her head to the right or left. Also insert to remain in a static position on any one area of position chin up or down depending upon the quadrant and the tooth. Change the insert’s path of motion. surface being treated. Evacuate irrigant using either a saliva ejector or High Volume Evacuator (HVE). • Applying excessive pressure. Use a very light grasp and pressure, with a soft tissue fulcrum whenever possible, especially on exposed cementum. 8.3 performing ultrasonic Scaling procedures • If sensitivity persists, decrease power setting and/or move from the sensitive tooth to another and then return. Note: Refer to the Infection Control Information booklet supplied with your system and Section 9 of SECTION 9: System Care this manual for general procedures to be followed... -
Page 14: Between .Patients
4 . Remove the Steri-Mate handpiece. Clean and sterilize FOR PATIENT USE. the handpiece following the procedure outlined in the booklet enclosed with your unit. 9.3 water Line Filter maintenance 5 . Disinfect the surfaces of the cabinet, Power Cord, Handpiece Cable, Water Supply Line, Foot Control When the water line filter becomes discolored, the filter and Auxillary Cable (if applicable) by applying an should be replaced to prevent reduced water flow to the approved non-immersion type disinfectant solution* Cavitron Plus Ultrasonic Scaler. A 10-pack of replacement carefully following the instructions provided by the filters is available by ordering Part Number 90158 from your disinfectant solution manufacturer. To clean System, local authorized DENTSPLY Distributor. generously spray disinfectant solution on a clean towel and wipe all surfaces. Discard used towel. Dry 1. Verify system is turned OFF. with a clean cloth. To disinfect system, generously 2. Disconnect the water supply hose from the water spray disinfectant on a clean towel and wipe all source. If a quick-disconnect connector is attached surfaces. Allow disinfectant solution to air dry. Never to the end of the hose, relieve the water pressure by spray disinfectant solution directly on the system. pressing the tip of the connector in an appropriate 6 . Inspect the handpiece cable for any breaks or tears. -
Page 15: 10 2 .Technical .Support .And .Repairs
5. Turn the system’s Main Power Switch to the OFF (0) system to cool for 10 minutes and turn system ON, (I) position. Wait 5 seconds and turn the system back ON. position. Verify light is not illuminated. 6. If problem still exists, replace both “AA” batteries in 3. If light is still illuminated, refer to Section 10.2 foot control with new “AA” batteries (Refer to Section Technical Support and Repairs to have unit serviced as 6.7) or connect auxiliary foot control cable. soon as possible. Symptom: System operates: Purge Mode will not function 10.2 Technical Support and repairs – icon flashing 1. Check that there is no insert in the handpiece. For technical support and repair assistance call DENTSPLY 2. Check that handpiece is properly installed to the cable Professional Cavitron Care Factory Certified Service at 1- assembly. 800-989-8826 Monday through Friday, 8:00 A.M. to 5:00 P.M. (Eastern Time). For areas outside the U.S., contact your local DENTSPLY Professional representative. -
Page 16: Warranty Period
SECTION 11: warranty period The Cavitron Plus Ultrasonic Scaler is warranted for TWO YEARS from date of purchase. The Steri-Mate Handpiece enclosed with your system is warranted for SIX MONTHS from date of purchase. Refer to the Warranty Statement Sheet furnished with your system for full Warranty Statement and Terms. SECTION 12: Specifications Electrical Voltage Continuous (100-240 VAC) Current 1.0 Amperes, Maximum Phase Single Frequency 50/60 Hertz Water Pressure 20 to 40 psig (138 to 275 kPa) Water Flow Rate Minimum Setting (CCW) < 15 ml/min Maximum Setting (CW) > 55 ml/min Weight 3.3 lbs (1.5 Kg) Dimensions Height: 5 in (12,7 cm) Width: 9.5 in (24,13 cm) Depth: 8 in (20,32 cm) Handpiece Cable length: 6.5 ft. (2.0 M) Auxillary Foot Control Cable length: 8ft. (2.4 M) Water Supply Line length: 8 ft. (2.4 M) Foot Control Protection Class IPX1. Not for operating theatres. Remote Communication Frequency: 2405 to 2480 MHz Power: < 1mW Channels: Operating Environment Temperature: 15 to 40 Deg. Celsius (59 to 104 Deg. Fahrenheit) Relative Humidity: 30% to 75% (non-condensing) -
Page 17: Quick Reference Guide
CAvITrON pLuS uLTrASONIC SCALEr QuICK rEFErENCE guIdE diagnostic display ON/OFF Illuminates when the Main Power On/Off switch is in the “ON” position. BLuE ZONE Illuminates when the ultrasonic power control is positioned in the Blue Zone of the power scale. The Blue Zone extended low-power range is effective for subgingival debridement and greater patient comfort during definitive therapy. rINSE Illuminates when the ultrasonic power level control is turned fully PURGE counterclockwise. With an insert in the handpiece, activate the Foot Control and lavage will occur with negligible tip movement. BOOST Illuminates when the Boost Mode is activated by the Foot Control. To activate, fully depress Foot Control to the second position. To deactivate Boost Mode, release Foot Control to first position. purgE BuTTON Illuminates when the Purge function is activated. To activate Purge, remove insert from the handpiece, press the Purge button on the Diagnostic Display and water will purge through system lines for two minutes. For optimal efficiency, turn the Handpiece Lavage Control to maximum water flow. To deactivate during the two minute cycle, press Purge button again or press Foot Control. SErvICE Lights when the system is not functioning properly. This display has three distinct modes: • Slow blink (1 blink per second) means the system is not operating within factory specifications. • Fast blink (3 blinks per second) indicates an improper set-up. • Steady light indicates the system is overheating. -
Page 18: Troubleshooting
QuICK rEFErENCE guIdE TrOuBLEShOOTINg SYmpTOm ACTION TAKEN System will 1. Check that the Main Power Switch is in the ON (I) position, and that the detachable power cord not operate: is fully seated in the receptacle on back of system. No Power ON Check that the system’s power cord plug is fully seated in an appropriate AC wall outlet. Indicator Check that the wall outlet is functional. System will 1. If the office has more than one foot control, test each to ensure that the proper foot control is not operate: being used. With a handpiece and insert installed, depress the foot control to the first position. Power ON The system should dispense water. If none of the foot controls operate the system, continue to Indicator is the next step. illuminated Resynchronize one foot control to the system (see Directions for Use Section 6.8 Foot Control Synchronization). System operates: Assure that handpiece lavage control is properly adjusted. No water flow to Check for clogged insert; Replace insert if necessary. -
Page 19: Analysis
4. Replace the On/Off switch. Slo-Blo Fuses good. No power 1. Unit is installed in a confined area 1. Provide adequate air circulation around unit. to circuitry. (such as a cabinet), or is too close to a heat source to insure proper air circulation around unit. Slo-Blo Fuse F3 and/or F4 1. Short in Power supply assembly. 1. Replace the Power Supply assembly. Failed. 2. Short in Power Drive PC Board 2. Replace the Power Drive PC Board assembly. assembly. Low insert scaling power or 1. Insert malfunction. 1. Test with another Cavitron insert. If test insert ® insert stops vibrating when works properly, discard the original insert. contacting tooth surface. 2. Insert is not pushed in far enough 2. a. Check if insert is fully seated in the handpiece. for automatic pick-up. b. If a handpiece soft grip is being used, verify that the grip is flush with the hard plastic of the insert port. Refer to the Installation Instructions provided with the soft grip for correct installation. 3. Unit improperly calibrated. 3. a. Return scaler to DENTSPLY for factory ® certified service. b. Refer to DENTSPLY Professional Division- ® Product Service SOP PS-153. - Page 20 Cavitron plus Troubleshooting and Analysis, continued ® ™ This troubleshooting section is meant for use by qualified Cavitron Service Technicians. ® SYmpTOmS CAuSES COrrECTIvE mEASurES Intermittent scaling power or no 1. Insert malfunction. 1. Test with another Cavitron insert. If test insert ® scaling power. works properly, discard the original insert. 2. Insert is not pushed in far 2. a. Check if insert is fully seated in the handpiece. enough for automatic pick-up. b. If a handpiece soft grip is being used, verify that the grip is flush with the hard plastic of the insert port. Refer to the Installation Instructions provided with the soft grip for correct installation. 3. Malfunction in Steri-Mate™ 3. Replace Steri-Mate™ Handpiece. Handpiece. 4. Bent or missing electrical pin in 4. Replace Steri-Mate™ Handpiece. Steri-Mate™ Handpiece. 5. Open or intermittent wires in 5. Install a working Steri-Mate™ Handpiece on the handpiece cable assembly. cable. Unplug the Handpiece cable connector at J3 of the Power Drive PC Board and check the continuity of the wires.
Need help?
Do you have a question about the Cavitron Plus and is the answer not in the manual?
Questions and answers