Advertisement
Quick Links
Advertisement

Related Manuals for Excellent Mjosa


Summary of Contents for Excellent Mjosa
- Page 1 Mjosa version NE...
- Page 2 Things you should know / Sinun Tulee Tietää / Oluline Teave / Ką turėtumėte žinoti / Lietas, kas jums ir jāzina / / Ting Du Bør Vite / Vad Du Borde Känna Till Это вы должны знать EN12150 Shower cubicle / Shower enclosure / Shower wall Dušas kabīnes / dušas stūrus/ dušas sienas var uzstādīt tikai telpās kuras: can only be installed to spaces which: - paredzēts izmantot kā...
- Page 3 Things you prepare / Näitä tarvitset / Vajalikud töövahendid / Ką turėtumėte pasiruošti / Lietas, kas jāsagatavo / / Ting du bør forberede / Saker du förbereder Это вам надо приготовить 3.2 mm Things you have / Pakkaus sisältää / Pakendi sisu / Ką reikia turėti / Lietas, kas jums ir / / Ting du har / Saker du har Это...
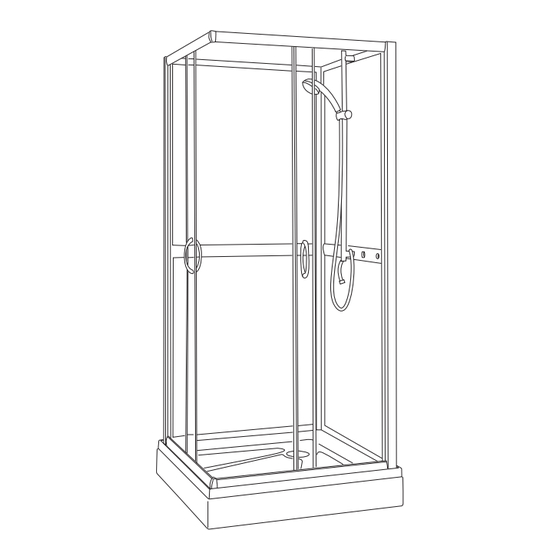
- Page 4 Max. Door Opening 150-160mm 2060mm Model 800mm 800mm 1040mm 410mm 800x800mm...
- Page 5 ST4x45mm Screw (w/ plastic caps) Stopperi ruuvilla EX79666 Screw Set Rubber stopper with screw set Muoviklipsit ruuvilla Plastic glass clips with screw Altaan pulttisetti Mjosa tray corner bolt set EX80141 Bolt Set Altaan ruuvisetti Tray panel screw set Tray Front Skirt EX79470 Altaan L-suoja...
- Page 6 The tray can be found in box marked 1/1. Place the tray in the location for its future use. Disassemble the tray skirt by unscrewing the screw covers and the removing the screws. Suihkukaapin allas löytyy laatikosta 1/1. Aseta allas tulevalle asennuspaikalleen.
- Page 7 The back corner aluminum profile can be found in box marked 3/3.rear panels can be found in box marked 2/3. Attach one rear panel to the back corner profile while paying attention to the location of the mixer holes.The “checkers” glass surface should be facing outside of the shower cabin.
- Page 8 The rail profiles can be found in box marked 3/3. Install the top and bottom rail profiles to the side panels using the ST4x45mm screws. Pay close attention to the direction of the profile with respect to the side panel glass. Ylä- ja alakiskot löytyvät laatikosta 3/3.
- Page 9 The rail profiles can be found in box marked 3/3. Install the top and bottom rail profiles to the side panels using the ST4x45mm screws. Pay close attention to the direction of the profile with respect to the side panel glass. Ylä- ja alakiskot löytyvät laatikosta 3/3.
- Page 10 Lift the front section of the cabin onto the tray while sliding the side aluminium profiles into the rear panels, as shown in the image. Afterwards, the entire cabin unit should be sitting on the tray by itself. Nosta kaapin etuosa altaan pohjalle ja liu'uta samalla alumiiniprofiilit takaseiniin kuvan osoittamalla tavalla.
- Page 11 The side panel gaskets can be found in the box marked 3/3. Attach the side panel gaskets (length of 181cm) to the side panels while paying attention to the direction of the blade. The gasket blade should be face towards inside the cabin, as shown in the image. Sivuprofiilien tiivisteet löytyvät laatikosta 3/3.
- Page 12 All the doors gaskets can be found in the box marked 3/3. Attach the water protection gaskets (length of 188cm) to the doors while paying attention to the direction of the blades, as shown in the image. Attach the magnetic gaskets to the doors, as shown in the image. Ovien tiivisteet löytyvät laatikosta 3/3.
- Page 13 The door handles can be found in the accessory box. Install the door handles as shown in the image while using the silicon gaskets to protect the glass. Do not over tighten the screw when fastening the handles to the glass. Kiinnitä...
- Page 14 Fasten and secure the cabin body using the ST4x10mm screws provided. Holes must be drilled through the aluminium profiles in the locations shown in the image. Use the pre-drilled holes as guides when drilling new holes so that the glass is not damaged. After the screws are fixed, use the provided screw caps to cover the screw heads.
- Page 15 Assemble the shower set by first installing the shower bar, as shown in the image. A hole must be drilled on the upper aluminium bar. Use the correct distance when drilling to avoid damaging the glass. Pay attention to the orientation of the shower head holder before assembling.
- Page 16 Mojsa Montörgatan 7, 2 tr, S-302 60 Merivalkama 4 C, FIN 02320, Halmstad, SWEDEN Espoo, FINLAND web: http://www.excellent-aftersales.com web: http://www.excellent-aftersales.com After - Sales Service email : aftersales@excellent-group.se email : aftersales@excellent-group.f i Ver.NE 003- 201114...
Need help?
Do you have a question about the Mjosa and is the answer not in the manual?
Questions and answers