Table of Contents
Advertisement
Available languages
Available languages
Quick Links
Advertisement
Table of Contents

Related Manuals for Excellent TORVI


Summary of Contents for Excellent TORVI
- Page 1 TORVI Odpływ punktowy Floor gully INEX.TO130.50...
-
Page 3: Informacje O Produkcie
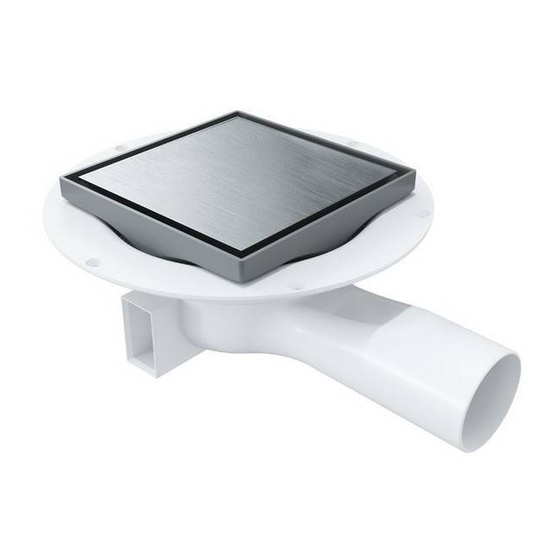
(wyrównując podciśnienie w kanalizacji). Odpływy punktowe Torvi spełniają wymagania normy EN 1253 zgodne z Europejskimi Standardami dla wpustów podłogowych. Wpusty te posiadają certyfikat ETA (Europejska Aprobata Techniczna). - Page 4 Gdy stosujesz klamrę zaciskową nie przyklejaj wykładziny do kołnierza odpływu. Mata uszczelniająca lub Klamra zaciskowa wykładzina elastyczna zapobiega penetracji wody pod matę uszczelniającą lub wykładzinę Odpływ punktowy Torvi ELEMENTY ZESTAWU Ruszt z opcją do zabudowy płytką Kratka odpływowa Wpust Maxflow z syfonem suchym DryOn...
-
Page 5: Instrukcja Montażu
INSTRUKCJA MONTAŻU Na konstrukcjach drewnianych: Instalując wpust użyj dodatkowych belek jako wzmocnienia. Aby ułatwić montaż na konstrukcjach drewnianych rekomendujemy użycie ramki (INEX.TO130.R300). Produkt dostępny jest na zamówienie. Przymocuj ramkę do belek, a następnie wpust do ramki za pomocą odpowiednich śrub, np. - Page 6 Na konstrukcjach betonowych: Jeżeli montaż wpustu nie był możliwy w trakcie wylewania posadzki, pozostaw wnękę 300 x 300mm. Po wyschnięciu wylewki, osadź wpust we wnęce i podłącz go do rury odpływowej, której spadek powinien wynosić co najmniej 1% (10mm / 1m). Wykonaj próbę...
- Page 7 WYCINANIE OTWORU W MATACH USZCZELNIAJĄCYCH I WYKŁADZINACH ELASTYCZNYCH Zdejmij foliową osłonę wpustu i wyciągnij pierścień zaciskowy. Ułóż matę uszczelniającą nad wpustem Maxflow. Jeżeli używasz wykładziny elastycznej, połóż ją zgodnie z zaleceniami jej producenta. Umieść klamrę zaciskową szeroką stroną skierowaną w górę. Nałóż kratkę i dociśnij, aż pierścień...
- Page 8 WYCINANIE OTWORU NOŻYKIEM DO MAT USZCZELNIAJĄCYCH I WYKŁADZIN ELASTYCZNYCH Do wycinania precyzyjnych otworów w matach uszczelniających i wykładzinach elastycznych zalecane jest użycie specjalnego nożyka: INEX.TO.N130. Produkt nie jest dołączony do zesta- wu, natomiast znacznie ułatwia precyzję wycinania otworu i gwarantuje prawidłowy montaż. Przed ułożeniem maty uszczelniającej wyciągnij pierścień...
- Page 9 MONTAŻ KRATKI Z RUSZTEM Przed rozpoczęciem montażu upewnij się, że mata uszczelniająca została prawidłowo przyklejona, a pierścień zaciskowy znajduje się w odpowiedniej pozycji. Kratkę umieść w centralnym miejscu we wpuście. Umieść klej pod całą powierzchnią plastikowej kratki i dociśnij ją mocno do wpustu, tak aby otwór w dużej mierze pokrywał się z otworem w pierścieniu zaciskowym.
- Page 10 INSTRUKCJA CZYSZCZENIA SYFONU DryOn Syfon suchy DryOn jest częściowo mechaniczny oznacza to, że gdy nie ma przepływu wody sy- fon pozostaje zamknięty. Specjalna sprężyna dociska zapadkę do syfonu, skutecznie zapobiegając przed wydostawaniem się nieprzyjemnych zapachów z kanalizacji, nawet gdy syfon jest suchy. Zapadka opada automatycznie pod naporem wody i pozwala spłynąć...
-
Page 11: About Product
ABOUT PRODUCT Torvi is the floor point gully that has been specially designed for installation with ceramic tiles and vinyl floorings on all types of surfaces, both on concrete floors and on wooden structures. Its innovation system is based on the use of a special clamping ring and DryOn dry siphon, which effectively prevents againts the unpleasant odors from often drying drains. - Page 12 When you use a clamping ring, do not stick the vinyl flooring to the drain flange. Sealing mat Clamping ring prevents water penetration or vinyl flooring under sealing mat or vinyl flooring Torvi floor gully PARTS OF THE SET Steel insert with tile insert possibility Frame...
-
Page 13: Installation Instruction
INSTALLATION INSTRUCTION On wooden floorings: For installation the gully, use additional joist as reinforcements. To make installation on wooden structure easier, we recommend using a frame (INEX.TO130.R300) dedicated for 130mm gullies. Product available on request. Attach the frame to the joist and then the gully to the frame with screws, e.g. 4x30mm. On the particle board, draw the dimensions of the frame and cut out the hole. - Page 14 On concrete floorings: If it was not possible to install the gully during pouring the floor, leave a recess of 300 x 300mm. When the screed is dried, set the gully in the recess and connect it to the drain pipe, decrees level should be at least 1% (10mm / 1m).
- Page 15 CUTTING THE HOLE IN SEALING MAT OR IN THE VINYL FLOORING Remove the foil cover of the gully and pull out the clamping ring. Lay the sealing mat over the Maxflow gully. If you are using a vinyl flooring, lay it according to the manufacturer's instructions.
- Page 16 CUTTING THE HOLE WITH A KNIFE IN SEALING MAT OR IN THE VINYL FLOORING For cutting precise holes in sealing mats and vinyl floorings, it is recommended to use a special knife: INEX.TO.N130. The product is not included in the kit, but it greatly facilitates the precision of cutting the hole and guarantees correct assembly.
- Page 17 FRAME AND TILE INSERT INSTALLATION Before assembly, make sure that the sealing mat has been properly glued and the clamping ring is in the correct position. Place the frame in a central place in the gully. Place the adhesive under the entire surface of the plastic frame and press it firmly against the gully so that its hole coincides with the hole in the clamping ring.
- Page 18 DryOn SIPHON CLEANING INSTRUCTION DryOn dry siphon is semi-mechanical, which means that when there is no water flow, the siphon remains closed. A special spring presses the flap against the siphon, effectively preventing the release of unpleasant odors from the sewage system, even when the siphon is dry. The flap automatically drops when water gets into the siphon and allows it to drain into the sewage system.
- Page 20 Excellent SA Podłęże 662 32-003 Podłęże Tel.: 12 657 18 87 e-mail: lazienki@excellent.com.pl www.excellent.com.pl SERWIS: tel.: +48 605 092 314 tel.: +48 601 954 485 e-mail: serwis@excellent.com.pl...
Need help?
Do you have a question about the TORVI and is the answer not in the manual?
Questions and answers