berlinger Fridge-tag 2 L User Manual
Internal/external sensor
Hide thumbs
Also See for Fridge-tag 2 L:
- User manual (59 pages) ,
- Operation manual (34 pages) ,
- Setup (10 pages)
Table of Contents
Advertisement
Advertisement
Table of Contents

Subscribe to Our Youtube Channel
Related Manuals for berlinger Fridge-tag 2 L


Summary of Contents for berlinger Fridge-tag 2 L
- Page 1 User Manual Fridge-tag 2 L INTERNAL/EXTERNAL SENSOR...
-
Page 2: Table Of Contents
Content Page 1. Display explanations ______________________________ 3 2. State of delivery/Sleep Mode _______________________ 4 3. Quality check prior to activation _____________________ 4 4. Placing the Fridge-tag 2 L/Placing the external sensor ____ 6 5. Activation process ________________________________ 7 5.1. Overview sequences of activation 5.2. Activation 5.3. Setting the calendar format 5.4. Use of READ and SET 5.5. Setting the date 5.6. Setting the time 5.7. Setting the Alarm limits (not standard) 5.8. Connection error (external sensor) 6. READ and change settings/ How to correct setting mistakes ____________________ 19 6.1. Overview menu 6.2. Menu entry 7. Display indication during measurement ______________ 22 8. Alarm trigger function ____________________________ 23 8.1. Single Alarm triggering 8.2. Alarm display and confirmation options... -
Page 3: Display Explanations
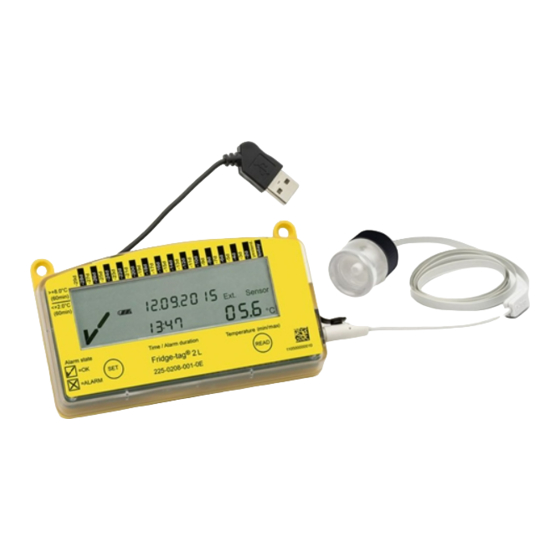
1. Display explanations Ext. Int.Sensor Sensor 1 - 888 max. °F 8888 °C min. (OK symbol) or (Alarm symbol) Daily HIGH/LOW (Alarm indicator) (showing history of the last 30 days) Power on indicator (double point is flashing) Battery power symbol (This icon indicates the remaining capacity of the battery) Additional (Warning symbol) Time, duration and text indicator Date and text indicator Indicator of measured minimum/maximum temperature Temperature display 10. Indicator of the temperature measurement unit (°F/°C) 11. Indicator of activated sensor: Int. = internal sensor (inside the Fridge-tag 2 L) Ext. = external sensor (cable with temperature sensor) Note: All illustrations in the operation manual refer to the Fridge-tag 2 L with internal sensor. Differences between internal and external sensors are additionally described. -
Page 4: State Of Delivery/Sleep Mode
2. State of delivery/Sleep Mode Fridge-tag 2 L is shipped in its so-called "Sleep Mode". > 25°C (15min) < 8°C (15min) Temperature (min/max) Alarm state Time / Alarm duration = OK dd.mm.yyyy 0123456789012 = ALARM ® Fridge-tag The display (LCD) is blank. 3. Quality check prior to activation (in Sleep Mode) The following chart shows which information will be indicated on the LCD screen upon successive READ button pressings while in Sleep Mode. - Page 5 Display check - Fridge-tag 2 L Pressing the READ-button Displayed Information 1st press of READ: > 25°C (15min) < 8°C (15min) Ext. Int.Sensor Display test: max. 1 - 888 °F 8888 min. °C all segments activated Temperature (min/max) 2nd press of READ: 0123456789012 > 25°C (15min) <...
-
Page 6: Placing The Fridge-Tag 2 L/Placing The External Sensor
4. Placing (the sensor of) the Fridge-tag 2 L Fridge-tag 2 L with an internal sensor The activated Fridge-tag 2 L must be placed immediately in its predetermined location. It is recommended and important to place the device in the center of the refrigerator for an optimal temperature observation. Please do not place the device into a freezer as the screen will freeze and the battery will lose power prematurely. Fridge-tag 2 L with an external sensor Two hours before activating the Fridge-tag 2 L the external sensor must be placed in its predetermined location. It is recom- mended and important to place the external sensor in the center of the refrigerator for a perfect temperature observation. For the right positioning of the external sensor within the fridge, please follow the instructions of WHO, CDC or any other govern- mental requirements of your country. External sensor Flat cable Fridge-tag 2 L device... -
Page 7: Activation Process
5. Activation process 5.1. Overview sequences of activation State of delivery 5.2 Activation 5.3 Setting the calendar format 5.4 Use of READ and SET 5.5 Setting the date 5.6 Setting the time 5.7 Setting the Alarm limits (only if factory preset otherwise skipped) 5.8 Connection error (only external sensor) Note: If the activation process has not been completed - after approx. 60 seconds without any button operation - the device will go back into Sleep Mode. The activation starts from the beginning. If you want to read or change settings (e.g. change °F to °C) after the activation has been completed, proceed as described in chapter 6 "Read and change settings/How to correct setting mistakes". -
Page 8: Activation
5.2. Activation To activate the device press the SET and the READ button simultaneously for more than 3 seconds. Note: Once the device is activated, it cannot be stopped anymore. > 25°C (15min) < 8°C (15min) Temperature (min/max) Alarm state Time / Alarm duration = OK dd.mm.yyyy 0123456789012 = ALARM ® Fridge-tag Successful activation is visible when the following indication will appear on the screen: 5°C 5min) 8°C 5min) Temperature (min/max) Alarm state Time / Alarm duration = OK dd.mm.yyyy 0123456789012... -
Page 9: Use Of Read And Set
Option 2: Setting the date format to: mm.dd.yyyy > 25°C (15min) < 8°C (15min) Temperature (min/max) Alarm state Time / Alarm duration = OK dd.mm.yyyy Press READ to change 0123456789012 = ALARM ® Fridge-tag the calendar format. Then press SET to save the calendar format After setting the calendar format, the first digit of the date will start flashing. -
Page 10: Setting The Date
5.5. Setting the date The following example shows how to set the date to: 16th of February 2018 (16.02.2018) in Europe format The 1 digit is flashing: > 25°C 15min) < 8°C 15min) Temperature (min/max) Alarm state Time / Alarm duration dd.mm.yyyy = OK 0123456789012 = ALARM... - Page 11 The 3 digit is flashing: > 25°C (15min) < 8°C (15min) Temperature (min/max) Alarm state Time / Alarm duration = OK dd.mm.yyyy 0123456789012 = ALARM ® Fridge-tag Press READ until "0" appears as the third Press SET to save. digit. The 4 digit is flashing: > 25°C (15min) < 8°C (15min) Temperature (min/max) Alarm state Time / Alarm duration = OK...
-
Page 12: Setting The Time
The 8 digit is flashing: > 25°C (15min) < 8°C (15min) Temperature (min/max) Alarm state Time / Alarm duration = OK dd.mm.yyyy 0123456789012 = ALARM ® Fridge-tag Press READ until "8" appears as the eighth Press SET to save. digit. The date is now set to: 16.02.2018 After setting the date, the first digit of the time will start flashing. - Page 13 The 2 digit is > 25°C flashing: (15min) < 8°C (15min) 1 00 Temperature (min/max) Alarm state Time / Alarm duration = OK dd.mm.yyyy 0123456789012 = ALARM Press READ three ® Fridge-tag times until "3" appears as the second digit. Press SET to save. The 3 digit is > 25°C (15min) flashing: < 8°C (15min) 1 40 Temperature (min/max)
-
Page 14: Setting The Alarm Limits (Not Standard)
Note: If the device is configured with self-programmable Alarm limits proceed with the following chapter. If not, the activation is now completed. Internal sensor: Continue with chapter 4. Placing the Fridge-tag 2 L External sensor: Connect the device with the external sensor and continue with chapter 5.8, Connection error. Note: During max. 1 minute after activation no temperature is displayed on the screen. 5.7. Setting the Alarm limits (Not standard, only by special order) This adjustment is done in 4 steps: 1. Setting the duration of the upper Alarm limit 2. Setting the temperature of the upper Alarm limit 3. - Page 15 > 25°C (15min) The 3 digit of the duration of < 8°C (15min) the Alarm limit is flashing: 0 00 Temperature (min/max) Alarm state Time / Alarm duration = OK dd.mm.yyyy Press READ to adjust 0123456789012 = ALARM ® Fridge-tag the number. Press SET to confirm the number. The 4 digit of the duration of > 25°C (15min) < 8°C (15min) the Alarm limit is flashing: 0 00 Temperature (min/max) Alarm state...
- Page 16 Instruction for setting a positive temperature limit between 0 °C/0 °F and +50 °C/+122 °F (internal sensor) and 0 °C/0 °F and +55 °C/+131 °F (external sensor) > 25°C (15min) < 8°C (15min) °C Press READ until the display Alarm state Temperature (min/max) Time / Alarm duration shows, no flashing sign = OK dd.mm.yyyy...
- Page 17 Setting a negative temperature limit below 0 °C/0 °F > 25°C (15min) < 8°C (15min) - 80 °C Temperature (min/max) Alarm state Time / Alarm duration = OK dd.mm.yyyy 0123456789012 = ALARM Press READ until the ® Fridge-tag " sign is flashing " indicated on the Press SET to set the screen: limit below 0 °C/0°F.
-
Page 18: Connection Error (External Sensor)
5.8. Connection error (external sensor only) After 10 minutes (factory standard) without a connection between the device and the external sensor: • the buzzer will sound two beeps at interval of three minutes for maximum 168h (7 days). • the whole display starts blinking. • any confirmation will stop the display blinking. • the buzzer only stops if the connection error is corrected. If the error still exists the buzzer continuously beeps at a three minute interval for 168h (7 days). > 25°C (15min) < 8°C (15min) Sensor Ext. --.- 1 21 °C Display status: Temperature (min/max) Alarm state Time / Alarm duration external sensor error = OK dd.mm.yyyy... -
Page 19: Read And Change Settings/How To Correct Setting Mistakes
6. Read and change settings / How to correct setting mistakes 6.1. Overview menu Device activated 6.2) Menu entry 6.2.1) Menu: OUTSIDE/SET DATE (Change date and/or time) external sensor OUTSIDE internal sensor SET DATE SET DATE 6.2.2) Menu: READ CONF (Read Alarm configurations) 6.2.3) Menu: CELS FAHR (change Alarm configurations) 6.2.4) Menu: SET CONF (only if enabled in factory setting, otherwise skipped) Note: If you scroll through the menu and you reach the display of the measuring mode again you need to restart from the beginning by accessing the menu. In order to adjust more than one setting (e.g. time & Celsius to Fahrenheit) you must complete each change and return to menu mode for the 2 change. -
Page 20: Menu Entry
(15min) < 8°C (15min) 6.2. Menu entry to read and change settings To change the date format, the date, the time, the temperature measurement unit or the Alarm settings or to read the preset Alarm limits please proceed as follows: Temperature (min/max) Alarm state Time / Alarm duration = OK dd.mm.yyyy 012345678901 = ALARM ® Fridge-tag Press and continue to ...then press READ shortly... hold SET..then release both but- tons simultaneously. "SET DATE" (internal sensor) is now displayed on the screen. "OUT SIDE" (external sensor) is now displayed on the screen. You entered the menu mode and may choose which item to see or change. - Page 21 6.2.1. Access the menu "SET DATE" The display shows the menu "OUT SIDE" (external sensor) Press READ until the display shows "SET DATE". The display shows the menu "SET DATE" (internal sensor). Press SET to access the menu to adjust the date format, date or time settings. Then follow the steps as described in chapter "Setting the date and time”. Note: Time and date adjustments have no effect on the Alarm records. Once the device is activated, it cannot be stopped anymore. The number of time adjustments during the same day is unlimited. Note: After the adjustment has been done, the Fridge-tag 2 L will be locked for 24 hours from the following midnight (e.g. changes on the 15th Sept., device locked from 00:01 am on the 16th until 00.01 am on the 17th). This is for security reasons. 6.2.2. Access the menu "READ CONF" The display shows the menu "SET DATE". Press READ until the display shows "READ CONF". Then press SET to access the menu to read the current Alarm configurations. First the display check appears. Then continuously press READ to scroll through the preset Alarm parameters. 6.2.3. Access the menu "CELS FAHR" The display shows the menu "SET DATE". Press READ until the display shows "CELS FAHR". Then press SET to access the menu to change the temperature measurement unit. To change the measurement unit (Celsius/Fahrenheit) press READ until the display shows the desired sign (°C/°F). Press SET to confirm the measurement unit.
-
Page 22: Display Indication During Measurement
7. Display indication during measurement mode Indication for max. 1 minute after completing > 25°C (15min) < 8°C (15min) the settings or after connecting the device with max. 0 00 °C the external Temperature (min/max) Alarm state Time / Alarm duration = OK dd.mm.yyyy sensor. For a maximum 0123456789012 = ALARM ® Fridge-tag of 1 minute no current temperature is displayed on the screen, indicated by (--.-). 7.1. - Page 23 8. Alarm trigger function 8.1. Single Event Alarm triggering The upper or lower Alarm triggering is done with a single event Alarm algorithm. Any kind of Alarm is triggered if the tempera- ture is continuously out of the set Alarm limits for longer than the set Alarm trigger time. Upper Alarm triggering Setting upper limit: Temperature > 8.0°C, Duration > 10h For an upper Alarm to be triggered the temperature needs to be continuously above 8°C for longer than 10h. Alarm triggered: (Alarm symbol) and 8°C (Warning symbol) displayed >10h 12 h 24 h In the example below the sum* of the daily upper temperature excursion is about 20h. No Alarm will be triggered! The tempera- ture was not continuously out of the set Alarm limits for more than 10h in one row. no Alarm triggered: (OK symbol) on the 8°C display.
- Page 24 Lower Alarm triggering Setting lower limit: Temperature <-0.5°C, Duration >1h For a lower Alarm to be triggered the temperature needs to be continuously below - 0.5°C for longer than 1h. Alarm triggerd: (Alarm Symbol) and -0.5°C (Warning Symbol) displayed >1h 12 h 24 h In the example below multiple low temperature excursions* are occurring. No Alarm will be triggered. Each temperature excur- sion was less than 1h out of the set Alarm limits. no Alarm triggered: (OK symbol) on the display. -0.5°C >1h >1h 12 h 24 h * The sum of the excursions is visible in the daily statistics under the column "Cumulative daily time below the limit".
-
Page 25: Alarm Display And Confirmation Options
8.2. Alarm display and confirmation options Option 1- Alarm indication "all Alarms”: With this option the Alarms will be visible on the display with an (Alarm symbol) for 30 days. > 25°C (15min) < 8°C (15min) Int.Sensor 1 42 °C Temperature (min/max) Alarm state Time / Alarm duration = OK dd.mm.yyyy 0123456789012 = ALARM ® Fridge-tag >... - Page 26 Option 2 - Alarm indication "unconfirmed Alarms”: the Alarms will be visible with an (Alarm symbol) until all Alarms (in the last 30 days history) have been confirmed as solved by pressing the read button. Afterwards the display will show a (OK symbol) until a new Alarm is triggered.
- Page 27 Settings: upper limit Temperature >8.0°C 8°C and duration >1h -0.5°C lower limit Temperature >1h >1h <-0.5°C and duration 1h 24 h 1. Alarm triggered: (Alarm symbol) on display and (Warning symbol) enabled 2. Alarm confirmed in temperature good condition: (OK symbol) on display 3. Alarm triggered: (Alarm symbol) on display and ( Warning symbol) enabled again. 2. Device is outside the set Alarm limits: If the READ button is pressed still during a temperature violation the buzzer will be muted for approx. 1h. The (Alarm-) and the (Warning symbol) will stay for the corresponding Alarm. If after 1h, the temperature is still outside the limit, the buzzer will restart beeping. Settings: upper limit Temperature >8.0°C and duration >1h 8°C lower limit Temperature -0.5°C <-0.5°C and duration 1h >1h 24 h 1.
-
Page 28: Cumulative Daily Time Above/Lower The Limit
8.3. Cumulative daily time above/lower the limit The Alarm trigger algorithm is based on a single event, although the Fridge-tag 2 L is measuring - daily based - the individual total time above or below the temperature limits. This measurement is not used for any Alarm condition. This value is only available in the generated PDF/ASCII files. Note: It could be the case that the total cumulative time above/ below the temperature limits are higher than the configured single event Alarm time without any Alarm triggering. Example set up: lower limit Temperature <-0.5°C, duration >1h 5°C <1h <1h <1h <1h 12 h 24 h In the above example multiple low temperature excursions with exposure times of less than 1h occurred. The cumulative daily time below the limits will measure about 3.5h but no Alarm will be triggered. The same behavior also applies to the upper Alarm. 9. Audio Alarm - (optional factory setting) In case of an upper or lower Alarm trigger, 3 audible Alarm signals will be triggered immediately. (500ms ON/500ms OFF). -
Page 29: Reading The History/Read Out Mode
10. Reading the History / Read out mode The information of the temperature excursions can either be viewed for the past 30 days directly on the device or for 28/56/84/112 days on the generated files (PDF/ASCII). Note: The external sensor of the Fridge-tag 2 L can remain at it‘s location for the read out process. Please consider, that there may occur a connection error after more than 10 minutes with- out connection between the device and the sensor. 10.1. Option 1: Read out day-per-day directly on the device (30 day history) Example of an OK display - during read out of the history The following information is >... - Page 30 Note: Continue repetitively pressing the READ button to read out day per day the details of the past 30 days. Note: When you reach an Alarm event, the indication on the screen of the Fridge-tag 2 L will be different to the indication of an OK display. Example of an Alarm display - during reading out of the history displayed screen of a "Lower Alarm event" > 25°C (15min) < 8°C (15min) Int.Sensor - 11 1 21 °C min. Temperature (min/max) Alarm state Time / Alarm duration = OK dd.mm.yyyy 0123456789012...
-
Page 31: Option 2: Read Out Alarms
The following additional information is indicated on the screen: • Highest recorded temperature (example: -1.1˚C) • The time duration out of the preset low temperature limit (example: 01:35; hh:mm) • Temperature recording in this example with internal sensor 10.2. Option 2: Read out only Alarms directly on the device - use Alarm-Super-Jump function (30 day history) If you like to read out only the Alarms directly on the device, press and hold the READ button for at least 3 seconds. displayed screen of the latest Alarm event: > 25°C (15min) < 8°C (15min) Int.Sensor 2 30 Press READ for Temperature (min/max) Alarm state... - Page 32 displayed screen of the latest Alarm event > 25°C (15min) < 8°C (15min) Int.Sensor max. 1 24 °C Then press READ again Temperature (min/max) Alarm state Time / Alarm duration = OK dd.mm.yyyy 0123456789012 = ALARM ® Fridge-tag The following additional information is indicated on the screen: • Highest recorded temperature example: +10.5 ˚C • The time duration out of the preset high temperature limit example 11:24; hh:mm. • Temperature recording with example: internal sensor Note: Press and hold the READ button again for at least 3 seconds and the next Alarm event will appear on the screen.
- Page 33 10.3. Option 3: Read out data from the files generated by the Fridge-tag 2 L by connecting it with a computer Plug the Fridge-tag 2 L into any computer via USB Interface. Make sure the device is plugged in properly. Wait sufficient time for the device to generate the ASCII and PDF files (approx. 2 min). Now choose the appropriate file generated by the Fridge-tag 2 L. USB connection of a Fridge-tag 2 L. You can see the progress bar by continuously appearing arrows in the upper display area. > 25°C (15min) < 8°C...
- Page 34 The hard drive of the Fridge-tag 2 L is shown in your explorer Open the appropriate file generated by the Fridge-tag 2 L. FT-2L (F:) FT-2L (F:) Note: For a proper USB-port disconnection of the device, please always use the "Safely Remove Hardware” function on your PC/ Mac. Right mouse click on the icon "Safely Remove Hardware and Eject Media". (Choose the right device to remove). FT-2L (F:) Do not disconnect the device before you receive the following message: Note: For this process no additional software is necessary.
-
Page 38: Auto Scaling Of Graphs In Pdf
10.5. Auto scaling of graphs in PDF The graph of the report is created dynamically depending on the following settings: • the alarm limits of the device • the highest and lowest measured value This is valid for all graphs in the PDF file until: • the highest and lowest measured values drop out the history • the temperature settings (self configurable device only) are changed PDF document of the Fridge-tag®... - Page 39 Sample of a PDF-file generated by a Fridge-tag 2 L with internal sensor. PDF document of the Fridge-tag® 2 L ent of the Fridge-tag® 2 L Identification number: 510500000006 510500000006 Date and time of report creation: 01/06/2016 20:37h ation: 01/06/2016 20:37h Activation date: 12/10/2015 13:40h 12/10/2015 13:40h Upper alarm limit: Above +8.0°C for 1min Above +8.0°C for 1min Lower alarm limit: Below +2.0°C for 1min...
-
Page 40: Temperature Record Duration
10.6. Temperature record duration (optional factory setting) Selectable record duration: 28, 56, 84, 112 days. Note: File names on the Fridge-tag 2 L are write protected. The names may only be changed after downloading onto a computer. Changing is either possible directly on unopened files or via open and save commands with the Adobe Reader. Using other programs may cause loss of the digital signature. Date: Date of measurement Event: t Time/date changed Event: a Alarm configuration changed Event: hh:mm Time stamp: status checked Average temp. Average temperature Status: in progress The data collection of "Today" is not yet complete Status: OK No Alarm has been triggered the past 30 days (No Alarm has yet been triggered since the last data read out on the device.*) Status: Alarm Alarm/s have been triggered (With means that the details of the corresponding Alarm have not been read out yet*) Status: Alarm Alarm/s have been triggered (Without... -
Page 41: Verification Process
10.7. Verification process This process is to verify if the files (PDF and ASCII-file) created by the Fridge-tag 2 L are authentic and have not been manipulated or accidentally changed (meets the strict FDA 21 CFR Part 11 requirements). 1st step: Download the software Berlinger Verifier from our website: www.berlinger.com/verifier 2nd step: Open the software. The following window will appear: 3rd step: Click on "Open file" 4th step: Select the file you would like to verify. Option 1: Select the files directly from the Fridge-tag 2 L which is connected to your computer. Option 2: Select the files from the place where you saved them on your computer. When the file is correct and in its original condition, the following window will appear: In case the file has been changed, an "error mes- sage" will appear. Proceed the same way with the PDF or the ASCII-file. The same OK or ERROR messages will appear. -
Page 42: Explanation Of Terms
HI or LO indicator (External sensor): If the Fridge-tag 2 L measures temperatures above +55 °C or below - 40 °C, it shows "HI" and "LO"on the screen and also in its extreme tempera- ture memory. The regular measurements and monitoring of Alarmlimits will continue as usual. As soon as the temperature is between +55 °C and - 40 °C numbers will be displayed again. 12. Expire code explanation Sample: exp 2020-07 The sample shows the expiry date of the Fridge-tag 2 L as July 2020 (2020-07). More information about the Fridge-tag 2 L can be found in the sales brochure and on the website: www.berlinger.com 13. Technical specifications Storage condition (inactive) 0 °C to +30 °C *Operating temperature (internal sensor) -25 °C to +55 °C *Operating temperature (external sensor) -40 °C to +60 °C Display visible (internal sensor) -10 °C to +55 °C Accuracy of temperature measurement internal sensor external sensor +/- 0.8 °C (-25 °C to - 10 °C) -
Page 43: Important Information
Accuracy of time measurement +/- 30 minutes/year Temperature measurement interval every minute Operating lifetime Fridge-tag 2 L up to 3 1/2 years Estimated battery lifetime (check battery indicator) Protection class (internal sensor) IP64 Protection class (external sensor) IP50 * for temperatures below 0 °C (+32 °F) we highly recommend to use an external sensor in order to avoid a shorter battery life. 14. Important Information Liability The manufacturer shall not be held liable: • if the device was used beyond the manufacturer’s given limitations. • for any claims due to the improper storage and use of the device. • for any problems with the temperature controlling and/or cooling unit. • for the bad quality of any monitored goods. • for incorrect readings if the device was used beyond its expiry date. •... - Page 44 Useful life The devices can be used up to 3 1/2 years after production date (1/2 year storage / 3 years useful life) on the condition that: • the buttons are not pressed for very long time, e.g. if jammed between the goods in a shipment. • storage and operation of the device should remain inside the recommendations of the manufacturer, especially tempera- tures below 0 °C or +32 °F could have a negative influence for the operating lifetime of the battery. The end of the useful life is indicated by the battery indicator on the display (see chapter 1 "Display information" on page 3) . Attention • The Fridge-tag 2 L monitors temperature exposure and not the product quality. Its purpose is to signal if product quality evaluation or testing is required. Berlinger & Co. AG Mitteldorfstrasse 2 9608 Ganterschwil Switzerland Tel.: +41 71 982 88 11 E-Mail: info@berlinger.com Web: www.berlinger.com Subject to change. Please note that all information in this document is correct at the time of pub- lication. Due to our policy of continuous product development, we reserve the right to change this information without prior notice. 201803_User Manual Fridge-tag 2 L_EN_V1...
Need help?
Do you have a question about the Fridge-tag 2 L and is the answer not in the manual?
Questions and answers