Table of Contents
Advertisement
Remote Vehicle Control System
CA-670
Owner's Manual
Deluxe Vehicle Security and Remote
Start System with Two Way
Confirming LCD Remote Control
IMPORTANT NOTE: The operation of the Security and Convenience System as described in this manual is
applicable to most vehicles. However, due to the configuration of some vehicles, some functions AND/OR SAFETY
PRECAUTIONS may not apply. Please see your installing dealer for more information.
Advertisement
Table of Contents

Related Manuals for Code Alarm CA-670


Summary of Contents for Code Alarm CA-670
- Page 1 Remote Vehicle Control System CA-670 Owner's Manual Deluxe Vehicle Security and Remote Start System with Two Way Confirming LCD Remote Control IMPORTANT NOTE: The operation of the Security and Convenience System as described in this manual is applicable to most vehicles. However, due to the configuration of some vehicles, some functions AND/OR SAFETY...
-
Page 2: Table Of Contents
Table of Contents Using Your Remote Control ... 3 Arming the security system Pre-arm mode Disarming the security system Disabling/Enabling confirmation chirps Attempted intrusion identification Two stage door unlock* Activating the trunk release feature* Using Your Remote Control, continued ... 4 Turning on the vehicle’s headlights* Activating optional channel 2* Activating optional channel 3*... -
Page 3: Using Your Remote Control
Using Your Remote Control Arming the Security System To arm the system, exit the vehicle, close all doors, then press the LOCK icon button on the remote control. The system will sound twice and the parking lights will flash twice, indicating the system is armed. The doors will also lock at this time (if equipped and connected). -
Page 4: Using Your Remote Control, Continued
Using Your Remote Control, continued Turning on the Vehicle’s Headlights (Optional) If this feature is enabled on your system, pressing and holding the LOCK icon button on the remote control for 2 seconds will turn on the vehicle’s headlights for 30 seconds. Activating Optional Channel 2 (Optional) If this feature is enabled on your system, pressing and holding the LOCK icon button and the TRUNK icon button on the remote control simultaneously will activate an optional feature. -
Page 5: Using Your Remote Vehicle Starter
Using Your Remote Vehicle Starter Remote Starting Your Vehicle To activate the remote vehicle start function, press and release the OPT button on the remote control two (2) times within 2 seconds. The system will sound, the parking lights will flash 1 time and the system will check the vehicle to ensure it is safe to start, if all safety parameters are correct, the vehicle will start within 5 seconds (diesel vehicles will take longer). -
Page 6: Using Your Remote Vehicle Starter, Continued
Using Your Remote Vehicle Starter, continued Operating the 2 / 4 Hour Start Up Timer Mode The system has the ability to start the vehicle every 2 or 4 hours over a 48 hour period. This feature is especially useful in cold climates where the only means to keep the engine and engine fluids warm is to periodically start the engine. -
Page 7: Using Your Remote Vehicle Starter, Continued
Using Your Remote Vehicle Starter, continued Operating the Daily Start Timer The system has the ability to start your vehicle based on a 24-hour countdown timer. To activate this feature, using the remote control press the LOCK and OPT buttons simultaneously for 1 second. The system will begin counting sown from 24 hours, and start the vehicle when it reaches zero. -
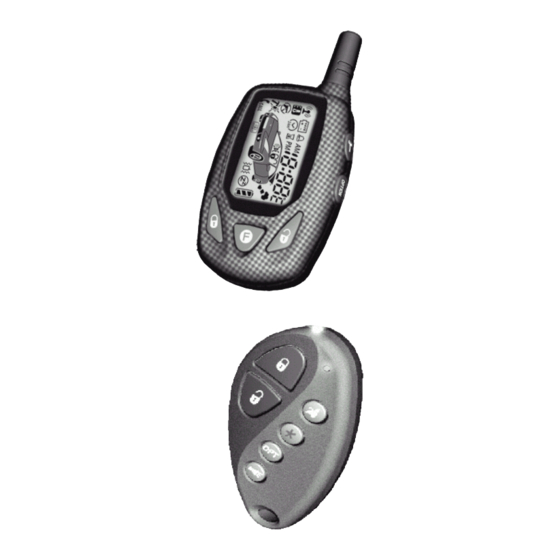
Page 8: Additional Lcd Remote Control Features
Additional LCD Remote Control Functions Check Vehicle Status Press the LOCK icon button, TRUNK icon button and OPTION button simultaneously for 1 second. The LCD remote control will display the system’s current status. Check Temperature Press the TRUNK icon button and OPTION button simultaneously for 1 second. The LCD remote control will display the vehicle’s interior temperature. -
Page 9: Lcd Remote Control Functions
LCD Remote Control Functions TRUNK TRUNK... -
Page 10: Lcd Remote Control Icons And Their Indications
LCD Remote Control Icons and Their Indications Security Sytem Armed Security Sytem Disarmed Trunk Release Option Vehicle is Running via Remote Vehicle Start Personal Protection LCD Remote Control Security System Trigger Activated Alarm Activated Vibrate Mode (Door Entry) Security System Trigger (Hood or Trunk Entry) Security System Trigger (IT-s Sensor) -
Page 11: Optional Songbird Feature
Optional Songbird Feature The optional songbird feature (Code Alarm part # SB1 and labor required) allows you to program songs and tones to your system (i.e. Setting a different tone for Lock activation and unlock activation). Turning Songbird On: Press and release the TRUNK icon button on the remote control, then press and hold the LOCK icon button on the remote control within 2 seconds. -
Page 12: Emergency Override Procedure
Emergency Override Procedure If your transmitter is lost or disabled, it will be necessary use the emergency override button to turn the security system off. There are two types of emergency override procedures. Check with your installing dealer to find out what has been activated on your system. Standard Emergency Override Procedure Enter the vehicle (the security system will trigger). -
Page 13: Code Systems, Inc. Limited Lifetime Warranty
Code Systems, Inc. Limited Lifetime Warranty A Code Systems Inc. (“CODE”) vehicle comfort, convenience and security system sold to a retail consumer purchaser by an authorized dealer of CODE and installed by an authorized dealer of CODE is warranted by CODE to the original retail consumer purchaser to be free from defects in workmanship and materials for the lifetime of the vehicle in which the system was originally installed. - Page 14 FCC COMPLIANCE This device complies with Part 15 of the FCC rules and with RSS-210 of Industry Canada. Operation is subject to the following two conditions: 1. This device may not cause harmful interference, and 2. This device must accept any interference received, including any interference that may cause undesired operation.
Need help?
Do you have a question about the CA-670 and is the answer not in the manual?
Questions and answers
Code alarm won't enable starter, tried to override and not working