
Related Manuals for Toyota PX-4226A-C


Summary of Contents for Toyota PX-4226A-C
- Page 1 DVX-AVX OWNER’S MANUAL Please read the manual for proper operation and keep it for future reference.
-
Page 2: Table Of Contents
Contents 1. PRECAUTIONS ..............................5 2. CAUTIONS ON HANDLING ..........................6 3. OPERATION PANEL ............................7 Functions of Buttons ............................7 4. Functions of Steering Wheel Remote Control Buttons ..................8 5. BASIC OPERATIONS ............................9 Turning on/off the power ............................9 Switching Source Modes .............................9 Home Screen ...............................9 Status Bar Display ...............................9 Switch to Clock Display ............................9 Adjusting the Volume ............................9... - Page 3 Contents 10. USB/MTP AUDIO OPERATIONS ........................16 Play/Pause Playback ............................16 Switch to Previous/Next File or track .........................16 Fast Forward/Fast Backward Operation ......................16 Repeat Playback ..............................16 Random Playback ..............................16 Album Artwork ..............................16 Selecting a Track on the album view .........................17 Selecting a Track on the artist view ........................17 Selecting a Track on the folders view ........................17 Selecting a Track on the songs view .........................17 11.
- Page 4 Contents Initializing Applications ............................25 Switching from Applications to Apple CarPlay™ (for iPhone users) ..............25 Switching from Applications to USB (MTP) ......................25 17. Apple CarPlay™ ...............................26 Apple CarPlay™ ..............................26 Initializing Apple CarPlay ...........................26 Accessing Apple CarPlay Screen (by Touch Panel) ..................26 Accessing Apple CarPlay Screen (by Physical Buttons) ...................26 Answering calls by steering wheel remote control (if equipped) ................26 Exiting Apple CarPlay Display ...........................26...
-
Page 5: Precautions
1. PRECAUTIONS CAUTION As the driver, you are responsible for your In the event that foreign materials is inserted safety and the safety of your passengers. in the unit, or if the unit gets wet and emitting smoke or strange smells, please stop using Please do not operate the system while the unit immediately and consult your nearest driving. -
Page 6: Cautions On Handling
2. CAUTIONS ON HANDLING Operation Panel About the registered marks, etc. Use of the Made for Apple badge means that an Please observe the following cautions. accessory been designed connect The units touch screen panel is designed to operate specifically to the Apple products identified in the badge, properly in the temperature range of -20˚... -
Page 7: Operation Panel
3. OPERATION PANEL 5. Touch Screen 6. Microphone 4. [HOME] 7. [Volume +] 8. [MUTE] 3. [ ] 9. [Volume -] 2. [ ] 1. USB Port 10. AUX Input Functions of Buttons 1. USB Port 6. Microphone USB mass storage device/MTP/iPod/iPhone/Android For handsfree. -
Page 8: Functions Of Steering Wheel Remote Control Buttons
4. FUNCTION OF STEERING WHEEL REMOTE CONTROL BUTTONS Radio USB/ Phone Mode iPod/ Keypad Phonebook History Incoming Outgoing Call In iPhone/ Dialled/ Call Call Progress BT Audio Missed/ Recent Button SOURCE Change valid Audio Source Mode No function (Radio Audio USB1 Audio Bluetooth Video USB1 Radio...) -
Page 9: Basic Operations
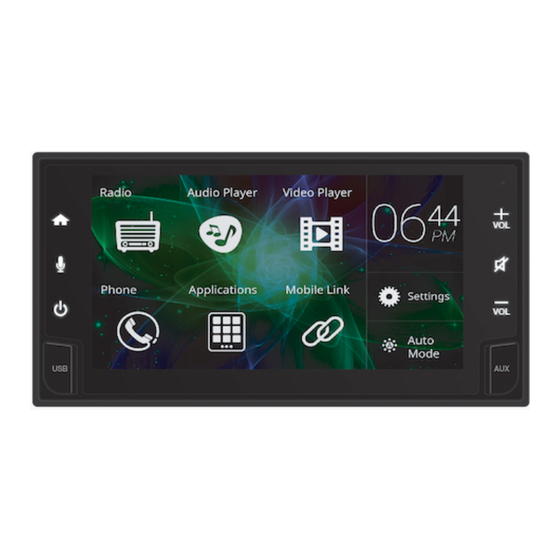
5. BASIC OPERATIONS Turning on/off the power Note: • Be careful about using this unit for a long time without running the engine. If you drain the car’s battery too much, you may not be able to start the engine and this can reduce the service life of the battery. -
Page 10: Parking Brake Safety
Parking Brake Safety Video Output The video at the unit can only be displayed when the If an external monitor is connected to the head unit, parking brake is enabled (when the car is parked). The passengers in the back seat can watch the video audio portion of the video can still be played, but a separately. -
Page 11: Rds Text
RDS Text 1. Press the button to display RDS text for current Storing preset memory station. Preset memory function can store up to 20 stations: 20 2. Press the [Cancel] button to close the RDS text stations for FM and AM. message box. -
Page 12: Rds Operations
7. RDS OPERATIONS (If equipped) • Turning off TA [RDS] button to select the RDS Tab. 1. Press the The tab controls will change accordingly. 2. During TA standby mode, press the “Traffic Annoucement (TA)”. The “TA” indicator in the display goes off and TA standby mode is cancelled. -
Page 13: Volume Setting Of Ta, Emergency Broadcast, And Pty
2. Press the “Programme Type (PTY)”, PTY standby Travel Travel mode is turned on. When the selected PTY broadcast starts, the display will change and the PTY item name Leisure Leisure appears in the display. Jazz Music Jazz Country Country •... -
Page 14: Usb Mode Operation
8. USB MODE OPERATIONS Connecting a USB memory/MTP device This system can play audio files (MP3/WMA/AAC/WAV) stored in an USB memory which is recognized an “USB Mass Storage Class device”. You can use your USB memory as an audio device by simple copying desired audio files into it. -
Page 15: Usb Video Operations
9. USB VIDEO OPERATIONS Showing video mode screen Play/Pause Playback 1. Press the button to pause during playback. 2. Press the button again to resume playback. Switch to Next/Previous Video 1. Press the button during playback to play previous/next video. Fast Forward/Fast Backward Operation 1. -
Page 16: Usb/Mtp Audio Operations
10. USB/MTP AUDIO OPERATIONS Repeat Playback 1. Press the button to select the repeat status for playback. The text will change accordingly. 2. Every time the button is pressed, the repeat function will change as: Repeat Off Track Repeat All Repeat •... -
Page 17: Selecting A Track On The Album View
Selecting a Track on the album view 2. Select the folder from the folders list to switch to This function allows you to select tracks from album songs view. view. 3. Press and hold the scroll bar, slide up or down to view [Albums] button to enter album view. -
Page 18: Ipod/Iphone Operations
11. iPod/iPhone OPERATIONS This section describes operations when connected to an Repeat Play Apple iPod/iPhone via the USB slot. 1. Press the button to select the repeat status for playback. The text will change accordingly. Notes: 2. Every time the button is pressed, the text will •... -
Page 19: Available Ipod Categories
2. If desired iPod category is not in the tab, slide the Supported iPod/iPhone Devices iPod directory tab up or down to look for more iPod Supported iPod/iPhone compatible software categories. version: 3. Select the desired category to go to the next level; iPod/iPhone Compatible Version press the... -
Page 20: Bluetooth® Audio Player Operations
13. Bluetooth® AUDIO PLAYER OPERATIONS Some Bluetooth mobile phones have audio features, Fast Forward/Backward and some portable audio players support the Bluetooth 1. Press and hold the button to start fast feature. These devices will be called as “Bluetooth backward or fast forward during playback. Releasing audio players”... -
Page 21: Bluetooth® Telephone Operations
14. Bluetooth® TELEPHONE OPERATIONS Introduction to Bluetooth® Technology 2. Press [VOICE] button again to cancel the voice Bluetooth® wireless technology radio dialing. technology that connects devices, such mobile phones and headsets, without wires or cords Keypad screen over a short distance of approximately 10 meters (approximately 33 feet). -
Page 22: Phonebook
Phonebook Notes: • The search function only search for the first character of the You can use the Phonebook data obtained from the contacts. device to make a call from this unit. • If the characters cannot be found, it will search and display the following alphabet. -
Page 23: Incoming Call
Separate call conversations with different • The unit will only save the contact and call log information of the latest phone. If a previous phone is re-connected to the numbers unit, all information will need to be downloaded again. • The following Telephone interrupt screen is displayed during two conversation call Incoming call 1. -
Page 24: Switching Between Call Conversations
Switching between call conversations End call during multiple call conversations • The following Telephone interrupt screen is displayed • The following Telephone interrupt screen is displayed during split call during end call selection 1) Select your desire call as active call, the second call 1) Select your desired call to be ended, system will will be on hold. -
Page 25: Applications
16. APPLICATIONS Initializing Applications Switching from Applications to Apple CarPlay™ (for iPhone users) Notes: 1. While an iPhone is connected to the unit by • For safety purposes, please do not operate the smartphone [Mobile Link] button on Applications, press the while driving. -
Page 26: Apple Carplay
17. Apple CarPlay™ When an iPhone is connected to the unit, Mobile Link Answering calls by steering wheel remote control (if equipped) will display the Apple CarPlay UI. 1. During an incoming call, press the [VOICE/ TEL ON] button on the steering wheel to answer the call. Apple CarPlay™... -
Page 27: Settings Operations
18. SETTINGS OPERATIONS Select Settings 2. Press and drag the pointer for Balance to the right to [Settings] button on the Home Screen. 1. Press the emphasize the sound from the right speakers. The display will change accordingly. 3. Press and drag the pointer for Balance to the left to 2. -
Page 28: Custom Equalizer
Custom Equalizer 4. Press the button to reset the Brightness and Contrast to default settings. Clock Adjustment 1) Gain Pointer Display 2) Gain display in dB 3) Reset Button 1) 24-Hour Format on/off button. 4) Back Button 2) Set Time Button. 3) Set Date 1. -
Page 29: Date Settings
Date Settings 2. Select the one of the listed items to perform customization of general settings. 3. Press the button to back to previous layer. Date Settings • Beep Function The beep function produces a beep sound whenever any button with a valid operation is pressed. 1. -
Page 30: Bluetooth Settings
Bluetooth Settings Pairing with a phone 1. Press the [Bluetooth] tab in the settings menu 1. Press the button to add a new device. The to select Bluetooth Settings. The display will change display will change accordingly. accordingly. 2. Turn on Bluetooth function on the mobile phone and set to discoverable mode before proceeding. -
Page 31: Troubleshooting
19. TROUBLESHOOTING • General Problem Cause Measure Power does not turn on. Fuse is blown. Replace with a fuse of the same amperage. (No sound is produced.) If the fuse blows again, consult your store of purchase. Incorrect wiring. Consult your nearest service centre. Nothing happens when The microprocessor has malfunctioned Consult your nearest service centre. - Page 32 • Bluetooth Telephone Problem Cause Measure System is not able to Bluetooth connection is not Use the device to connect manually or receive and make calls established yet. enter Bluetooth Handsfree mode and after being paired. manually reconnect to the last connected The unit will take several seconds to device.
- Page 33 • Thin-Film-Transistor (TFT) Screen Problem Cause Measure The image is not The parking brake is not engaged. Check that the parking brake is engaged. displayed. The display is dark. The Brightness control is too low. Adjust the Brightness properly. The headlight of the vehicle is lit. The display is made dark at night to prevent the glare (When the headlight of the vehicle is lit in the daytime, the display...
- Page 34 • Mobile Link (Apple CarPlay) Problem Cause Measure Mobile Link shows a Device is not connected to the unit. Connect an iPhone to the unit. display to connect a The device is not compatible. Use a compatible device which supports compatible smartphone.
-
Page 35: Error Display
20. ERROR DISPLAY Error Cause Measure Display DEVICE The connected USB device is not If the USB device is frozen, disconnect it, and ERROR supported. reconnect it again. Connect a proper USB device. An error occurred when controlling the Disconnect the USB device, and reconnect it USB device. -
Page 36: Specifications
21. SPECIFICATIONS FM tuner Screen Frequency Range : 87.50 ~ 108.00 MHz Screen size : 6.75 inch Usable Sensitivity : <18dB Pixels : 2764800 Stereo Separation (1 kHz) : >18dB Resolution : 1280 (horizontal) x 720 (vertical) x 3 (RGB) Frequency Response (±3dB) : 100Hz: 0 ±4dB, 7kHz :-10 ±... - Page 37 CUSTOMER CARE For Further information on the system, please contact your nearest UMWT Toyota Motor Service Branch or: CUSTOMER RELATIONS MANAGEMENT (CRM) No. 2. Persiaran Raja Muda, Seksyen 15, 40200 Shah Alam, Selangor Darul Ehsan. Toyota Freephone: 1800-88-TOYOTA (869682) Operating hours : 8.00 am - 5.30pm (Monday to Friday)
- Page 38 280-9600-00 Printed in Malaysia...
Need help?
Do you have a question about the PX-4226A-C and is the answer not in the manual?
Questions and answers