
Related Manuals for Dahua DHI-ARD1731-W2


Summary of Contents for Dahua DHI-ARD1731-W2
- Page 1 Wireless PIR–Camera User’s Manual ZHEJIANG DAHUA VISION TECHNOLOGY CO., LTD. V1.0.1...
-
Page 2: Foreword
This manual introduces the installation, functions and operations of the Wireless PIR–Camera (hereinafter referred to as the "PIR–Camera"). Read carefully before using the device, and keep the manual safe for future reference. Model DHI-ARD1731-W2; DHI-ARD1731-W2 (868) Safety Instructions The following signal words might appear in the manual. Signal Words... - Page 3 User’s Manual About the Manual ● The manual is for reference only. Slight differences might be found between the manual and the product. ● We are not liable for losses incurred due to operating the product in ways that are not in compliance with the manual.
-
Page 4: Important Safeguards And Warnings
User’s Manual Important Safeguards and Warnings This section introduces content covering the proper handling of the PIR–Camera, hazard protection, and protection of property damage. Read carefully before using the PIR–Camera, and comply with the guidelines when using it. Operation Requirements ●... -
Page 5: Table Of Contents
User’s Manual Table of Contents Foreword ........................................I Important Safeguards and Warnings ............................III 1 Introduction ......................................1 1.1 Overview ......................................1 1.2 Technical Specifications ................................. 1 2 Checklist ........................................4 3 Design ......................................... 5 3.1 Appearance ....................................5 3.2 Dimensions ....................................6 4 Power On ........................................ -
Page 6: Introduction
User’s Manual 1 Introduction 1.1 Overview With its built-in 2-MP HD camera and CMOS image sensor, wireless PIR–Camera detects intrusions and captures high-definition snapshots. It is a wireless passive infrared detector that sends snapshots through the Wi-Fi and Ethernet connection to your phone and ARC (alarm center), for the causes of intrusions to be effectively identified. - Page 7 User’s Manual Type Parameter Description DHI-ARD1731-W2(868): DHI-ARD1731-W2: Carrier Frequency 868.0 MHz–868.6 MHz 433.1 MHz–434.6 MHz DHI-ARD1731-W2: DHI-ARD1731-W2(868): RF: Up to 1,200 m RF: Up to 1,600 m (5,249.34 (3,937.01 ft) in an open Communication ft) in an open space space...
- Page 8 User’s Manual Type Parameter Description Scenario Indoor Operating Current 65 μA Day: 170 mA (Avg); 800 mA (Max) Night: 230 mA (Avg); Alarm Current 2.8 A (Max)
-
Page 9: Checklist
User’s Manual 2 Checklist Figure 2-1 Checklist Table 2-1 Checklist Item Name Quantity Item Name Quantity PIR–Camera Quick start guide Double-sided adhesive Legal and regulatory tape information Screw package Battery QR code... -
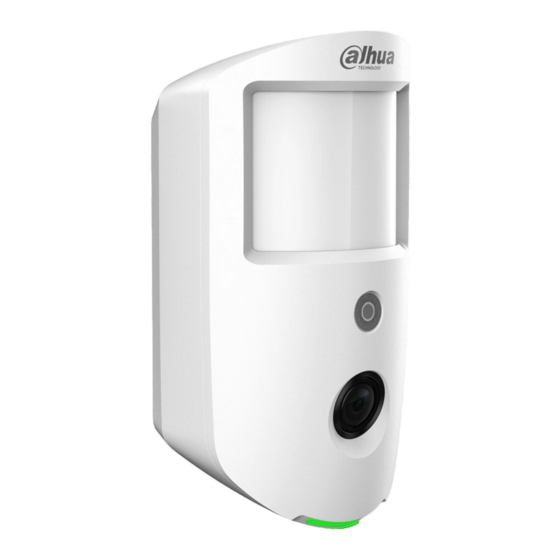
Page 10: Design
User’s Manual 3 Design 3.1 Appearance Figure 3-1 Appearance Table 3-1 Structure Name Description IR light Provides IR light for dark environments. Camera Captures images when an intrusion alarm is triggered. ● Flashes green quickly: Pairing mode or reduced sensitivity mode. ●... -
Page 11: Dimensions
User’s Manual 3.2 Dimensions Figure 3-2 Dimensions (mm [inch]) -
Page 12: Power On
User’s Manual 4 Power On Step 1 Loosen the screw to open the PIR–Camera. Figure 4-1 Loosen the screw Figure 4-2 Open the PIR–Camera Step 2 Insert batteries into the PIR–Camera. ● When inserting the batteries, make sure that they are all charged to the same level. ●... - Page 13 User’s Manual Figure 4-3 Insert batteries Step 3 Turn on the PIR–Camera. Figure 4-4 Turn on the PIR–Camera...
-
Page 14: Adding The Pir-Camera To The Hub
User’s Manual 5 Adding the PIR–Camera to the Hub Before you connect PIR–Camera to the hub, install the DMSS app to your phone. This manual uses iOS as an example. ● Make sure that the version of the DMSS app is 1.99 or later, and the hub is V1.002.R.220625 or later. -
Page 15: Installation
User’s Manual 6 Installation 6.1 Field of View Field of view of the PIR are shown below. When installing and using the PIR–Camera, make sure there are no objects partially or fully obscuring the detector's field of view. Figure 6-1 Field of View 6.2 Installing the PIR–Camera Prior to installation, add the PIR–Camera to the hub and test the signal strength and RF-HD. - Page 16 User’s Manual Figure 6-2 Drill holes Step 2 Close the PIR–Camera. Figure 6-3 Close the PIR–Camera Step 3 Secure the PIR–Camera with a screw. Figure 6-4 Secure the PIR–Camera...
-
Page 17: Configuration
User’s Manual 7 Configuration You can view and edit general information of the PIR–Camera. 7.1 Viewing Status On the hub screen, select a PIR–Camera from the accessory list, and then you can view the status of the PIR–Camera. Table 7-1 Status Parameter Value The status for whether the functions of the PIR–Camera are enabled or... -
Page 18: Configuring The Pir-Camera
User’s Manual Parameter Value The status of whether the PIR–Camera forwards its messages to the hub through the repeater. Transmit through Repeater The PIR–Camera does not support the function of the repeater (DHI- ARA43 series) to transmit images from the PIR–Camera to the hub. Program Version The program version of the PIR–Camera. - Page 19 User’s Manual Parameter Description Configure the number of snapshots that can be taken at a time, the interval and the parameters of the image. ● Tap Times to Take Snapshots, and then select times from 1 to 10. ● Tap Trigger Interval, and then you can select 10, 30, 60, or 120 seconds.
- Page 20 User’s Manual Parameter Description The system provides you with time to leave or enter the protection zone without alarm. ● Delay Time for Entering Arming Mode: When you enter the zone, if you do not disarm the system before the delay ends, an alarm will be triggered.
-
Page 21: Appendix 1 Cybersecurity Recommendations
IP video surveillance is not immune to cyber risks, but taking basic steps toward protecting and strengthening networks and networked appliances will make them less susceptible to attacks. Below are some tips and recommendations from Dahua on how to create a more secured security system. - Page 22 User’s Manual 1024–65535, reducing the risk of outsiders being able to guess which ports you are using. 6. Enable HTTPS We suggest you to enable HTTPS, so that you visit Web service through a secure communication channel. 7. MAC Address Binding We recommend you to bind the IP and MAC address of the gateway to the device, thus reducing the risk of ARP spoofing.
- Page 23 User’s Manual device. More information Please visit Dahua official website security emergency response center for security announcements and the latest security recommendations.
- Page 24 User’s Manual...
Need help?
Do you have a question about the DHI-ARD1731-W2 and is the answer not in the manual?
Questions and answers