Advertisement
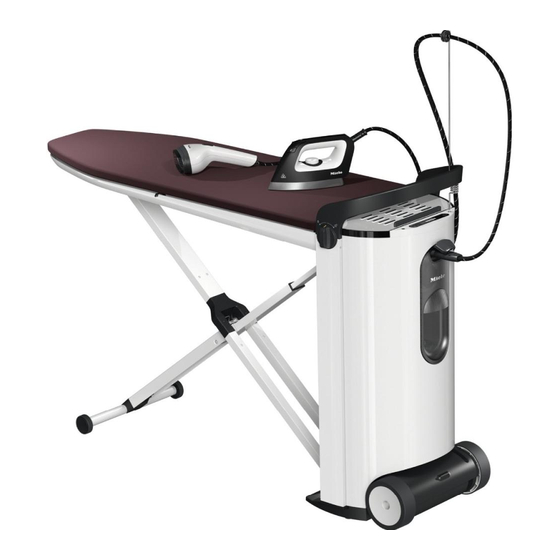
Assembly
Move the steam ironing system to its
installation location.
Use one hand to pull the release
mechanism upwards.
This releases the locking mechanism of
the ironing board and the X-frame folds
down.
Hold onto the release mechanism
and guide the ironing board into a
position of approx. 45°.
The ironing board remains in this
position by itself.
12027890-01
Use both hands to pull the ironing
board upwards into a horizontal
position until this audibly clicks into
place on both sides of the tower.
Click!
Ensure the ironing board has locked
into place on both sides of the tower.
Engaging on both sides is a prerequisite
for the height adjustment and the fan in
the ironing board to work.
Click!
Advertisement
Table of Contents

Related Manuals for Miele FashionMaster B 4847


Summary of Contents for Miele FashionMaster B 4847
- Page 1 *INSTALLATION* 12027890-01 Assembly Move the steam ironing system to its installation location. Use both hands to pull the ironing board upwards into a horizontal position until this audibly clicks into Use one hand to pull the release place on both sides of the tower.
- Page 2 *INSTALLATION* 12027890-01 Assembly Adjusting the height The steam ironing system can be adjusted to suit your personal preference. The maximum working height is around 102 cm. When adjusting the height, ensure the mains connection cable does not become trapped in the mechanism. The steam ironing system is now assembled.
- Page 3 *INSTALLATION* 12027890-01 Assembly At the same time, pull the handle upwards with the other hand or press the handle down. Do not push down on the ironing board while adjusting the height. Always use the handle on the tower to adjust the height.
- Page 4 *INSTALLATION* 12027890-01 Connecting Insert the plug into a suitable earthed Connecting the mains socket (see “Electrical connection”). connection cable The steam ironing system is designed for connection to a properly installed earthed socket for AC 220-240 V, 50-60 Hz. Guide the mains connection cable through the slot in the lid.
- Page 5 *INSTALLATION* 12027890-01 Connecting Removing the iron and the The steam ironing system is suitable steam hose holder for right-handed or left-handed people. Operation is optimised for both sides. Connecting the steam hose Open the steam connection socket by pulling it upwards. ...
- Page 6 *INSTALLATION* 12027890-01 Connecting Danger of tipping over when the iron is placed in an upright position. An iron placed in an upright position can easily tip over and fall. Always place the iron onto the iron resting area with its soleplate down. ...
- Page 7 *INSTALLATION* 12027890-01 Electrical connection Before you connect the steam Do not use a multi-socket adapter or ironing system to the electricity an extension lead to connect the supply, you must check the steam ironing system to the power connection data (voltage and supply.
Need help?
Do you have a question about the FashionMaster B 4847 and is the answer not in the manual?
Questions and answers