Table of Contents
Advertisement
Available languages
Available languages
Quick Links
2/2
972027 - CYCLONIC-S10
CONSIGNES D'UTILISATION
INSTRUCTIONS FOR USE
GEBRUIKSAANWIJZINGEN
INSTRUCCIONES DE USO
ISTRUZIONI PER L'USO
Aspirateur
Vacuum Cleaner
Stofzuiger
Aspirador
Aspirapolvere
....................02
....................12
....................24
....................36
....................48
07/2021-01
Advertisement
Table of Contents

Subscribe to Our Youtube Channel
Related Manuals for VALBERG CYCLONIC-S10


Summary of Contents for VALBERG CYCLONIC-S10
- Page 1 07/2021-01 Aspirateur Vacuum Cleaner Stofzuiger Aspirador Aspirapolvere 972027 - CYCLONIC-S10 CONSIGNES D'UTILISATION ....02 INSTRUCTIONS FOR USE ....12 GEBRUIKSAANWIJZINGEN ....24 INSTRUCCIONES DE USO ....36 ISTRUZIONI PER L'USO ....48...
- Page 3 110 cm...
- Page 6 Merci ! M e rc i d ’ a v o i r c h o i s i c e p ro d u i t VA L B E R G . Choisis, testés et recommandés par ELECTRO DEPOT, le s p ro d u i t s d e l a m a rq u e VA L B E R G v o u s a s s u re n t u n e u t i l i s a t i o n s i m p l e , u n e p e r f o r m a n c e f i a b l e e t u n e q u a l i t é...
- Page 7 Table des matières Composants Aperçu de l’appareil Aperçu de l’appareil Utilisation prévue Caractéristiques Chargement de la batterie Utilisation de Installation de la plaque de support mural l’appareil Montage/Démontage Fonctionnement Nettoyage et entretien Nettoyage et Dépannage entretien Rangement Les notices sont aussi disponibles sur le site http://www.electrodepot.fr/sav/notices/ http://www.electrodepot.be/fr/sav/notices...
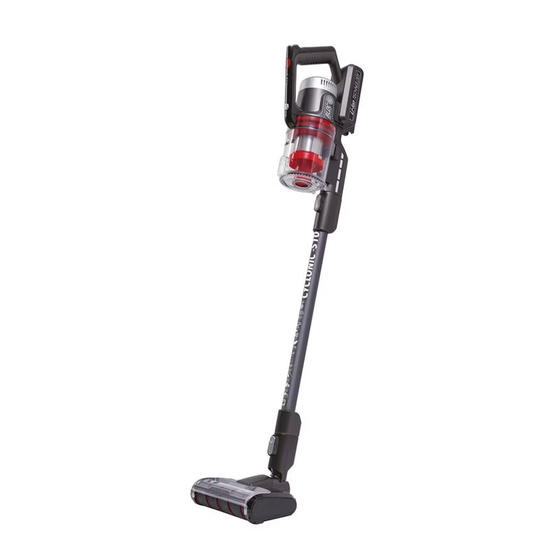
- Page 8 Aperçu de l’appareil Composants Filtre assemblé (à l’intérieur du Port de charge de la batterie compartiment à poussière) Bouton marche/arrêt Embout de l’aspirateur à main Bouton de puissance pour vitesse Tube rapide, moyenne et lente Bouton de déverrouillage de la Voyant LED de puissance brosse pour sols Brosse pour sols avec poils (pour...
-
Page 9: Utilisation Prévue
• Toute autre utilisation est susceptible d’endommager l’appareil ou de provoquer des blessures. Caractéristiques Modèle : 972027 - CYCLONIC-S10 Puissance de l’aspirateur : 350 W max. Capacité du compartiment à poussière : 0,7 l Puissance d’aspiration :... -
Page 10: Chargement De La Batterie
Aperçu de l’appareil Utilisation de l’appareil Chargement de la batterie La batterie doit être chargée avant la première utilisation et lorsque l’aspirateur ne se met pas en marche en raison d’un niveau de batterie trop faible. REMARQUE : L’aspirateur s’arrête automatiquement lorsque le niveau de batterie est trop faible et que celle-ci doit être rechargée. - Page 11 Aperçu de l’appareil Utilisation de l’appareil Installation de la plaque de support mural REMARQUE : Trouvez un emplacement adéquat pour la plaque de support mural. • De préférence, placez la plaque de support mural à proximité d’une prise secteur. • N’installez la plaque de support mural que dans un endroit où...
- Page 12 Aperçu de l’appareil Utilisation de l’appareil Montage/Démontage Montage de l’aspirateur : Poussez la brosse ou le suceur désiré dans le tube jusqu’à ce qu’ils soient fermement insérés. Brosse pour sol/puissante uniquement – faites tourner le tube fixé à la brosse pour sols ou puissante dans le sens des aiguilles d’une montre jusqu’à...
-
Page 13: Nettoyage Et Entretien
Aperçu de l’appareil Nettoyage et entretien Fonctionnement • Une fois l’appareil monté, il est prêt à être utilisé. Pour mettre l’aspirateur en marche, appuyez sur le bouton Marche/Arrêt. Les voyants LED de la batterie s’allument alors. Appuyez plusieurs fois sur le bouton de puissance pour faire passer d’un niveau de puissance à... - Page 14 Aperçu de l’appareil Nettoyage et entretien Appuyez sur le levier pour déverrouiller la base du compartiment à poussière et le vider. Appuyez sur le bouton de déverrouillage du compartiment à poussière. Retirez le compartiment à poussière. Sur le haut du compartiment à poussière, tirez le filtre en mousse à l’aide du ruban. Essuyez tous les éléments à...
-
Page 15: Dépannage
Nettoyage et entretien Nettoyage des accessoires Séparez le tube ou l’aspirateur à main des brosses/du suceur. Retirez toute obstruction et nettoyez à l’eau. Séchez complètement avant d’utiliser à nouveau l’appareil ou avant de le ranger pour une longue durée. Dépannage Problème Cause possible Solution... - Page 16 Thank you! T h a n k y o u f o r c h o o s i n g t h i s VA L B E R G p ro d u c t . V A L B E R G p r o d u c t s a r e c h o s e n , t e s t e d , a n d recommended by ELECTRO DEPOT, so you can be sure y o u a re g e t t i n g a t o p - q u a l i t y, e a s y - t o - u s e p ro d u c t t h a t w o n ’...
- Page 17 Table of Contents Parts Product overview Product overview Intended use Specifications Charging the battery Product usage Installing the wall mount Assembly/Disassembly Operation Cleaning and maintenance Cleaning and Troubleshooting maintenance Storage...
-
Page 18: Product Overview
Product overview Parts Assembled filter Battery charging port (inside the dust cup) On/Off switch Handheld vacuum nozzle Power button (for high, medium and Tube low speed) Power LED indicator Floor brush release button Floor bristle brush (for all types of Battery LED indicators flooring) HEPA filter cover... -
Page 19: Intended Use
This vacuum cleaner is for household use only. It has not been designed for industrial or professional use by cleaning companies. • Any other use may damage the unit or cause injury. Specifications Model: 972027 - CYCLONIC-S10 Vacuum power output: 350 W max. Dust cup capacity: 0.7 L Suction power:... -
Page 20: Product Usage
Product usage Charging the battery The battery must be charged before first use and whenever the vacuum will not turn on because the battery is too low. NOTE: When the power is too low and the battery needs to be charged, the vacuum will automatically turn off. -
Page 21: Installing The Wall Mount
Product usage Installing the wall mount NOTE: Find a suitable location for the wall mount. • Preferably install the wall mount near an mains socket. • Only install the wall mount in a location where the ambient temperature is constant and between +5 °C and 40 °C. •... - Page 22 Product usage Assembly/Disassembly Mounting the vacuum cleaner: Attach the desired brush or crevice tool to the tube until it is firmly secured. Floor brush/power brush only - Rotate the tube attached to the floor/power brush clockwise until the brush release button is facing forward. Next, press down so that the underside of the brush comes into full contact with the floor.
-
Page 23: Operation
Product usage Operation • Once the unit is assembled, it is ready for use. Press the On/Off button to turn on the vacuum. The battery LED indicators will light up. Press the power button as required to toggle between power levels. The LED indicator will change colour as follows: White = medium power Blue = high power... -
Page 24: Cleaning And Maintenance
Cleaning and maintenance Cleaning and maintenance WARNING! • Always turn off and unplug the unit from the power supply before cleaning. • Never immerse the unit in water or any other liquid. • Detach all accessories from the main unit. •... -
Page 25: Troubleshooting
Cleaning and maintenance Cleaning the floor brush Press the brush release button downwards and remove the clip that secures the right side of the brush in place. Pull the right side of the brush as shown, then slide the left side off the pin that holds it in place. - Page 26 Cleaning and maintenance Problem Possible Cause Solution The brush is not • The brush is clogged • Cut the tangled threads with scissors. spinning. with debris, such as • Remove the brush to clean it. Make hair/fur. sure it spins smoothly when you put it back in place.
- Page 28 Proficiat met uw keuze voor een product van VALBERG. De selectie en de testen van de toestellen van VALBERG g e b e u re n v o l le d i g o n d e r c o n t ro le e n s u p e r v i s i e v a n E L E C T R O D E P O T.
-
Page 29: Gebruik Van Het Toestel
Inhoudstafel Onderdelen Overzicht van het Overzicht van het apparaat toestel Doelmatig gebruik Specificaties De accu opladen Gebruik van het De muurhouder installeren toestel Montage/Demontage Werking Reiniging en onderhoud Reiniging en Probleemoplossing onderhoud Opslag... -
Page 30: Overzicht Van Het Toestel
Overzicht van het toestel Onderdelen Filtergedeelte (binnenin het Acculaadaansluiting stofreservoir) Aan/uit-knop Mondstuk van handstofzuiger Zuigkrachtknop voor hoge, medium Buis of lage snelheid Ontgrendelingsknop voor LED-zuigkrachtcontrolelampje vloerborstel Vloerborstel met haartjes (voor alle LED-accucontrolelampjes soorten vloer) Deksel van HEPA-filter LED-controlelampjes Ontgrendelingsknop voor HEPA-filter stofreservoir Krachtig draaiende borstel (om stof... -
Page 31: Overzicht Van Het Apparaat
Deze stofzuiger is alleen bestemd voor huishoudelijk gebruik. Het apparaat is niet ontworpen voor industrieel of professioneel gebruik door schoonmaakbedrijven. • Elk ander gebruik kan schade aan het apparaat of letsel aan personen teweegbrengen. Specificaties Model: 972027 - CYCLONIC-S10 Vermogen van stofzuiger: 350 W max. Inhoud van stofreservoir: 0,7 l Zuigkracht: Hoog 95 W, Medium 22 W, Laag 8 W... -
Page 32: De Accu Opladen
Aperçu de l’appareil Gebruik van het toestel De accu opladen Laat de accu voor ingebruikname op en telkens wanneer de stofzuiger niet wordt ingeschakeld omdat het accuvermogen te laag is. OPMERKING: De stofzuiger stopt automatisch wanneer het accuvermogen te laag is en moet vervolgens worden opgeladen. Steek de stekker van de lader in de acculaadaansluiting. - Page 33 Aperçu de l’appareil Gebruik van het toestel De muurhouder installeren OPMERKING: Zoek een gepaste plaats voor de muurhouder. • Breng de muurhouder bij voorkeur in de buurt van een stopcontact aan. • Installeer de muurhouder in een ruimte met een continue kamertemperatuur tussen +5 °C en 40 °C •...
- Page 34 Aperçu de l’appareil Gebruik van het toestel Montage/Demontage Montage van de stofzuiger: Duw de borstel of het spleetmondstuk in de buis totdat het stevig vastzit. Alleen vloerborstel/ krachtige borstel - draai de buis die aan de vloerborstel/ krachtige borstel is vastgemaakt in de richting van de klok totdat de ontgrendelingsknop van de borstel naar voren is gericht.
- Page 35 Aperçu de l’appareil Gebruik van het toestel Werking • Zodra het apparaat in elkaar is gezet, is het klaar voor gebruik. Druk op de aan/uit-knop om de stofzuiger in te schakelen. De LED-accucontrolelampjes branden vervolgens. Druk meerdere keren op de zuigkrachtknop om de verschillende zuigkrachtstanden te doorlopen.
-
Page 36: Reiniging En Onderhoud
Aperçu de l’appareil Reiniging en onderhoud Reiniging en onderhoud WAARSCHUWING! • Schakel het apparaat altijd uit en haal de stekker uit het stopcontact voordat het wordt schoongemaakt. • Dompel het apparaat niet in water of een andere vloeistof. • Maak alle accessoires los van het apparaat. •... - Page 37 Reiniging en onderhoud • Breng alle onderdelen in de omgekeerde volgorde aan. De vloerborstel reinigen Duw de ontgrendelingsknop voor de borstel omlaag en verwijder de sluiting aan de rechterkant die de borstel op zijn plaats houdt. Trek aan de rechterkant van de borstel, zoals weergegeven, en schuif de linkerkant vervolgens uit de as die de borstel op zijn plaats houdt.
- Page 38 Reiniging en onderhoud Probleem Mogelijke oorzaak Oplossing De werkingstijd • De oplaadduur was te • Laad de accu volledig op zoals vermeld is na het opladen kort. in de sectie over opladen. veel te kort. • De accu is versleten. •...
- Page 40 ¡Muchas gracias! M u c h a s g r a c i a s p o r h a b e r e le g i d o n u e s t ro p ro d u c t o VA L B E R G .
-
Page 41: Utilización Del Aparato
Índice Componentes Descripción del Descripción del aparato aparato Uso previsto Características Carga de la batería Utilización del Instalación de la placa de soporte de pared aparato Montaje/desmontaje Funcionamiento Limpieza y mantenimiento Limpieza y Resolución de problemas mantenimiento Almacenamiento... -
Page 42: Descripción Del Aparato
Descripción del aparato Componentes Filtro montado (en el interior del Puerto de carga de la batería compartimento colector de polvo) Botón de encendido/apagado Conector de la aspiradora manual Botón de potencia para velocidad Tubo rápida, media y lenta Botón de desbloqueo del cepillo para Indicador LED de potencia suelos Cepillo para suelos con cerdas (para... -
Page 43: Uso Previsto
• Cualquier otro uso podría dañar el aparato o provocar lesiones. Características Modelo: 972027 - CYCLONIC-S10 Potencia de la aspiradora: 350 W máx. Capacidad del compartimento colector de polvo: 0,7 L Potencia de aspiración:... -
Page 44: Carga De La Batería
Aperçu de l’appareil Utilización del aparato Carga de la batería La batería deberá cargarse antes del primer uso y cuando la aspiradora no se ponga en funcionamiento debido a que el nivel de carga de la batería sea demasiado bajo. NOTA: La aspiradora se apagará... - Page 45 Aperçu de l’appareil Utilización del aparato Instalación de la placa de soporte de pared NOTA: Busque un lugar adecuado para la placa de soporte de pared. • Preferiblemente, coloque la placa de soporte de pared cerca de una toma de corriente. •...
- Page 46 Aperçu de l’appareil Utilización del aparato Montaje/desmontaje Montaje de la aspiradora: Empuje el cepillo o la boquilla de succión que desee en el tubo hasta que estén completamente insertados. Solo el cepillo para suelos/potente: gire el tubo fijado al cepillo para suelos/potente en el sentido de las agujas del reloj hasta que el botón de desbloqueo del cepillo esté...
- Page 47 Aperçu de l’appareil Utilización del aparato Funcionamiento • Una vez lo haya montado, el aparato ya estará listo para usar. Para encender la aspiradora, presione el botón de Encendido/Apagado. Los indicadores LED de la batería se encenderán. Presione repetidamente el botón de potencia para pasar de un nivel de potencia a otro.
-
Page 48: Limpieza Y Mantenimiento
Aperçu de l’appareil Limpieza y mantenimiento Limpieza y mantenimiento ¡ADVERTENCIA! • Apague siempre el aparato y desenchúfelo de la toma de corriente antes de limpiarlo. • No sumerja nunca el aparato en el agua ni en ningún otro líquido. • Quite todos los accesorios de la unidad principal. -
Page 49: Resolución De Problemas
Limpieza y mantenimiento Limpieza del cepillo para suelos Presione el botón de desbloqueo del cepillo hacia abajo y retire el enganche que mantiene el lado derecho del cepillo en su posición. Tire del lado derecho del cepillo tal y como se indica y, a continuación, deslice el lado izquierdo fuera del enganche que lo mantiene en su posición. - Page 50 Limpieza y mantenimiento Problema Posible causa Solución El tiempo de uso es • El tiempo de carga • Cargue completamente la batería tal y demasiado corto ha sido insuficiente. como se indica en el apartado de carga. después de cargar •...
- Page 52 Grazie! G r a z i e p e r a v e r a c q u i s t a t o q u e s t o p ro d o t t o VA L B E R G . S e le z i o n a t i , t e s t a t i e r a c c o m a n d a t i d a E L E C T R O D E P O T , i p ro d o t t i a m a rc h i o VA L B E R G a s s i c u r a n o u n u t i l i z z o s e m p l i c e , p re s t a z i o n i a f f i d a b i l i e a l t a...
- Page 53 Indice Componenti Operazioni Operazioni preliminari preliminari Destinazione d’uso Specifiche tecniche Ricarica della batteria Utilizzo Installazione del supporto a parete dell’apparecchio Assemblaggio e disassemblaggio Utilizzo Pulizia e manutenzione Pulizia e Risoluzione dei problemi manutenzione Conservazione...
-
Page 54: Operazioni Preliminari
Operazioni preliminari Componenti Filtro assemblato (all'interno del Presa di ricarica della batteria contenitore della polvere) Pulsante di accensione/ Tubo dell'aspirapolvere portatile spegnimento Pulsante della potenza (massima, Tubo intermedia e minima) Pulsante di sbloccaggio della Indicatore luminoso della potenza spazzola per pavimenti Spazzola per pavimenti con setole Indicatori luminosi della batteria (per tutti i tipi di pavimenti) -
Page 55: Specifiche Tecniche
• Qualsiasi altro utilizzo comporta il rischio di danni all'apparecchio e infortuni. Specifiche tecniche Modello: 972027 - CYCLONIC-S10 Potenza dell'aspirapolvere: 350 W max. Capacità del contenitore della polvere: 0,7 l Potenza di aspirazione: Potenza massima: 95 W;... -
Page 56: Utilizzo Dell'apparecchio
Utilizzo dell’apparecchio Ricarica della batteria La batteria deve essere ricaricata prima del primo utilizzo e quando l'aspirapolvere non si accende perché il livello di carica della batteria è troppo basso. NOTA: l'aspirapolvere si spegne automaticamente quando il livello di carica della batteria è... -
Page 57: Installazione Del Supporto A Parete
Utilizzo dell’apparecchio Installazione del supporto a parete NOTA: individuare un luogo adeguato per l'installazione del supporto a parete. • Si raccomanda di installare il supporto a parete in prossimità di una presa di corrente. • Il supporto a parete deve essere installato in ambienti con temperatura costante e compresa tra +5°C e 40°C. - Page 58 Utilizzo dell’apparecchio Assemblaggio e disassemblaggio Assemblaggio dell'aspirapolvere Spingere la spazzola o la bocchetta desiderata nel tubo finché non si blocca. Solo spazzola per pavimenti/spazzola motorizzata: ruotare il tubo fissato alla spazzola in senso orario in modo tale che il pulsante di sbloccaggio della spazzola sia rivolto in avanti.
- Page 59 Utilizzo dell’apparecchio Utilizzo • Dopo averlo assemblato, l'apparecchio è pronto all'uso. Per accendere l'aspirapolvere, premere il pulsante di accensione/spegnimento. Gli indicatori della batteria si illumineranno. Premere ripetutamente il pulsante della potenza per passare da un livello all'altro. L'indicatore cambierà colore come indicato di seguito. Bianco = potenza intermedia Blu = potenza massima Spento = potenza minima...
-
Page 60: Pulizia E Manutenzione
Pulizia e manutenzione Pulizia e manutenzione AVVERTENZA • Spegnere l'apparecchio e scollegarlo dalla presa di corrente prima di pulirlo. • Non immergere l'apparecchio in acqua o altri liquidi. • Scollegare tutti gli accessori dall'unità principale. • Pulire l'apparecchio con un panno leggermente umido. Assicurarsi che non penetri alcun liquido all'interno dell'apparecchio. -
Page 61: Risoluzione Dei Problemi
Pulizia e manutenzione Pulizia della spazzola per pavimenti Portare il pulsante di sbloccaggio del rullo verso il basso e rimuovere l'attacco che fissa il lato destro del rullo. Tirare il lato destro della spazzola come illustrato, quindi fare scivolare il lato sinistro fuori dal fermaglio. - Page 62 Pulizia e manutenzione Problema Possibile causa Soluzione La batteria • La durata • Ricaricare completamente la batteria si scarica della ricarica è come indicato alla sezione "Ricarica rapidamente. insufficiente. della batteria". • La batteria è usurata. • Fare sostituire la batteria da un tecnico qualificato.
- Page 64 CONDITION DE GARANTIE Ce produit est garanti pour une période de 2 ans à partir de la date d’achat*, contre toute défaillance résultant d’un vice de fabrication ou de matériau. Cette garantie ne couvre pas les vices ou les dommages résultant d’une mauvaise installation, d’une utilisation incorrecte ou de l’usure anormale du produit.
Need help?
Do you have a question about the CYCLONIC-S10 and is the answer not in the manual?
Questions and answers