Advertisement
Quick Links
Advertisement

Related Manuals for NCR 7703-K168


Summary of Contents for NCR 7703-K168
- Page 1 Kit Instructions Wireless M.2 Card and Antenna 7703-K168 Issue A...
- Page 2 NCR, therefore, reserves the right to change specifications without prior notice. All features, functions, and operations described herein may not be marketed by NCR in all parts of the world. In some instances, photographs are of equipment prototypes. Therefore, before using this document, consult with your NCR representative or NCR office for information that is applicable and current.
-
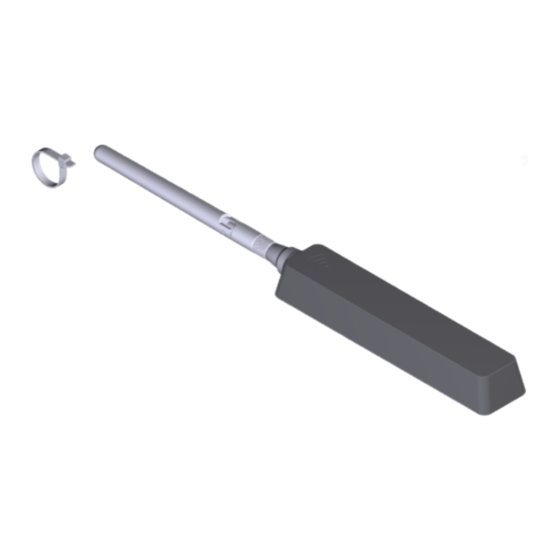
Page 3: Kit Contents
Wireless M.2 Card and Antenna This kit provides the wireless network components for the NCR XR7 Plus POS (7703). Kit Contents... -
Page 4: Installation Procedure
Wireless M.2 Card and Antenna Installation Procedure 1. Lay the terminal face down on a flat surface. Caution: Always use a soft material (cloth, foam) to protect the display screen when placing the terminal face down. 2. Remove the Base Stand and Rear Cover assembly. a. - Page 5 Wireless M.2 Card and Antenna 3. Remove the Display Collar (9 screws). 4. Remove the Blank Plate from Port B (left side of terminal) of the Display Collar. The plate is connected to the Display Collar with a strong adhesive. Use care when removing it to not damage the Display Collar.
- Page 6 Wireless M.2 Card and Antenna 5. Mount and secure the Standalone Antenna to the housing. a. Remove the adhesive liner from the back of the Standalone Antenna. b. Use the "L" shaped markers on the housing as a guide to mount the Antenna. c.
- Page 7 Wireless M.2 Card and Antenna 8. Install the Display Collar onto the terminal. 9. Insert the Adapter at an angle into the Motherboard connector then slightly press it downward to align its mounting hole to the threaded stud on the Motherboard.
- Page 8 Wireless M.2 Card and Antenna 10. Secure the Adapter to the Motherboard with a screw (1). 11. Insert the Wireless M.2 Card at an angle into the Adapter connector, then slightly press the M.2 Card downward.
- Page 9 Wireless M.2 Card and Antenna 12. Secure the Wireless M.2 Card with a screw (1). 13. Route and connect the Antenna Cables to the Wireless M.2 Card. a. Connect the Dipole Antenna Cable to the "AUX" connector (connector 1) on the card.
- Page 10 Wireless M.2 Card and Antenna 14. Connect the Ground Cable to the Motherboard. 15. Reinstall the Base Stand and Rear Cover assembly on the terminal.
- Page 11 Wireless M.2 Card and Antenna Installing the Wireless Driver The Wireless Driver install package is located in the following location in the NCR disk image. c:\Install\Drivers\Wireless Run the file and follow the prompts to install the Wireless[nn.n.n.n]win32.exe driver. External Dipole Antenna Note: The Wireless Module has an internal antenna and if reception is adequate the External Dipole Antenna is not required and not installed for cosmetic reasons.
Need help?
Do you have a question about the 7703-K168 and is the answer not in the manual?
Questions and answers