
Related Manuals for Victron energy VE.Bus BMS V2


Summary of Contents for Victron energy VE.Bus BMS V2
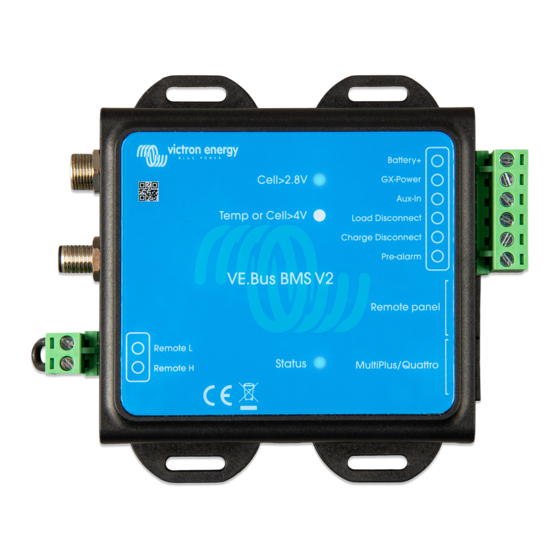
- Page 1 ENGLISH VE.Bus BMS V2 Product manual Rev 01 - 10/2022 This manual is also available HTML5.
-
Page 2: Table Of Contents
5.2. LED indications ......................18 6. Frequently asked questions ...................... 19 7. Technical specifications VE.Bus BMS V2 ..................20 8. Appendix ..........................21 8.1. Dimensions VE.Bus BMS V2 .................... 21 8.2. VE.Bus BMS V2 compared to VE.Bus BMS V1 ............... 22... -
Page 3: General Description
The Victron Lithium Battery 12.8V & 25.6V Smart have integrated Balancing, Temperature and Voltage control (acronym: BTV) and connect to the VE.Bus BMS V2 with two M8 circular connector cord sets. The BTVs of several batteries can be daisy chained. Please see our Lithium Battery Smart product page for details. - Page 4 True remote on/off terminal • The VE.Bus BMS V2 needs to remain connected to the battery positive in order to be able to keep the Multi in low power mode even when AC input on the Multi is available (Multi will stop inverting/charging, close the transfer switch and indicate a low battery error on the status LEDs).
-
Page 5: Safety Precautions
VE.Bus BMS V2 2. Safety precautions • Installation must strictly follow the national safety regulations in compliance with the enclosure, installation, creepage, clearance, casualty, markings and segregation requirements of the end-use application. • Installation must be performed by qualified and trained installers only. -
Page 6: Installation
VE.Bus BMS V2 3. Installation 3.1. What's in the box? The following items are in the box: • 1x VE.Bus BMS V2 • 1x Mains detector • 1x 0.3m RJ45 UTP cable • Piece of Velcro adhesive hook and loop tape Note that the DC power cable to power the BMS is not included. -
Page 7: Basic Installation
(VE.Bus combination error). This error indicates that the VE.Bus products or firmware versions cannot be combined. If it is not possible to update the inverter/chargers or inverters to a VE.Bus firmware version xxxx415 or higher the VE.Bus BMS V2 cannot be used. -
Page 8: Battery Bms Cable Connections
VE.Bus BMS V2 3.2.2. Battery BMS cable connections In the case of several batteries in parallel and/or series configuration, the BMS cables should be connected in series (daisy- chained), and the first and last BMS cable should be connected to the BMS. -
Page 9: Mains Detector
VE.Bus BMS V2 3.2.3. Mains detector The mains detector is not required for the new style MultiPlus 12/1600/70 and MultiPlus 12/2000/80, MultiPlus-II, Quattro-II and inverter models. In this case this chapters can be skipped and the mains detector should be disposed of. -
Page 10: Controlling Dc Loads And Chargers
• Its remote on/off H terminal becomes free floating (usually high). This signal is provided by the Load disconnect output (wired to the remote on/off H terminal of the BatteryProtect) of the VE.Bus BMS V2. See the wiring example System with a BatteryProtect and a solar charger [14]. -
Page 11: Dvcc Operation With Ve.bus Bms V2
Inverter RS, Multi RS or Multis. In order for the GX device to control the solar chargers, Inverter RS or Multi RS in a system with a VE.Bus BMS V2, DVCC must be enabled. These chargers are controlled by setting their maximum charge current limit to zero when the VE.Bus BMS V2 requests that charging should stop. -
Page 12: Remote On/Off Terminal
A typical application is switching off the system when a predetermined state of charge (SoC) is reached in a BMV. Its relay then operates the remote on/off terminal of the BMS. Note that at least the wire loop between pins L and H must be plugged in, so that the VE.Bus BMS V2 can switch on. Page 10... -
Page 13: Gx Device
1. Connect the GX device VE.Bus port to the Remote panel port on the BMS via an RJ45 cable (not included). Note that this is different from the former VE.Bus BMS V1, which allowed only the connection of a Digital Multi Control. The VE.Bus BMS V2 allows to connect a GX device, a VE.Bus Smart dongle or a Digital Multi Control. -
Page 14: Connecting A Digital Multi Control Or A Ve.bus Smart Dongle
VE.Bus BMS V2 3.6. Connecting a Digital Multi Control or a VE.Bus Smart dongle VE.Bus Smart dongle Digital Multi Control (DMC) must be connected to the Remote panel port of the BMS. Both have on/off/charger-only control of the inverter/charger. Note that in systems containing a Digital Multi Control and a GX device or a VE.Bus Smart dongle at the same time, on/off/ charger-only control of the inverter/charger is only possible via the Digital Multi Control. -
Page 15: System Examples
VE.Bus BMS V2 4. System examples 4.1. System with a GX device, on/off switch and pre-alarm circuit AC/DC power supply Pre-alarm warning circuit Description AC source, grid or generator Circuit breaker MultiPlus-II Inverter/charger Remote on/off switch VE.Bus BMS V2 Cerbo GX... -
Page 16: System With A Smartshunt, Batteryprotect And Solar Charger
VE.Bus BMS V2 4.2. System with a SmartShunt, BatteryProtect and solar charger loads Description AC source, grid or generator Circuit breaker MultiPlus-II Inverter/charger Solar charger VE.Direct non-inverting remote on/off cable connects between the solar charger VE.Direct port and the BMS Charge disconnect terminal VE.Bus BMS V2... -
Page 17: Basic System
VE.Bus BMS V2 4.3. Basic system Description MultiPlus-II Inverter/charger VE.Bus BMS V2 Lithium Battery Smart or battery consisting of multiple batteries creating a 12V, 24V or 48V battery bank Page 15 System examples... -
Page 18: System With An Alternator
VE.Bus BMS V2 4.4. System with an alternator Description AC source, grid or generator Circuit breaker Orion DC-DC charger, the remote H terminal is connected to the Charge disconnect terminal on the VE.Bus V2 BMS VE.Bus BMS V2 MultiPlus-II Inverter/charger... -
Page 19: Three-Phase System With A Digital Multi Control
VE.Bus BMS V2 4.5. Three-phase system with a Digital Multi Control Description Digital Multi Control MultiPlus-II Inverter/charger installed and configured as a 3-phase system VE.Bus BMS V2 Lithium Battery Smart or battery consisting of multiple batteries creating a 12V, 24V or 48V battery bank... -
Page 20: Operation
VE.Bus BMS V2 5. Operation 5.1. Important warning Lithium batteries are expensive and can be damaged due to over discharge or over charge. Damage due to over discharge can occur if small loads (such as: alarm systems, relays, standby current of certain loads, back current drain of battery chargers or charge regulators) slowly discharge the battery when the system is not in use. -
Page 21: Frequently Asked Questions
Q5: What does it mean when the BMS displays a VE.Bus Error 15? With VE.Bus firmware versions below version xxxx415 the VE.Bus BMS V2 will generate a VE.Bus Error 15, VE.Bus combination error. This error indicates that the VE.Bus products or firmware versions cannot be combined. Resolution: Update the inverter/ charger to a firmware version xxxx415 or higher, if available. -
Page 22: Technical Specifications Ve.bus Bms V2
VE.Bus BMS V2 7. Technical specifications VE.Bus BMS V2 Electrical Input voltage range 9 – 70Vdc Current draw - regular operation 10mA (excluding Load disconnect current) Current draw - low cell voltage Current draw - switched off via remote 1.50mA... -
Page 23: Appendix
VE.Bus BMS V2 8. Appendix 8.1. Dimensions VE.Bus BMS V2 Page 21 Appendix... -
Page 24: Ve.bus Bms V2 Compared To Ve.bus Bms V1
VE.Bus BMS V2 8.2. VE.Bus BMS V2 compared to VE.Bus BMS V1 This table highlights the differences between the VE.Bus BMS V2 compared to it's predecessor, the VE.Bus BMS V1. Feature VE.Bus BMS V2 VE. Bus BMS V1 Product image MultiPlus/Quattro VE.Bus port...
Need help?
Do you have a question about the VE.Bus BMS V2 and is the answer not in the manual?
Questions and answers