Table of Contents
Advertisement
Quick Links
Advertisement
Table of Contents

Related Manuals for CPI Smart7

Summary of Contents for CPI Smart7
- Page 1 Installation Guide Smart7 Cashless Reader, Generation 7 44072IG0101EN v1.0...
- Page 2 Crane Payment Innovations (CPI). CPI reserves the right to change the product specifications at any time. While every effort has been made to ensure that the information in this publication is accurate, CPI disclaims any liability for any direct or indirect losses (howsoever caused) arising out of use or reliance on this information.
-
Page 3: Version History
Smart7 cashless reader Version history Version history Revision Change Chapters Concerned Editor Date W. Renner D. Garz 44072IG0101EN_.._V1.0 First official version K. Roese May 20, 2021 44072IG0101EN_Smart7_Installation-Guide_V1.0 Published by CPI... -
Page 4: About This Installation Guide
This chapter is intended to help the reader navigate easily within this guide. This guide is meant for qualified technicians or CPI-trained and authorized personnel and describes the firmware and configuration installation and set-up procedures of the Smart7cashless reader with an MDB VMC interface or with an RS-232 coin changer interface. It considers the basic differences between the previous reader generations in terms of set-up, operating and testing procedures. -
Page 5: Symbols
Smart7 cashless reader About this installation guide 2.1.2 Symbols The following symbols are used throughout this installation guide to call attention to safety messages and important information related to the cashless reader. Caution indicates a hazardous situation which, if not avoided, could result in minor or moderate injury. - Page 6 Contents...
-
Page 7: Table Of Contents
Configuring Smart7 cashless reader ......................5 5.1.3 Default configuration ..........................5 5.1.4 Setting Smart7 cashless reader parameters (example: Country and Company Code) ........5 5.1.5 Updating Smart7 cashless reader using a configuration file ................. 7 5.1.5.1 Configuration archive file structure..............................7 5.1.5.2... - Page 8 Table of contents Smart7 cashless reader Installation ......................15 List of figures ......................18 Index ........................19 Published by CPI 44072IG0101EN_Smart7_Installation-Guide_V1.0 viii...
-
Page 9: Safety Instructions
Safety instructions Before installing and setting up the Smart7 cashless reader, please read this guide and in particular the safety instructions carefully at least once. This is to ensure that the contents of this guide have been understood, and the reader knows how to install and set up the cashless reader. -
Page 10: Smart7 Cashless Reader Models
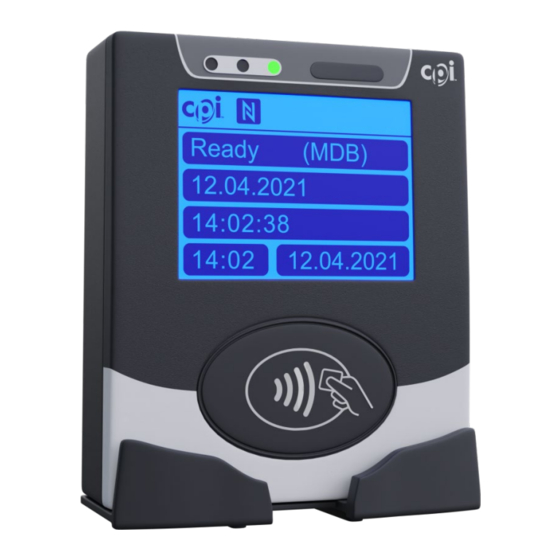
Irrespective of the optional display, both models only differ in the interface to an MDB machine or a coin changer with RS-232 interface. Smart7 cashless reader with MDB machine interface The pictures below shows the front of the Smart7 MDB cashless reader with display on the left and without display on the right-hand side: Fig. 1: Smat7 MDB with Display, Front Fig. -
Page 11: Configuration
Configuration Configuration This chapter describes how to use the GEN7 Configurator online tool to: • Assign a Smart7 cashless reader to a customer or location • Configure a cashless reader • Change default cashless reader parameters • Update a cashless reader using a configuration file The last sub-chapter summarizes the cashless reader’s set-up and configuration... - Page 12 Configuration Smart7 cashless reader Fig. 8: GEN7 Creator – Creating a New Customer Navigate to the Customers section. Click New customer button. In the New Customer dialog box enter Customer name, Device ID prefix and select the Country/Company Code Range(s) that should be available for the new customer by clicking the "+"...
- Page 13 Smart7 cashless reader Configuration Fig. 10: GEN7 Configurator – Assigning Cashless Readers to a Customer If necessary, tick further readers to be assigned. Click the Folder button in the right-hand New Location field to go to the list of customers/locations available.
-
Page 14: Configuring Smart7 Cashless Reader
File button to the computer and then be transferred to the reader, either directly or via USB flash drive. Each new Smart7 cashless reader is supplied from the factory with a default configuration with the country/company code set to 0/0. These are not valid values for country and company codes and therefore a reader will show "ERROR –... - Page 15 Smart7 cashless reader Configuration Fig. 14: GEN7 Configurator – Selecting VMC Settings Dialog Box Navigate to the Customers section. Select the Customer you want to create a reader configuration for A reader configuration created on customer level will be applicable to all the readers that are assigned to that customer.
-
Page 16: Updating Smart7 Cashless Reader Using A Configuration File
Fig. 17: GEN7 Configurator – Generating a Configuration File 5.1.5.3 Loading configuration file onto cashless reader The configuration file can be copied to the Smart7 cashless reader either from the PC using a File Explorer or from a type C USB flash drive: Published by CPI... -
Page 17: Summary Of Smart7 Cashless Reader Set-Up And Configuration
Select customer, customer location, system location or reader. Download configuration file to PC. The server of the GEN7 Configuration online tool generates a configuration archive file as described in Chap. 5.1.5 “Updating Smart7 cashless reader using a configuration file”, p. 7. -
Page 18: Loading Configuration File Onto The Smart7 Cashless Reader
Open reader using Windows Explorer for instance. Drag and drop configuration file to the reader. 5.2.3.2 From USB flash drive to the Smart7 cashless reader Connect type C USB flash drive to PC. Copy configuration file to USB flash drive. -
Page 19: Quick Diagnostics Using Display Messages And Status Leds
Quick diagnostics using display messages and Status LEDs The display models of the Smart7 cashless reader provide status, operation, and maintenance information on the on-board display (cp. Chap 6.1 “Display Messages”, p. 10) whereas the Smart7 cashless reader models without display provide device status and error signals via status LEDs (cp. -
Page 20: Support Packages
As soon as a USB cable is connected, a service package will be created. This is included in a SPK.tar file and can be copied to the PC. For technical support, it can be uploaded to the GEN7 Configurator online tool or sent to the CPI support e-mail account: support@cranepi.com. -
Page 21: Logs
… which can be viewed in the Microsoft Notepad text editor: Fig. 24: Log Files Shown in the Notepad Application Protocols The protocols are in .pco format and can only be viewed in the CPI FileExplorer software, respectively by CPI support staff. 44072IG0101EN_Smart7_Installation-Guide_V1.0 Published by CPI... -
Page 22: Selections
Support packages Smart7 cashless reader Fig. 25: Archive’s Protocol Folder Selections Selection list is also in .json format and can be read in the viewer or in the Notepad application. Fig. 26: Archive’s Selections Folder Statistics The cashless reader’s statistics is provided in .DTS text format like with the previous generation 6 cashless readers: Published by CPI 44072IG0101EN_Smart7_Installation-Guide_V1.0... -
Page 23: Tag List
Smart7 cashless reader Support packages Fig. 27: Archive’s Statistics Folder It can be read in MDSview: Fig. 28: Reader’s Statistical Values shown in MDSview Software Tag list The Tag list includes a system information file, which is always encrypted. 44072IG0101EN_Smart7_Installation-Guide_V1.0... - Page 24 • Never pull the connecting cable of the cashless reader from the machine when a voltage is applied. Use the M4 x 5 screws supplied in the box with the product and the following installation drawing to mount the Smart7 cashless reader: Fig.
- Page 25 CPI shall not be liable for any consequential damages as a result of defects in material or workmanship. Damage due to electrical overload, negligence, accidents, misuse, abuse, vandalism, or an act of God is not covered by CPI warranty. Any alteration of the product after manufacture voids the warranty in its entirety.
- Page 26 Appendix...
- Page 27 Fig. 1: Smat7 MDB with Display, Front ............................... 1 Fig. 2: Smart7 MDB, Rear Side .................................. 1 Fig. 3: Smart7 MDB without Display, Front ..............................1 Fig. 4: Smat7 RS-232 with Display, Front ..............................1 Fig. 5: Smart7 RS-232, Rear Side ................................1 Fig.
- Page 28 Index Smart7 cashless reader Index Abbreviations ....................iv Error localisation ..................10 About Chapter ..................... v Guide ....................... iv Archive file structure ................7, 11 Firmware update ................... 2 Config folder ..................11 Logs folder ..................... 12 Protocols folder ..................12 Selections folder ..................
- Page 29 Smart7 cashless reader Index SPK.tar file ....................11 Statistics folder................... 13 Status LEDs ....................10 pco files ..................... 12 Summary Pictograms ....................v Chapter ..................... v Protocols folder ..................12 Configuration steps .................. 8 Support package ..................11 Symbols ......................v...
- Page 30 C O N T A C T U S Crane Payment Innovations Corporate HQ 3222 Phoenixville Pike, Suite 200 Malvern, PA 19355 support@cranepi.com cranepi.com/support...
Need help?
Do you have a question about the Smart7 and is the answer not in the manual?
Questions and answers