
Subscribe to Our Youtube Channel
Related Manuals for Lantronix IONMM-232


Summary of Contents for Lantronix IONMM-232
- Page 1 IONMM-232 ION Management Module Install Guide Part Number 33725 Revision B January 2022...
- Page 2 IONMM-232 Install Guide Intellectual Property © 2022 Lantronix, Inc. All rights reserved. No part of the contents of this publication may be transmitted or reproduced in any form or by any means without the written permission of Lantronix. Lantronix is a registered trademark of Lantronix, Inc. in the United States and other countries.
-
Page 3: Table Of Contents
Lantronix IONMM-232 Install Guide Contents 1 Introduction ............................5 Related Documents ............................7 Package Contents ............................7 2 Installation .............................. 8 Using the CONSOLE Port ........................... 11 Operating Systems Supported ........................11 Configuring HyperTerminal ......................... 12 Starting an RS-232 Session ........................13 Starting a Telnet Session .......................... - Page 4 Lantronix IONMM-232 Install Guide Cautions and Warnings Cautions indicate that there is the possibility of poor equipment performance or potential damage to the equipment. Warnings indicate that there is the possibility of injury to person. Cautions and Warnings appear here and may appear throughout this manual where appropriate. Failure to read and understand the information identified by this symbol could result in poor equipment performance, damage to the equipment, or injury to persons.
-
Page 5: Introduction
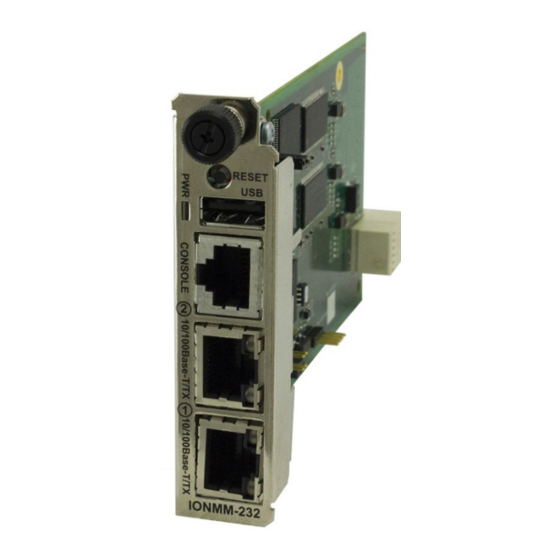
ION Management Module (IONMM-232) from Lantronix. Product Description The ION Management Module (IONMM-232) is a single slot design slide-in module that allows you to configure and manage all of the other ION family slide-in cards (SICs) installed in an ION Chassis and remotely connected standalone modules. - Page 6 The IONMM-232 is an IONMM with an RJ-45 CLI Port that communicates via RS-232. With the introduction of the new IONMM-232, ION Management modules are now available in two versions. The IONMM with its USB Type B console port, and the IONMM-232 with its RJ-45 serial RS232 console port.
-
Page 7: Related Documents
7. ION System x3230 Remotely Managed NID User Guide, 33342 8. ION x222x & x32xx Multiport NIDs Installation Guide, 33433 Package Contents Unpack the contents of the IONMM-232 package and verify them against the checklist below. IONMM-232 Slide-In-Card Documentation Postcard ... -
Page 8: Installation
Use the procedure below to install the IONMM-232 in the ION Chassis. Wear a grounding device and observe electrostatic discharge precautions when installing the IONMM-232 into the ION Chassis. Failure to observe this caution could result in damage to or failure of the IONMM-232. - Page 9 IONMM-232 Install Guide Install Procedure Note: The IONMM-232 is a “hot swappable” device and can be installed with power on in the chassis. 1. Locate an empty slot in the ION System chassis. 2. Grasp the edges of the IONMM-232 by its front panel.
- Page 10 Description RESET button Pressing this button reinitializes the IONMM-232. One USB 2.0 Type A port used to connect the IONMM-232 to a PC for a direct serial interface so a system administrator can access and USB Connector control the IONMM-232 using CLI commands.
-
Page 11: Using The Console Port
IONMM-232 Install Guide Accessing the IONMM-232 The IONMM-232 can be accessed by using either the CONSOLE port or via an Ethernet network connection. The network connection can be via a Telnet session or a Web graphical user interface (GUI). Using the CONSOLE Port The IONMM-232 can be connected to a local management station (PC) through a serial interface using the CONSOLE port. -
Page 12: Configuring Hyperterminal
Lantronix IONMM-232 Install Guide Configuring HyperTerminal Follow the steps below to set up the terminal emulator software (e.g., HyperTerminal) to use the USB COM port. 1. On the desktop, right-click on My Computer. 2. Select Manage. The Computer Management window displays. -
Page 13: Starting An Rs-232 Session
5. Type your password (the default is private). Note: the password is case sensitive. 6. Press Enter. The command line prompt displays. You can now enter commands to set up the various configurations for the IONMM-232. For a description of all available CLI commands see the ION Systems CLI Reference Manual, 33461. -
Page 14: Starting A Telnet Session
Using an Ethernet Network The IONMM-232 can be managed remotely through the Ethernet network via either a Telnet session or a Web interface. Before this is possible you must set up the IP configuration for the IONMM-232. Important: It is recommended that you initially set up the IP configuration through the serial interface (USB connection). -
Page 15: Web Browsers Supported
To sign in to the IONMM-232 via the Web: 1. Open a web browser. 2. In the address (URL) block, type the IP address of the IONMM-232 (the default is 192.168.0.10). 3. Click Go or press Enter. The ION System Sign in screen displays. - Page 16 ] next to ION Stack. This unfolds "ION Stack" node in the left tree view and will 7. Click the plus sign [ refresh device status. ] next to Chassis to unfold the chassis devices. Note: the IONMM-232 shows up 8. Click the plus sign [ as an IONMM in the management tree view.
-
Page 17: Troubleshooting
Troubleshooting Procedure 1. Press the Reset button on the IONMM-232. Does the fault resolve itself? • Proceed to step 2. 2. Is the PWR (Power) LED lit? •... -
Page 18: Problem Conditions
IONMM-232 Install Guide Problem Conditions Cannot access the IONMM-232 via USB port 1. Check that the USB cable is connected to the IONMM-232 and to the PC/workstation. 2. Check that the terminal emulator software is configured and running properly. See “Configuring HyperTerminal”... - Page 19 11) or the Web interface (see “Starting the Web Interface” on page 15). Note: if you are unable to access the IONMM-232 through the Web interface, go to step 3. From the CLI, type: show ssh config and press Enter.
- Page 20 3. Check with your IT department that the network is up and running. 4. Check that the network cable is connected to the IONMM-232 and the network port. 5. Check the IP addressing. At the command prompt, type show ip-mgmt config and press Enter. Verify the assigned IP address, Gateway IP address, and sub-net mask.
- Page 21 IONMM-232 Install Guide 9. Is Management VLAN enabled? Make sure that the management station/PC is part of Continue with step the same VLAN as the IONMM-232. Make sure that the correct port is being used on the IONMM-232. Is access restored? •...
- Page 22 The IONMM-232 PCB has a Hardware / Software mode Jumper at J4. Warning: Do not use this Jumper unless directed by a Lantronix Tech Support specialist. Note: The factory default setting is Software Mode. If changed to Hardware Mode, access via Web UI or CLI is lost.
- Page 23 Lantronix IONMM-232 Install Guide CLI Command to list files in tftpboot (-ls) IONMM-12157809 C1|S19|L1D>backup module-list 1,2,3,4,5,6,7,8 Processing... Backup finished IONMM-12157809 C1|S19|L1D>ls -la /tftpboot drwxrwxr-x 2 root root 0 Mar 28 13:47 . drwxr-xr-x 19 root root 0 Dec 31 1969 ..
-
Page 24: Contact And Compliance Information
A description of any action(s) already taken to resolve the problem (e.g., changing switch mode, rebooting, etc.): __________________________________________________________________ _________________________________________________________________________________ The serial # and revision # of each involved Lantronix product in the network: _________________________________________________________________________________ _________________________________________________________________________________ A description of your network environment (layout, cable type, etc.): _________________________... - Page 25 Anerkennung ihrer Konformität. Declaration of Conformity Manufacture’s Name: Lantronics, Inc. Manufacture’s Address: 48 Discovery, Suite 250, Irvine, California 92618 USA Declares that the products: IONMM-232 Conforms to the following Product Regulations: FCC Part 15 Class A, EN 55032:2012, EN 55024:2010 Directive 2014/30/EU...
- Page 26 Irvine, CA 92618, USA Toll Free: 800-526-8766 Phone: 949-453-3990 Fax: 949-453-3995 Technical Support Online: http://www.transition.com/support. Sales Offices For a current list of our domestic and international sales offices, go to the Lantronix web site at www.lantronix.com/about/contact. 33725 Rev. B https://www.lantronix.com/...
Need help?
Do you have a question about the IONMM-232 and is the answer not in the manual?
Questions and answers