Advertisement
Quick Links
—— Installation and Safe Use Manual ——
MODELS PR74, PR75, PR75XL, PR76, PR77, PR77XL, PR78,
PR79, PR79XL, PR87, PR87XL, BA780 AND BA780XL POLES
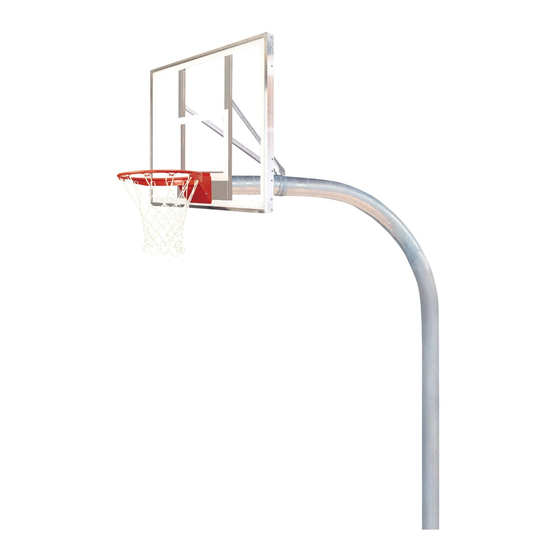
Mega Duty Gooseneck Basketball Systems
P A R T S L I S T
Item
Qty
Description
A
1
Gooseneck Pole
1
B
Backboard Mounting Adapter
C
3
Band Clamp
D
2
7/16" x 2" Carriage Bolt
E
2
3/8" x 1" Hex Bolt
F
2
3/8" Flat Washer
G
2
3/8" Lock Washer
H
3
5/16" x 2" Carriage Bolt
I
3
5/16" Flange Nut
J
2
7/16" Flat Washer
K
2
7/16" Lock Washer
Inspect all contents prior to installation. Report any missing parts to dealer immediately.
¨
Read all instructions before proceeding.
¨
Save this instruction in the event that the manufacturer must be contacted in the future.
¨
IMPROPER INSTALLATION, MAINTENANCE OR USE MAY CAUSE FAILURE AND SERIOUS PERSONAL
1. Call your local utility locator service, usually by dialing 811, before digging to avoid serious injury or
service interruption.
2. Select the location for the concrete base footing. Note that the face of the Backboard (P) will be distanced
from the center of the footing according to information in Figure 12. Dig a 12" diameter hole that is 48"
deep, remove additional soil from the bottom 1/3 - 1/2 of the hole in a bell shape to add pole stability. In
areas where the normal frost line is below 48" it is advisable to dig to the normal frost line. See Figure 1.
3. Make sure that you have a level and a broomstick or similar pole to vibrate air pockets out of concrete. A
12" diameter by 48" deep hole with a bell bottom will require approximately 5 cubic ft. of
Quick Dry Concrete (S). You will need to adjust the amount depending on the size of hole you prepared.
Having too much is better than having too little.
4. Mix concrete according to the directions on the bag. It is advantageous to have the mixture "wet". This
will increase your working time and allow batches to mix in the hole. Pour the hole full to ground level.
Implementation Date: 11/08/22
ORDERED SEPARATELY
Rev: 1
N.J.C.
Item
Qty
Description
L
2
7/16" Hex Nut
M
2
Backboard Brace
N
2
1/2" Square Head Set Screw
O
2
1/2" Jam Nut
P
1
Backboard
Q
1
Rim and Net
R
1
1/4" x 1" Roll Pin
S
TBD
Quick Dry Concrete (supplied by costumer)
T
1
Pole Pad (optional)
U
1
Backboard Conversion Plate (only required on some
systems)
V
2
Backboard Spacer Plate
WARNING!
INJURY.
File: E:\ pub\Instructions\Pole systems
1
Customer Service
(800) 247-7668
Ref#: 920476
Author: L.M.
Advertisement

Related Manuals for Bison PR74


Summary of Contents for Bison PR74
- Page 1 —— Installation and Safe Use Manual —— MODELS PR74, PR75, PR75XL, PR76, PR77, PR77XL, PR78, PR79, PR79XL, PR87, PR87XL, BA780 AND BA780XL POLES ORDERED SEPARATELY Customer Service Mega Duty Gooseneck Basketball Systems (800) 247-7668 P A R T S L I S T...
- Page 2 48 hours. Do not proceed any further until concrete is completely cured. 7a. On systems PR74, PR78, PR79, PR79XL, PR87 and PR87XL, assemble Backboard Conversion Plate (U), Backboard Mounting Adapter (B), Backboard (P) and the Rim (Q) using the hardware provided with the Backboard Conversion Plate (U).
- Page 3 FIGURE 5 9. Place the assembly from 7a or 7b or 7c above on to the end of the pole. It is easiest to place the assembly onto the end of the pole upside down and then rotate 180° before installing and tensioning the 1/2”...
- Page 4 See Figure 9. FIGURE 9 FIGURE 10 12b. If you are installing a PR74, PR78, PR79, or PR79XL with a BA42UC, BA407U, or BA472PC Backboard (P) use 3/8” x 1” Hex Bolts (E), 3/8” Flat Washer (F), and 3/8” Lock Washer (G) to attach the other end of the Backboard Brace (M) to the threaded holes in the rear of the Backboard (P).
- Page 5 13. When Backboard (P) and Rim (Q) are level, drill 1/4” diameter hole into Gooseneck Pole (A) using the pilot hole into the Backboard Mounting Adaptor (B) as guide. Insert 1/4” x 1” Roll Pin (R) with a hammer to reduce risk of rotation or movement. See Figure12. FIGURE 12 14.