
Related Manuals for Meade LX-90


Summary of Contents for Meade LX-90
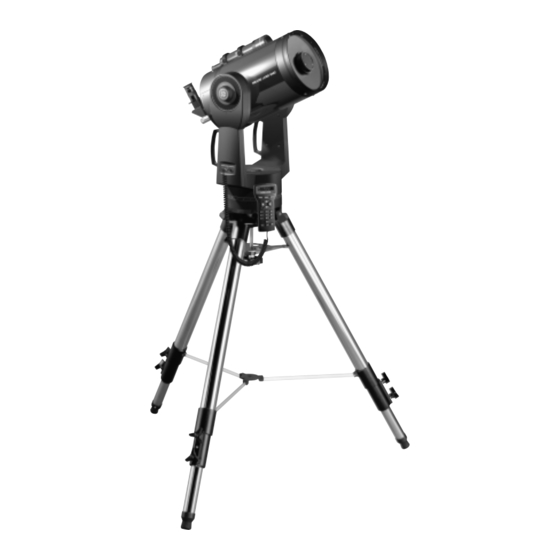
- Page 1 Instruction Manual 8" LX90 Schmidt-Cassegrain Telescope with Autostar Hand Controller Meade Instruments Corporation...
- Page 2 Focal Plane In the Schmidt-Cassegrain design of the Meade LX90, light enters from the right, passes through a thin lens with 2-sided aspheric correction (“correcting plate”), proceeds to a spherical primary mirror, and then to a convex secondary mirror. The convex secondary mirror multiplies the effective focal length of the primary mirror and results in a focus at the focal plane, with light passing through a central perforation in the primary mirror.
-
Page 3: Table Of Contents
Do not mix battery types. If these precautions are not followed, batteries may explode, catch fire, or leak. Improperly installed batteries void your Meade warranty. If you are anxious to use your telescope for the first time, read the QUICK-START GUIDE on pages 4 and 5. -
Page 4: Quick-Start Guide
It is recommended that you attach the supplied tripod to the LX90 for observing. Perform the telescope and Autostar setup indoors in the light so that you become familiar with the parts and operation before moving the telescope out- side into the dark for observing. - Page 5 Plug one end into the HBX port of the computer control panel and plug the other end into the Coil Cable port on the Autostar handbox. (c) 00 Meade [2.0] A U T O S T A R Flip the Power Switch on the computer control panel to the ON position.
-
Page 6: Telescope Features
TELESCOPE FEATURES (not shown; see below) Fig. 1: The LX90 Telescope and Autostar Handbox. - Page 7 800 million miles. Focus beyond the Solar System and observe majestic nebulae, ancient star clusters, remote galaxies, and even stars recently discovered to have planets orbiting about them. Meade LX90 telescopes are instruments fully capable of growing with your interest and are ideal for both the casual observer and serious astronomer alike.
- Page 8 Autostar handbox and to the telescope’s motor drive. C. ON/OFF Switch - Turns the Computer Control Panel and Autostar ON or OFF. D. Auxiliary (AUX) Port (2) - Provides connection for current and future Meade accessories, such as the Meade Accessory Port Module. See “OPTIONAL ACCESSORIES,”...
-
Page 9: Autostar Features
Take a guided tour of the best celestial objects to view on any given night of the year. • Download the latest satellite data and software revisions directly from the Meade website (www.meade.com) and share software with other Autostar enthusiasts. (Requires option- al #505 AstroFinder™... - Page 10 GO TO. Pressing GO TO again resumes the slew to the object. As soon as the coor- Arrow Keys - Slew the telescope in a specific direction (up, down, left, and right), at any dinates are entered, one of nine different speeds.
- Page 11 Not only will you be able to see examples of their art, but you may even be able to pick up some “tricks of the trade” to try out on your LX90 telescope. See page 38 for more information about photography with the LX90.
-
Page 12: Getting Started
• Set of hex wrenches How to Attach the Tripod to the Telescope Assembly The telescope’s fork mount attaches directly to the field tripod. The telescope in this way is mount- ed in an “Altazimuth” (“Altitude-Azimuth,” or “vertical-horizontal”) format. The telescope in this configuration moves along vertical and horizontal axes, corresponding respectively to the Declination (vertical) and Right Ascension (horizontal) axes in an astronomical observing mode. -
Page 13: Precautionary Notes
Improperly installed batteries of the battery holders . Note void your Meade warranty. Always remove the batteries if they are not to be used position of rib in the battery for a long period of time. -
Page 14: Choosing An Eyepiece
If you have not already done so, insert the Super Plössl 26mm eyepiece into the diagonal prism. Unlock the R.A. (9, Fig. 1) and Dec (6, Fig. 1) locks so that the telescope moves freely on both axes. Point the telescope at some well-defined and stationary land object at least 200 yards dis- tant, such as the top of a telephone pole or street sign. -
Page 15: Observing
Practice focusing objects with the focus knob (8, Fig. 1). prism in place, Once you get a feel for how your telescope moves and focuses, try to view something images will be right- more challenging, like a bird or a distant moving train. -
Page 16: Slew Speeds
NOTE: Do not look through Point your telescope at the Moon (note that the Moon is not visible every night) and practice the telescope's eye- using the Arrow keys and the slew speeds to view different features. The Moon contains many piece or viewfinder interesting features, including craters, mountain ranges, and fault lines. -
Page 17: Astronomical Observing
As the Earth rotates beneath the night sky, the stars appear to move from East to West. The speed at which the stars move is called the sidereal rate. You can setup your telescope to move at the sidereal rate so that it automatically tracks the stars and other objects in the night sky. If the telescope is not tracking an astronomical object, the object will drift out of the eyepiece field of view. -
Page 18: Observe A Star Using The Automatic Tracking Feature
Make sure that the Dec and R.A. locks (6 and 9, Fig. 1) are secured as described above. Verify that Autostar is properly connected to your telescope. See “HOW TO ASSEMBLE IMPORTANT NOTE: YOUR TELESCOPE,”... -
Page 19: Easy (Two-Star) Align
Autostar slews the telescope to a first alignment star. The user is asked to ver- ify that the telescope is pointed at the chosen star and then prompted to center the star in the eyepiece. The process is repeated with a second star to complete the alignment. -
Page 20: Go To Saturn
NOTE: The GO TO key also allows you to perform a "spiral search." A spiral search is useful when the telescope slews to an object, but that object is not visible in the eyepiece after the telescope finishes it search. (This sometimes occurs during an alignment procedure.) Press GO TO when the slew is finished and the telescope... -
Page 21: Basic Autostar Operation
AUTOSTAR,” page 17, before proceeding with this exercise. OBJECT Select from over 30, 220 database objects and press GO TO to move the telescope automatically to the object and place it in the telescopic field of view. SETUP Select Item:... -
Page 22: Entering Data Into Autostar
To Calculate Sunset time: Press the MODE key several times, until “Select Item: Object” is displayed. Press the Scroll Down key once to display the “Event” option in the “Select Item” menu. Press the ENTER key to choose the "Event" option and move down a level. "Event: Sunrise"... -
Page 23: Menus And Menu Options
GO TO once to change the second line to the name of the brightest star in the constel- lation. Press GO TO a second time to slew the telescope to that star. Use the Scroll keys to cycle through the list of stars in the constellation, from brightest to dimmest. -
Page 24: Event Menu
Identify is an exciting feature for an observer who wants to scan the night sky and start explor- ing. After the telescope has been properly aligned, use the Autostar Arrow keys to move about in the sky. Then follow this procedure: IMPORTANT NOTE: Only use the Arrow keys to move the telescope during the Identify procedure. -
Page 25: Glossary Menu
When the alarm time arrives, Autostar beeps. Press ENTER to deacti- vate the alarm. Eyepiece Calc calculates information about an eyepiece for the specific telescope to which Autostar is connected. " Field of View: Scroll through a list of available eyepieces. -
Page 26: Setup Menu
Cord Wrap, when set to "On," moves the telescope in such a way as to prevent the cords and cables attached to your telescope assembly from getting wound around the assembly and tan- gled as the telescope slews to objects. -
Page 27: Surf The Web
" Calibrate Motor: If the telescope motors appear to have a problem, use this option to retest the motors before performing a Reset. This option is also used if an Autostar unit is moved between telescopes, to match Autostar to the new telescope. To calibrate the motors, select this option and press ENTER. - Page 28 Autostar handbox. " Software: Sends only the basic Autostar software. This is useful if one user has down- loaded a new version of Autostar software from the Meade website (www.meade.com) and wants to pass this software along to friends. "...
-
Page 29: Advanced Autostar Features
If you plan to observe using Autostar at different geographic locations, you can store up to six observation sites in Autostar's memory to help simplify your telescope setup. Perform these procedures using the Site options (Add, Select, Delete, Edit) of the Setup menu. -
Page 30: Finding Objects Not In The Database
Check out your local library, computer store, or book- "Object Position" and store for astronomy books, CD Roms, or magazines (such as Sky & Telescope or Astronomy), a set of coordinates to find coordinates of celestial objects. The objects/coordinates you enter become part of your displays. -
Page 31: Observing Satellites
Satellite orbits change and new satellites (including the Space Shuttle) are launched. Visit the Meade web site (www.meade.com) approximately once a month to get updated information and instructions on how to download this data to Autostar. If orbital parameters are more than one month old, the satellite pass may not happen at the time predicted by Autostar. -
Page 32: How To Create Your Own Guided Tour
"text only" or as a "MS-DOS text" file). • The Meade #505 Cable Connector Kit to download tour information to the Autostar handbox. Tour Modes The objects chosen for a tour list are selected from Autostar's database or by entering the object's RA and Dec coordinates. - Page 33 Writing a Tour Using the list of commands listed above, a custom tour can be created. Placing the word AUTO SELECT before any of the command lines activates Automatic Mode and, when selected, Autostar automatically searches and finds the designated object. The following is a list of command lines, complete with keywords and necessary strings: TITLE Title must be the first keyword in your tour after any comment lines and must be 15 characters...
- Page 34 ASTEROID "name" Enter ASTEROID and then the name of the desired asteroid in quotes. Autostar displays infor- mation about the asteroid from its database. For example: ASTEROID: "Ceres" COMET "name" Enter COMET and then the name of the desired comet in quotes. Autostar displays information about the comet from its database.
-
Page 35: Landmarks
In this procedure, you will store the location of terrestrial landmarks in Autostar's memory. Set the telescope in the home position, if necessary. Note for future reference where the tel- escope is located and if you have aligned the telescope, which alignment method is used. -
Page 36: Identify
To Select a landmark from the database: Make sure the telescope is located and aligned exactly as when the desired landmark was entered into memory. Display the "Landmark: Select" menu option. Press ENTER. Use the Scroll keys to scroll through the list of objects you have previously entered. When the desired object displays, press ENTER to select the object. -
Page 37: Advanced Alt/Az Alignment
Use the Scroll keys to scroll to a star on the list that you wish to align upon. Select a star that you can easily locate in the night sky. Press ENTER. The telescope slews to the star. Use the Arrow keys to move the telescope until the star is centered in the eyepiece. Press ENTER. -
Page 38: Photography With The Lx90
A few tips on photography with the LX90: Use the Field Tripod for the telescope. At an effective focal length of 2000mm, even small external vibrations can easily ruin an otherwise good photo. CAUTION: With the #62 T-Adapter and a camera body mounted to the LX90 photo port, the telescope can only be rotated vertically about 45°. -
Page 39: Optional Accessories
OPTIONAL ACCESSORIES A wide assortment of professional Meade accessories is available for the LX90 telescope. The premium quality of these accessories is well-suited to the quality of the instrument itself. Consult the Meade General Catalog for complete details on these and other accessories. - Page 40 Tele-Extender is required. The variable Tele-Extender threads onto the telescope's eyepiece- holder, into which is inserted an eyepiece of typically about 26mm focal length; the 35mm cam- era body couples to the tele-extender by means of a T-Mount. The Meade Variable Tele- Extender permits a range of projection images.
-
Page 41: Maintenance
LX90 will give you the best optical performance. As part of final optical testing, every Meade Schmidt-Cassegrain is precisely collimated at the Meade factory before shipment. However, vibrations in shipping can cause the optical system to become misaligned. - Page 42 At this point, look at the front of the telescope where your finger is aiming. It will either be pointing directly at a set screw, or it will be between two set screws aiming at the set screw on the far side of the black plastic secondary mir- ror support.
-
Page 43: Inspecting The Optics
Customer Service hours are 8:30 AM to 4:30 PM, Pacific Time, Monday through Friday. In the unlikely event that the LX90 requires factory servicing or repairs, write or call the Meade Customer Service Department first, before returning the telescope to the factory, giving full par- ticulars as to the nature of the problem, as well as your name, address, and daytime telephone Fig. -
Page 44: Specifications
Clear aperture ...8" Focal length ...2000mm Focal ratio (photographic speed) ...f/10 Resolving power...0.56 arc secs Coatings ...Meade EMC Super Multi-Coatings Mounting ...Cast-aluminum, double-tine forks Gears ...4.9"-dia worm gears, both axes Alignment ...Altazimuth or equatorial w/optional wedge Pointing Precision ...5 arc-minutes in GO TO mode Slew Speeds ...1x sidereal to 6.5°/sec in 9 increments... -
Page 45: Appendix A: Equatorial (Polar) Alignment
In order to Polar align your telescope, it is essen- tial to have an understanding of how and where to locate celestial objects as they move across the sky. -
Page 46: Locating The Celestial Pole
Autostar Polar Alignment Autostar provides three different methods for Polar Alignment: Easy, One-Star and Two-Star. In each method, the telescope is pointed at Polaris, which Autostar uses the star as a refer- ence. Easy Polar Alignment Polaris and two alignment stars are chosen by Autostar based on the date, time, and location entered. -
Page 47: Equatorial Wedge
With the telescope aligned to the Celestial Pole, first look up the celestial coordinates (R.A. and Dec.) of the object in a star atlas. Then loosen the R.A. lock and turn the telescope to read the correct R.A. of the desired object; lock the R.A. lock onto the object. Next, turn the telescope in Declination to read the correct Declination of the object. -
Page 48: Appendix B: Helpful Charts
APPENDIX B: HELPFUL CHARTS Latitude Chart for Major Cities of the World To aid in the Polar Alignment procedure (see page 45), latitudes of major cities around the world are listed below. To determine the latitude of an observing site not listed on the chart, locate the city closest to your site. Then follow the procedure below: Northern Hemisphere observers (N): If the site is over 70 miles (110 km) North of the listed city, add one degree for every 70 miles. -
Page 49: Appendix C: Training The Drive
APPENDIX C: TRAINING THE DRIVE Train the telescope motors using Autostar. Perform this procedure if you are experiencing any pointing accuracy prob- lems. Fig. 31 depicts the complete Drive Training procedure. Use a terrestrial object, such as a telephone pole or lamp post, to train the drive. Complete this NOTE: exercise once every 3 to 6 months to maintain the highest level of telescope pointing accuracy. -
Page 50: Basic Astronomy
So as you look through your Meade LX90 telescope, keep in mind Galileo. To him, a telescope was not a mere machine of glass and metal, but something far more - a window through which the beating heart of the universe might be glimpsed, a fuse to set fire to mind and imagination. - Page 51 The moons Mars is about half the diameter of Earth, and appears through the telescope as a tiny reddish- can be observed in orange disk. It may be possible to see a hint of white at one of the planet’s Polar ice caps.
-
Page 52: A Roadmap To The Stars
A Roadmap to the Stars The night sky is filled with wonder and intrigue. You too, can enjoy exploring the universe simply by following a few pointers on a roadmap to the stars. First, find the Big Dipper which is part of the constellation Ursa Major. - Page 53 ONE YEAR from the date of original purchase in the U.S.A. and Canada. Meade will repair or replace a product, or part thereof, found by Meade to be defective, provided the defective part is returned to Meade, freight-prepaid, with proof of purchase.
Need help?
Do you have a question about the LX-90 and is the answer not in the manual?
Questions and answers