Table of Contents
Advertisement
Advertisement
Table of Contents

Related Manuals for Meade LX80


Summary of Contents for Meade LX80
- Page 1 Instruction Manual LX80™ Multi-Mount Telescope System With Astronomer Inside™...
- Page 3 • Seek medical advice immediately if a battery has been swallowed . Caution: If batteries or parts are swallowed, see a doctor immediately. ® The name “Meade,” “AudioStar” and the Meade logo are trademarks registered with the U.S. Patent and Trademark Offi ce and in principal countries throughout the world.
-
Page 4: Table Of Contents
Appendix E: Latitude Chart ..65 Aligning the LX80 ......24 Appendix F: Declination North America 66 Initializing AudioStar . -
Page 5: A Solid Telescope Built For A Lifetime Of Service
OTAs. If you are like us, you can’t wait to get outside under a dark sky to try out your new LX80 telescope. We have provided a Getting Started Guide that will get you up and running in the shortest amount of time possible. After your fi... -
Page 6: Telescope Features
Robust Aluminum Construction With large two inch diameter stainless steel legs, the all new LX80 tripod is rugged and stable. Built-in fi ne- tune leg levelers at the top of each leg make doing small leveling adjustments the easiest they’ve ever been. -
Page 7: Audiostar
AudioStar Counterweight Shaft AudioStar™ computer-control handbox. Meade’s Large sectional counterweight shafts allows for revolutionary AudioStar computer controller fi nds selecting the ideal shaft length for counter balancing and points your telescope to over 30,000 objects in or dual-tube confi gurations. -
Page 8: Lx80 Key Features
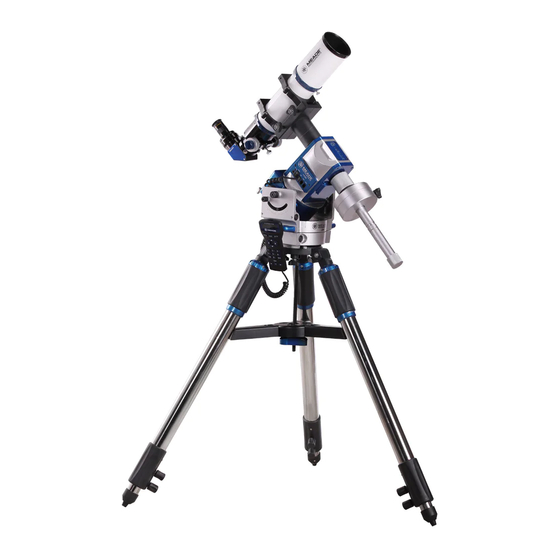
2” Star Diagonal with 1.25” Adapter Latitude Pivot Point 2-Speed Crayford Style Focusing System (Refractors Only) RA Clutch AudioStar Handbox DEC Clutch AudioStar Coil Cord Multi-Function Hex Head Tool Dovetail Lock Knobs Carry Handles Figure 1: LX80 Key Features - Rear View... - Page 9 LX80 Key Features Vixen®-style Dovetail Receiver DEC Reference Point Cradle Rings (Refractors only) Battery Compartment Cover Azimuth Lock Knob Battery Compartment Lock Knob Latitude Scale Counterweight Lock Knob DEC Setting Circle Figure 2: LX80 Key Features - Front View...
- Page 10 Multi-Function Hex Head Tool A. B. C. D. E. F. Bubble Level 3& AZ and EQ Home Position Figure 3: LX80 Control Panel - Detail AZ Home reference point EQ Home reference point (Not Visible) 3& 2& Figure 4: LX80 Controls...
- Page 11 Spreader Bar Tripod Mounting Base Variable Height Tripod Legs Spreader Bar Tension Knob Tripod Leg Lock Knobs (two on each leg) 4& Tripod Leg Leveler Tripod Lock Knobs Figure 5: LX80 Drive Base Close-up 4& Figure 6 : LX80 Tripod...
- Page 12 LX80 Key Features Adjustments for German EQ Mode Azimuth Adjustment Drive Latitude Adjustment Drive Latitude Lock 2& Latitude Pivot Point Multi-Function Hex Head Tool Fig 7: Multi-Function Hex Head Tool Fig 8: Azimuth Adjustment Fig 9: Latitude Adjustment 2& Fig 10: Latitude Pivot Point...
-
Page 13: Key Features Explained
Universe not necessary to use the lock knob. Star Diagonal with Adapter: Holds the eyepiece The Meade LX80 Series models are versatile, high- upright for easy viewing. Provides a more resolution telescopes. Supplied with an AudioStar comfortable right-angle viewing position. Slide... - Page 14 D. Handbox (HBX) Port LX80 Carry Handles: Use these carry handles E. Aux 1 to help move the LX80 mount from one location to another. F. Aux 2 DEC Setting Circle. Counterweight Safety Cap: Prevents the counterweight from accidentally slipping off the DEC Reference Point.
-
Page 15: Getting Started
How to Assemble Your Telescope Secure the extension by tightening the two leg lock The LX80 telescope can be confi gured in three (3) knobs on each leg securely. Note that included on modes of operation (alt-azimuth, equatorial or dual the tripod head is a convenient bubble level to guide mode). -
Page 16: Mount Head To Tripod
4. Attach mount to tripod base. Place the mount safety cap which needs to be removed to install the onto the tripod head using the built-in handles on counterweights. the mount (see Fig. 15). Note the “arrow” and “N” graphic printed on the front side of the mount. Fig 17: Thread-on counterweight shaft Fig 15: Place mount base on tripod. -
Page 17: Mount Optical Tube Assembly
6. Attach the optical tube to the dovetail mount. viewfi nder collimation screws to the viewfi nder All of Meade’s standard LX80 OTAs is equipped bracket leaving room to slide the viewfi nder tube with a dovetail that mates with the mount’s Vixen®- into the bracket. -
Page 18: Level The Mount
fi nished observing to protect the delicate optics. Back off the eyepiece thumbscrews (Fig. 22) and If using Meade’s Universal AC Adapter, connect the 12v connector directly to the computer slide the diagonal into the holder and tighten the control panel. -
Page 19: Balancing The Telescope
RA (Right Ascension) Balance: At this point you will need to use the LX80 hex tool (Page 12, Fig 9, 31). This tool can be found at the lower left of the backside of the drive base. Twist Fig 25: While maintaining hold of OTA, loosen the counter clockwise to remove the tool from the mount. -
Page 20: Aligning The Viewfi Nder
DEC and RA axes and will hand on the counterweight shaft to control rotation. perform optimally. Return to Alt-Az Mode: Insert the LX80 tool into the hex headed latitude adjustment, twisting the tool in a counter clockwise direction to bring the mount head back up to a vertical (alt-az) confi... -
Page 21: Choosing An Eyepiece
LX80 Series. The focal object is still centered in the eyepiece. length of the 8” LX80 Series SC model is 2034mm (see Specifi cations, Page 60). 5. Look through the viewfi nder and loosen or tighten, as appropriate, one or more of the viewfi... -
Page 22: Using Audiostar's Goto Capabilities
(Page 33, Fig 39, 1). more rapidly at higher powers. See TRACKING 2. If you are using the LX80 for the fi rst time, it will OBJECTS, Page 23, for detailed information prompt you to select the desired language. Select on how you can counteract the drift in the fi... -
Page 23: Playing Audio
Observe the Moon Playing Audio Point your telescope at the Moon (note that the The LX80 is equipped with Astronomer Inside Moon is not visible every night). Use your AudioStar technology. This revolutionary technology provides handbox to practice using the arrow keys and the slew object descriptions of night sky objects while you are speeds to view different features. -
Page 24: The Lx80 Multi-Mount System
To automatically track and locate objects in the night the telescope by moving in the horizontal and sky, the LX80 must fi rst be initialized, then aligned on vertical directions. the sky. It is best to set up the telescope in twilight or 6. -
Page 25: Alt-Azimuth Mode
If you wish to change this sky in order for the LX80 to successfully locate and setting later on, use the Site menu. See SITE, Page 42 track celestial objects. -
Page 26: Finding Magnetic North
still level, rotate it so that it points in the direction of the provided combination bubble level/compass into North Star. Lock the horizontal lock. The tube is pointing the telescopes diagonal to aid you in the leveling True North and now in the alt/az home position. process. -
Page 27: Goto Saturn
stars to align upon. When the telescope slews to Once the telescope is aligned, you may choose and the fi rst star for alignment, it may not appear in the “Go To” any object listed in AudioStar’s Object menu. fi eld of view of the eyepiece. The alignment star This exercise demonstrates how to select one such should be easily recognized and be the brightest celestial object, the planet Saturn, for viewing from the... -
Page 28: Equatorial Mode
LX80 to successfully locate and track celestial objects. Performing the “Easy Alignment” routine is the ideal way to get started. -
Page 29: Locating The Celestial Pole
fi nd the North Star (Polaris) by using the Big Dipper as a guide (Page 62, Fig 47). Using the LX80 hex head tool loosen the right and left Easy Align side latitude locks. Insert the same tool into the latitude adjustment drive. -
Page 30: Goto Saturn
Successful” displays. If AudioStar does not display this Saturn” displays. message, perform this procedure again. 5. Press ENTER. “Calculating” displays. Then Note: AudioStar locates alignment stars based on the “Saturn” and a set of coordinates displays. Note date, time and location entered. Using this information that Saturn’s (and other planets’) coordinates and the Polar Home Position as its starting point, the change throughout the year. -
Page 31: Dual Ota Mode
Position the secondary adapter so it is at the same angle as the primary OTA dovetail adapter Fig 37: Dual OTA Alt-Az and tighten to a “snug” fi t using the LX80 tool. The LX80’s sectional counterweight shaft is designed to accept a secondary dovetail adapter enabling you to mount a second optical tube assembly. - Page 32 OTA so that it is aligned on the same object. Retighten the dovetail adapter locks to a “snug” fi t. LX80 TIPS Observing Considerations • Try to pick an observing site away from street and house lights and car headlights. While this is not always possible, the darker the site, the better.
-
Page 33: Audiostar Handbox
Push of a Button • Take a guided tour of the best celestial objects Control of the LX80 is through the operation of the to view on any given night of the year. standard-equipment AudioStar. Nearly all functions of the telescope are accomplished with just a few pushes •... -
Page 34: Audiostar Handbox Features
If MODE is pressed and held for two seconds or AudioStar enthusiasts. more, information about the telescope’s status • Control your LX80 with your PC using a serial displays. When the status displays, press one of interface. the Scroll keys (Page 33, Fig. 39, 7) to display the following information: •... - Page 35 The Scroll keys also scroll through the letters of Slew Speeds the alphabet and numerical digits. LX80 has nine slew speeds that are directly Note: The Scroll Down key and the Down Arrow key proportional to the sidereal rate (the rate at...
-
Page 36: Observation Using Audiostar's Arrow Keys
Terrestrial Observing that AudioStar is properly connected to your telescope. See Getting Started on Page 15. The LX80 Series optical tubes are excellent high- resolution, terrestrial (land) telescopes. Viewing 2. Flip the telescope power switch to the ON terrestrial objects requires looking along the Earth’s position. -
Page 37: Audiostar Operation
AudioStar Operation Important Note: No matter how many levels into AudioStar are traveled, each press of the MODE key moves up a level, until the top level, “Select Item”, is reached. Once in the Select Item level, press MODE to return to the topmost level, “Select Item: Object”. -
Page 38: Object Menu
LX80 database. See Page 45 for located and displayed on the screen. Press GoTo and more information (for complete instructions on how to the telescope slews to that object. -
Page 39: Audiostar Menu Tree
AudioStar #497 MENU TREE Figure 43: The AudioStar #497 Menu Tree... -
Page 40: Event Menu
Largest, etc. Once you have set the parameters of and date of the winter or summer solstice of the the search, select “Start Search” and press ENTER. current year. AudioStar will display the results of the search. See Glossary Menu Page 49 for more information. -
Page 41: Setup Menu
AudioStar beeps. Press ENTER to deactivate telescope’s power, AudioStar is unable to be returned the alarm. to operation without turning the power off and then back on. Eyepiece Calc calculates information about an eyepiece for the specifi c telescope to which AudioStar Language: Select the English language or other pre- is connected. - Page 42 selected telescope. • Reverse UP/DOWN reverses the functions of the Up and Down Arrow keys (i.e., the Up key • Az Ratio and Alt Ratio: The Az (Azimuth) moves the telescope down). ratio and Alt (Altitude) ratio refers to the gears of the telescope’s motors.
- Page 43 (up to six sites may be stored). downloaded a new version of AudioStar Scroll through the list of Countries/States. software from the Meade website (www.meade. Press ENTER when the site you wish to add com) and wants to pass this software along displays.
-
Page 44: Advanced Audiostar Features
Advanced AudioStar Features Adding Observing Sites observing sites list. Choosing a site already on the list (as opposed to using the “Custom” If you plan to observe using AudioStar at different feature) makes it easier to edit, as the “Time geographic locations, you can store up to six Zone”... -
Page 45: Find Objects Not In The Database
keys to enter the digits for the Right Ascension Using AudioStar to Find Objects Not in coordinate of your object. When you are the Database fi nished, press ENTER. In this procedure, you will enter coordinates of celestial 7. “Declination: +00°.00’” displays. Use the Number objects that do not appear in any of the AudioStar keys to enter the digits for the Declination database lists. -
Page 46: Landmarks
Satellite orbits change and new satellites (including such as those in the Landmark database. Be the Space Shuttle) are launched. Visit the Meade web sure to change this option back to “Astronomical” site (www.meade.com) approximately once a month when you wish to view celestial objects again. -
Page 47: Identify
To check on the available amount of memory in “Landmark: Select” displays. AudioStar. 6. Press the Scroll Down key once. “Landmark: AudioStar has a limited amount of memory. Once you Add” displays. Press ENTER. begin to store Landmarks, User Objects and other bits 7. -
Page 48: Training The Drive
Displayed information: Example: 9. Press ENTER begin Az/RA (Right Ascension) training. Catalog or common name... Messier 107, NGC 6171, Orion Nebula, etc 10. “Drive Setup: For this..” begins to scroll across the Type of object...... Globular Cluster, Nebula, display. This is a reminder to point your telescope Black Hole, etc. -
Page 49: Advanced Alt/Az Alignment
North the telescope is pointed reasonable magnifi cations possible with the LX80 when setting the home position (Page 29, Fig. telescopes. See OPTIONAL ACCESSORIES, 36). -
Page 50: Photography
35mm frame. 6. Photography of the Moon and planets through the Photography through a long lens such as the LX80 LX80 can be especially gratifying, but points 1 requires special technique for good results, and the through 4 should be particularly noted in this case. - Page 51 Talking Telescope software translates AudioStar text to synthesized speech through PC speaker. • Use the camera’s timer or remote shutter release (if available for your camera) to minimize vibration. • Includes a cable to connect your LX80 model to Wireless shutter releases available your PC Serial Port.
-
Page 52: Optional Accessories
Optional Accessories A wide assortment of professional Meade accessories is available for the LX80 telescope models. The premium quality of these accessories is well-suited to the quality of the instrument itself. To fi nd out more information about these and other exciting... - Page 53 More accessories will soon be available for your tube attaching to the front-cell of the telescope. LX80 model. To fi nd out more about these and other #905 Variable Polarizer (1.25”): The #905 system accessories available for your telescope, check out includes two polarizer fi...
-
Page 54: Maintenance
Use the 6. If your LX80 model is not to be used for an following guidelines: extended period, perhaps for one month or more, it is advisable to remove the eight AA-size batteries from 1. -
Page 55: Troubleshooting
In fact, when the The following suggestions may be helpful with operation batteries are installed, the power is on and the RA of the LX80: lock engaged, the telescope is moving. However, the The power indicator light on the telescope does not... -
Page 56: Customer Service
SERVICE Interior air conditions may distort terrestrial or celestial images, making it diffi cult, if not impossible, If you have a question concerning your LX80 to obtain a sharp focus. For optimal viewing, use telescope, call the Meade Instruments Customer the telescope outside in the open air instead of Service Department at (800) 626-3233. -
Page 57: Appendix A: Training The Drive
APPENDIX A: Verify that AUDIOSTAR Press > until it TRAINING THE DRIVE INITIALIZATION is is centered complete. Scope slews left. Perform this procedure if you are experiencing any Bring target back Press MODE until to center using Select Item is displayed. pointing accuracy problems. -
Page 58: Appendix B: Basic Astronomy
Edwin Hubble proposed a glimpse into the origin of the universe; Albert Einstein unraveled the relationship Using the LX80, brilliant detail can be observed on the of time and light. Almost daily, using sophisticated Moon, including hundreds of lunar craters and maria, successors to Galileo’s crude telescope, such as the... - Page 59 Listed below Stars are large gaseous are the best planets for viewing through the LX80. objects that self- illuminated by nuclear fusion in their core.
-
Page 60: Appendix C: Specifi Cations
Mount Only II 60 II 90 Product Number 37-0080-00 Product 0610-08-01 0810-08-01 1010-08-01 0306-08-01 4507-08-01 SMT60-10-LX80 SMT90-15-LX80 7 09942 38120 7 Number Telescope Mounting Alt-Azimuth or German Equatorial 7 09942 7 09942 7 09942 7 09942 7 09942 7 09942... -
Page 61: Appendix D: Equatorial Alignment
APPENDIX D: EQUATORIAL (POLAR) ALIGNMENT 46, 1) is that point in the sky where an extension of the Polar Alignment North Pole intersects the celestial sphere. The North In Polar Alignment, the telescope is oriented so that Star, Polaris is located very near the North Celestial the horizontal and vertical axes of the telescope are Pole (Fig. -
Page 62: Locating The Celestial Pole
After the site is dark, face North by pointing your the observer for alignment. First, choose “LX80 Polar” left shoulder toward where the Sun sets. To precisely from the “Setup: Telescope: Telescope Model” menu point at the pole, fi... - Page 63 3. Note the extent of the star’s drift in declination (disregard drift in right ascension): a. If the star drifts South (or down), the telescope’s polar axis is pointing too far East. If the star drifts North (or up), the telescope’s polar axis is pointing too far West.
-
Page 64: Periodic Error Correction (Pec) Training
PEC On and Off Menu Options Periodic Error Correction (PEC) Training (Polar Alignment and RA Drive Only) Select “On” when you want the telescope to use the training information. Select “Off” when you do not want If you wish to improve the tracking performance for the telescope to use the training information. -
Page 65: Appendix E: Latitude Chart
APPENDIX E: Northern hemisphere observers (N): If the site is over 70 miles (110 km) North of the listed city, add one degree LATITUDE CHART for every 70 miles. If the site is over 70 miles South of Latitude Chart for Major Cities of the World the listed city, subtract one degree per 70 miles. - Page 66 APPENDIX F: MAGNETIC DECLINATION: NORTH AMERICA 60°N 50°N 40°N 30°N East Declination West Declination 20°N 10°N 130°W 120°W 110°W 100°W 90°W 80°W...
-
Page 67: Appendix F: Declination North America 66 Appendix G: Declination Global
APPENDIX G: MAGNETIC DECLINATION: GLOBAL MAP... -
Page 68: Recycling Information (Europe)
RECYCLING INFORMATION (EU Countries only) Correct Disposal of this Product (Waste Electrical & Electronic Equipment) This marking shown on the product or its literature indicates that it must not be disposed of in unsorted municipal waste at the end of its working life To prevent possible harm to the environment or human health from uncontrolled waste disposal, please separate this from other types of wastes and recycle it as required... - Page 69 Notes:...
-
Page 72: Meade Limited Warranty
Every Meade telescope, spotting scope, and telescope accessory is warranted by Meade Instruments Corp. (“Meade”) to be free of defects in materials and workmanship for a period of ONE YEAR from the date of original purchase in the U.S.A. and Canada. Meade will repair or replace a product, or part thereof, found by Meade to be defective, provided the defective part is returned to Meade, freight-prepaid, with proof of purchase.
Need help?
Do you have a question about the LX80 and is the answer not in the manual?
Questions and answers