Table of Contents
Advertisement
Quick Links
Advertisement
Table of Contents
Troubleshooting

Subscribe to Our Youtube Channel
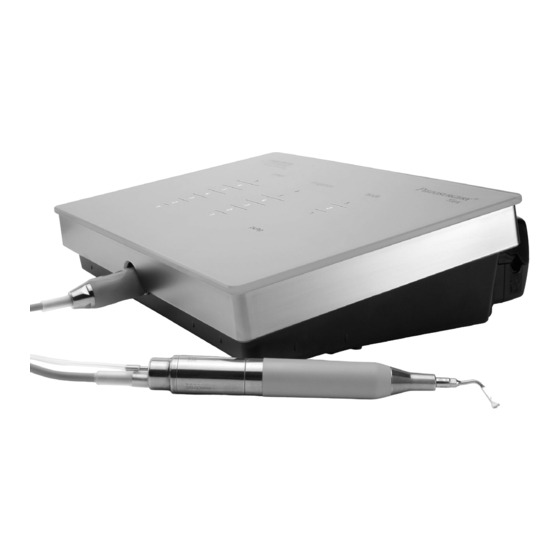
Related Manuals for mectron Piezosurgery flex


Summary of Contents for mectron Piezosurgery flex
- Page 1 USE AND MAINTENANCE MANUAL flex 0051...
- Page 3 Copyright © Mectron S.p.A. 2021. All rights reserved. No part of this document can be reproduced in any form without the written consent of the copyright owner.
-
Page 4: Table Of Contents
flex TABLE OF CONTENTS Introduction 1.1 Intended Use of PIEZOSURGERY® flex Description of the Device 1.2.1 Users Disclaimer Safety Precautions Symbols Identification Data 2.1 Device Identification Label 2.2 Handpiece Identification Data 2.3 Inserts Identification Data Delivery 3.1 List of the Components of the PIEZOSURGERY® flex First Installation Safety Requirements in the Installation Phase 4.2 Connecting the Accessories 5.1 Switching the Device On and Off Description of the Keyboard 5.3 Foot Pedal Button 5.4... - Page 5 PAGE INTENTIONALLY LEFT BLANK...
- Page 6 flex PAGE INTENTIONALLY LEFT BLANK...
-
Page 7: Introduction
The words WARNING, CAUTION and NOTE MECTRON is committed to the continuous contained in this document, carry special updating of our products, which may entail meaning and must be carefully reviewed. changes to components of the device. -
Page 8: Description Of The Device
Piezosurgery Inc. shall be under no liability, expressed or implied, with respect to any damages (personal injury and/or damage... -
Page 9: Safety Precautions
WARNING: Only use original devices’. The interval for periodic checks, Piezosurgery/Mectron inserts, accessories in the intended operating conditions and and spare parts. described in this “Use and Maintenance” manual, is one year. CAUTION: No modification of this... - Page 10 flex WARNING: Contraindications. Do CAUTION: Allow reusable, autoclavable not use PIEZOSURGERY® flex on patients accessories to gradually return to room with heart stimulators (Pace-makers) or temperature after steam sterilization and other implantable electronic devices. This prior to usage. The cooling process must not precaution also applies to the operator. be accelerated. CAUTION: Contraindications. Do not WARNING: Breakage and wear-out of carry out any treatments on metal or ceramic the inserts.
-
Page 11: Symbols
INTRODUCTION Symbols Symbol Description Symbol Description Device compliant with Regulation (EU) Nemko Mark 2017/745. Notified UL CSA compliance 0051 body: IMQ S.p.A. Caution, read the Medical Device Instructions For Use Operating Instructions Manufacturer Date of manufacture Serial Number Lot Number Product Number Single-Use Do not resterilize Sterilized with Ethylene Use-by date Oxide (EO) Can be sterilized in... - Page 12 flex Symbol Description Symbol Description Do not touch moving General warning parts Temperature limitation Humidity limitation for for transport and transport and storage storage Atmospheric pressure Do not use if package is limitation for transport damaged and storage International Protection International Protection Code of the mechanical IPX8 IP20 Code of the mechanical casing. Liquid ingress casing.
-
Page 13: Identification Data
60 s ON - 30 s OFF with irrigation Handpiece Identification Data Each handpiece is laser-marked with (refer to Figure 1 at page 8 • its serial number (SN); • its product number (REF); • its date of manufacturing; • the device name (PIEZOSURGERY® medical); • the Mectron logo; • HIBC 128 Data Matrix; • CE, MD, Applied Part and Sterilizable symbols. NOTE: The complete list of symbols and their description are shown in Chapter 1.5 on page... -
Page 14: Inserts Identification Data
03120127 HIBC 128 Data Matrix medical PIEZOSURGERY ® medical Figure 1 – Handpiece Identification Data Inserts Identification Data The following data are laser-marked on each insert: • the name of the insert (Ref. 1); • the Mectron logo (Ref. 2); • the lot number to which the insert belongs (Ref. 3); • the symbols “Single-use” and “CAUTION: read the instructions for use” (Ref. 4) -
Page 15: Delivery
DELIvERY DELIVERY List of the Components of the PIEZOSURGERY® flex Refer to the front endpaper. The PIEZOSURGERY® flex device is supplied as of a set of equipment, as follows: Console with an integrated peristaltic PIEZOSURGERY® flex consists of accessories pump; that can be ordered separately. The packaging of the device cannot undergo Drip stands for supporting the saline strong impacts contains electronic bags; components, therefore the transport and the C. Power supply cable with hospital grade storage must be carried out with particular plug;... -
Page 16: First Installation
Piezosurgery Inc. The device must be installed is considered as a disconnecting means. in a suitable place that is handy for its use. The installation form has to be filled and sent The device must be installed in a comfortable to Mectron S.p.A. to ensure traceability and place suitable for its use. the warranty activation. Safety Requirements in the Installation Phase WARNING: Contraindications. WARNING: Do not operate the foot Interference with other equipment. The... -
Page 17: Connecting The Accessories
FIRST INSTALLATION CAUTION: No modification of this equipment is allowed. Connecting the Accessories Equipotential plug: The device is equipped with an additional equipotential plug located on the rear of the console. This plug is in accordance with DIN 42801. Insert the connector of the equipotential cord (optional) to the plug on the rear of the device’s console. The purpose of additional potential equalization is to reduce differences of potential which can occur during operation between the device’s body and... - Page 18 flex Connect the foot pedal to the back of the device in the socket marked with the symbol , by means of the plug of the pedal cable, until you hear a “click” sound. In order to disconnect the foot pedal from the device grab the connector of the foot pedal, press the release flap and pull the connector back;...
- Page 19 • Insert the part of the irrigation tube with a bigger diameter and with length of 15 cm into the peristaltic pump; WARNING: Use only original Piezosurgery/Mectron accessories. Do not use irrigation tubings other than those supplied by Piezosurgery/Mectron. • Close the pump cover completely; WARNING: Do not operate the foot pedal of the PIEZOSURGERY® flex...
- Page 20 flex Open the air inlet on the tube before operating. Release the irrigation tube clamp, if this is closed; With the marked dot facing upward, insert the connector of the handpiece cord into the handpiece socket on the console. Gently push the handpiece-cord connector until it bottoms out. CAUTION: To avoid damaging the handpiece-cord, hold only the connector when disconneting the cord.
-
Page 21: Use
Switching the Device On and Off Switching the Device On Facing the front of the device, press the power switch on the left of the device body to the “I” position, being careful not to press the foot pedal. The device does a self-test and 4 symbols appear on the device (ref. P inside cover). At the end of the self-test the symbols turn off one by one, the device sets on the default setting and is ready to be used. Switching the Device Off Facing the front of the device, press the power switch on the left of the device... -
Page 22: Description Of The Keyboard
flex Description of the Keyboard TOUCH KEYBOARD The user can configure the device by simply touching on the touch keyboard. Depending on the selected setting, the electronic feedback system automatically adjusts the correct operating frequency. POWER (Ref. L front endpaper) The desired level of power is adjustable from 7 levels, from 1 to 7, by selecting flex mode power... -
Page 23: Foot Pedal Button
FILLING THE IRRIGATION TUBING KIT (Ref. O front endpaper) The device is equipped with the “pump” flex key which allows to perform the PUMP mode power irrigation function. The PUMP function can be used at the beginning of the treatment, to fill the entire irrigation tubing up to the insert, pump pump so that the surgery can be started with the necessary irrigation (see Chapter 5.5 on page 21). -
Page 24: Safety Requirements Before And During Use
Sterilization manual provided with the device. Every use Once used, each reusable WARNING: Use of non-original accessory must be thoroughly reprocessed Piezosurgery/Mectron inserts: this can prior to reuse, according to the procedures completely damage the threading of the described in the Cleaning and Sterilization handpiece, affecting the proper operation manual provided with the device. Before and causing injury to the patient. - Page 25 CAUTION: The electrical contacts CAUTION: Do not screw or twist the inside the cord connector must be dry. footswitch cord connector during insertion or Upon completion of the sterilization cycle removal - it is a push/pull connector and can and before connecting the handpiece cord be damaged by twisting. to the console, make sure that the electrical CAUTION: The foot pedal is specifically contacts of the connector are perfectly dry. designed to be used only in connection with If necessary, dry the contacts by blowing air the PIEZOSURGERY® flex device. Only use...
- Page 26 flex WARNING: Handle sharp-edged and WARNING: Before every treatment, pointed inserts with particular care. During make sure that the insert appropriate the tightening/untightening operations, the for the treatment is securely attached sharp -edged / pointed parts of the insert to the handpiece. Use exclusively the could cause harm. PIEZOSURGERY® Medical torque wrench to securing the insert to the handpiece. Do not CAUTION: Do not activate the handpiece use any other tool such as pliers, pincers, etc.
-
Page 27: Instructions For Use
Screw the chosen insert onto the Piezosurgery Medical handpiece till it ® bottoms out; Use the Mectron torque wrench to secure the insert; To use the Mectron torque wrench correctly, operate as follows: Fit the insert into the wrench as shown;... - Page 28 flex Firmly hold the central body of the handpiece; CAUTION: Do not grasp the handpiece by its terminal part and/or cord, but only by its central body. The handpiece must not be rotated, but must be grasped firmly, and you must click! only rotate the wrench. Tighten the insert by turning the torque wrench clockwise until it clicks (the wrench turns with respect to the body of the handpiece, producing clicking sounds).
- Page 29 As soon as the irrigation comes out from the Piezosurgery Medical handpiece, ® flex the cycle can be stopped by pressing power irrigation mode PUMP again or, alternatively, by pressing the foot pedal. The Pump function is disabled and the keyboard is enabled again, and displays the last setting used;...
-
Page 30: Important Information On Inserts
Use a new insert. Insert showing signs of non-original Piezosurgery Medical/ of deformation or cracking must be Mectron inserts may result in patient or replaced immediately. operator injury or system malfunction • Do not activate the handpiece while and will void any applicable warranty. -
Page 31: Maintenance
The customer is entitled to deliver the old • Irrigation kit at the end of each surgery; device for disposal to the retailer supplying the new equipment. Instructions on correct • Torque wrench: when worn out or disposal are available from Mectron. broken. Non-compliance with the previous points may Disposable materials and materials that imply produce a fine in accordance with the Waste a biological risk... -
Page 32: Technical Specifications
flex TECHNICAL SPECIFICATIONS Device compliant with Regulation (EU) Classe IIa 2017/745 Applied part type B (insert) Classification as per IEC/EN 60601-1 IP 20 (device) IP X8 (foot pedal model FS-06) According to the standard IEC 80601-2-60 Essential performance the device has no essential performance. Device for intermittent operation 60sec. ON - 30sec. OFF with irrigation Power supply voltage 100-240 v~ 50/60 Hz Max. power consumption 120 VA Fuses Type 5 x 20 mm, T 2AL, 250v Automatic scan Operating frequency From 24 KHz to 36 KHz Adjustable on the touch screen: Power settings 7 power levels, from 1 to 7 Adjustable on the touch screen:... -
Page 33: Guidance And Manufacturer's Declaration - Electromagnetic Emissions
EMC precautions and must be installed at safety distance from life-support systems. and commissioned according to the EMC The Piezosurgery flex must not be used information provided in this chapter. adjacent or stacked with other electrical equipments. If adjacent or stacked use of WARNING: Only use original the device is necessary, normal operation of Piezosurgery/Mectron accessories and spare the equipment and the Piezosurgery Flex, in parts. The use of cables and accessories not the configuration in which they will be used, supplied by Piezosurgery/Mectron might should be verified prior their use. negatively affect the EMC performances. WARNING: Portable and mobile radio communication devices may influence the correct functioning of the device. -
Page 34: Accessible Parts Of The Casing
flex 8.1.2 Accessible Parts of the Casing PIEZOSURGERY® flex is designed to operate in the electromagnetic environment specified below. The customer or user of PIEZOSURGERY® flex should ensure that it is used in such an environment. Basic EMC Electromagnetic Phenomenon standard or test Immunity test levels Environment Guidance method The floor must be made of wood, concrete or ceramic Electrostatic ±8 kv on contact tiles. If the floor is covered... -
Page 35: Guidance And Manufacturer's Declaration - Electromagnetic Immunity
TECHNICAL SPECIFICATIONS 8.1.3 Guidance and Manufacturer’s Declaration - Electromagnetic Immunity 8.1.3.1 Power Connection A.C. Input PIEZOSURGERY® flex is designed to operate in the electromagnetic environment specified below. The customer or user of PIEZOSURGERY® flex should ensure that it is used in such an environment. Basic EMC Electromagnetic Phenomenon standard or test Immunity test levels... - Page 36 flex d) If the frequency stepping skips over an ISM or m) r.m.s. , before modulation is applied. amateur band, as applicable, an additional test n) The ISM (industrial, scientific and medical) bands frequency shall be used in the ISM or amateur radio between 0,15 MHz and 80 MHz are 6,765 MHz to band. This applies to each ISM and amateur radio 6,795 MHz; 13,553 MHz to 13,567 MHz; 26,957 MHz band within the specified frequency range. to 27,283 MHz; and 40,66 MHz to 40,70 MHz. The e) Testing may be performed at other modulation amateur radio bands between 0,15 MHz and 80 MHz frequencies identified by the RISK MANAGEMENT are 1,8 MHz to 2,0 MHz, 3,5 MHz to 4,0 MHz, 5,3 MHz PROCESS. to 5,4 MHz, 7 MHz to 7,3 MHz, 10,1 MHz to 10,15 MHz, 14 MHz to 14,2 MHz, 18,07 MHz to 18,17 MHz, f) ME EQUIPMENT and ME SYSTEMS with a d.c. power...
-
Page 37: Points Of Contact With The Patient
TECHNICAL SPECIFICATIONS 8.1.3.2 Points of Contact with the Patient PIEZOSURGERY® flex is designed to operate in the electromagnetic environment specified below. The customer or user of PIEZOSURGERY® flex should ensure that it is used in such an environment. Basic EMC Electromagnetic Phenomenon standard or test Immunity test levels Environment Guidance method The floor must be made of wood, concrete or ceramic Electrostatic ±8 kv on contact tiles. If the floor is covered... -
Page 38: Parts Accessible To The Input / Output Signals
flex 8.1.3.3 Parts Accessible to the Input / Output Signals PIEZOSURGERY® flex is designed to operate in the electromagnetic environment specified below. The customer or user of PIEZOSURGERY® flex should ensure that it is used in such an environment. Basic EMC Electromagnetic Phenomenon standard or test Immunity test levels Environment Guidance method The floor must be made of wood, concrete or ceramic Electrostatic ±8 kv on contact tiles. If the floor is covered... -
Page 39: Specifications Of The Tests For The Immunity Of The Accessible Parts Of The Casing To The Wireless Rf Communications Device
TECHNICAL SPECIFICATIONS 8.1.4 Specifications of the tests for the Immunity of the Accessible Parts of the Casing to the Wireless RF Communications Device PIEZOSURGERY® flex is designed to operate in an electromagnetic environment in which radiated RF disturbances are under control. The customer or the user of PIEZOSURGERY® flex can help prevent electromagnetic interference by ensuring a minimum distance between the mobile and portable RF (transmitters) communication devices and PIEZOSURGERY® flex, as recommended, in relation to the maximum output power of radiocommunications equipment. -
Page 40: Troubleshooting
flex NOTE: If necessary to achieve the WARNING: Portable RF communication IMMUNITY TEST LEvEL, the distance equipment (including peripheral devices as between the transmitting antenna and the antenna cables and external antennas) must PIEZOSURGERY® flex may be reduced to 1 not be used closer than 30 cm (12 inches) to m. The 1 m test distance is permitted by IEC any part of the device PIEZOSURGERY® flex, 61000-4-3. including the cables specified by the manufacturer. Otherwise, there may be a performance degradation of these devices. TROUBLESHOOTING 9.1 Diagnostic System and Symbols on Keyboard... - Page 41 TROUBLESHOOTING Symbol on the Keyboard Possible Cause Solution Check that there are no Peristaltic pump malfunction. impediments to pump rotation. Correctly reposition the Irrigation kit not positioned silicon tubing inside the correctly inside the pump. pump (see Chapter 4.2 on page 11 The device has been turned Turn device off and wait 5 off and on again without seconds before turning it on waiting 5 seconds. again. Turn the device off and wait Abnormalities in the power 5 seconds before turning it distribution network,...
-
Page 42: Troubleshooting Quick Guide
Unscrew the insert and screw The insert is not properly it back correctly by using the tightened into the Mectron torque wrench. When operating, the handpiece. (Refer to Chapter 5.5 on Piezosurgery Medical ®... - Page 43 (Refer to Chapter 4.2 on page 11 Unscrew the insert and screw it back correctly by using the The insert is not correctly Mectron torque wrench. tightened on the handpiece (Refer to Chapter 5.5 on Poor performance page 21 Broken, worn-out or Replace the insert with a new deformed insert.
-
Page 44: Fuses Replacement
flex 9.3 Fuses Replacement WARNING: Switch the device off. Always turn the device off with the main switch and disconnect it from the electrical power socket before performing the following intervention. Apply leverage with a flat screwdriver, inserting its tip in the seat of the fuse- holder drawer located under the power supply socket; Pull out the fuse-holder drawer; WARNING: Replace the fuses, complying to the characteristics indicated in Chapter 8 on page 26... -
Page 45: Customer Service - Returns And/Or Repairs
TROUBLESHOOTING 9.4 Customer Service - Returns and/or Repairs If you need technical assistance regarding the Please provide the following information: use, or you encounter a problem that requires • Data of the owner with telephone servicing or repair, contact PIEZOSURGERY number; Inc. Customer Service at (1.888.87-PIEZO). • Product name; Returning products for any reason, requires •... -
Page 46: Warranty
If upon examination by PIEZOSURGERY Inc. ® The manufacturer, Mectron S.p.A., warrants service personnel it is determined that the to the first original purchaser (customer) that malfunction is caused by abnormal wear and their products have been tested, inspected tear or by damage caused by misuse, abuse, and shipped in proper working order. - Page 48 Manufacturer: Distributed in U.S. by: Mectron S.p.A. via Loreto 15/A 16042 Carasco (Ge) Italy Tel. +39 0185 35361 850 Michigan Avenue Fax +39 0185 351374 Columbus, Ohio 43215 www.mectron.com Phone 614.459.4922 e-mail: mectron@mectron.com Fax 614.459.4981 www.piezosurgery.us e-mail: info@piezosurgery.us Reseller - Rivenditore - Wiederverkäufer - Revendeur - Revendedor...
Need help?
Do you have a question about the Piezosurgery flex and is the answer not in the manual?
Questions and answers