Advertisement
Quick Links
Advertisement

Related Manuals for rc3Dprint QUICKIE


Summary of Contents for rc3Dprint QUICKIE
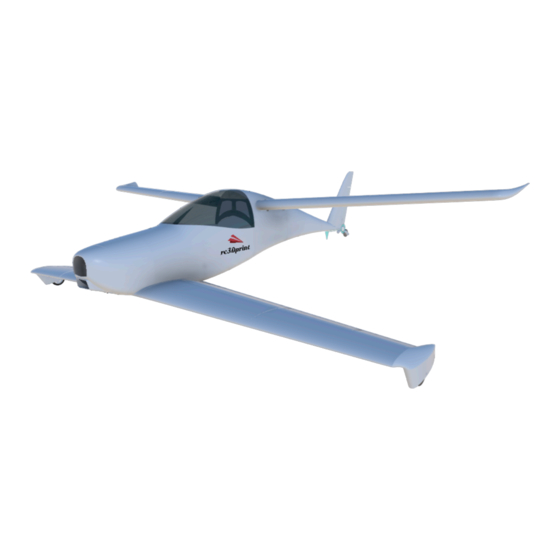
- Page 1 P R I N T I N G A N D A S S E M B L Y I N S T R U C T I O N...
- Page 2 T H A N K Y O U Thank you for downloading this Quickie. These models take many hours of work to make available to you so please don’t share the STL files with others. Send them to www.rc3print.com where they can download the models themselves. This enables me to continue to develop new models to make them available for download.
-
Page 3: Parts List
P A R T S L I S T R E Q U I R E D Motor - 2836 motor (or similar) - 1 x ESC and LIPO as required - 3S/4S battery 4 - Channel radio kit minimum. 6 channels preferred - one channel for each control surface. 5 x 9g servo Pultruded carbon tubes: 2 x 1m 8mm Outside Diameter + 1m 10mm Outside Diameter _ 8mm Inside Diameter - 1m 3mm Tube -... - Page 4 I N C L U D E D S T L . F I L E S F U S E L A G E A F T W I N G...
-
Page 5: R U D D E R A S S E M B L Y
C A N A R D R U D D E R A S S E M B L Y... - Page 6 M A I N W H E E L P A R T S...
-
Page 7: Specifications
S P E C I F I C A T I O N S Wing Span & Area 1055mm - 25.43dm Weight of Printed Parts 450g Flying Weight (2200mAh 3S): 750g Wing Loading 25.4 g/dm 11.6 oz/sq.ft Wing Cube Loading Channels 4 Channel Minimum Centre of Gravity... - Page 8 P R I N T I N G P R O F I L E S * If printing in LW-PLA from Colorfabb we recommend following the calibration process suggested by the manufacturer regarding nozzle temp and flow, below are suggestions L W - P L A P R O F I L E 1 Save this profile as LW-PLA.
- Page 9 P L A P R O F I L E 0.4mm Wall Thickness Wall line count Lines Top/Bottom Pattern Infill Density Cubic Infill Pattern I suggest double the normal printing speed. Infill Speed 215C Printing Temperature 60C (optional) Build Plate Temperature 20% Max Fan Speed Generate Support...
- Page 10 A S S E M B L Y 4 M U S T R E A D P O I N T S 1. D R Y F I T E A C H P I E C E T O G E T H E R B E F O R E G L U I N G I N P L A C E .
- Page 11 Check which way round the servo should go by sighting the servo control rod hole on Fuselage 4. Fuselage 4, 5 include a 3mm carbon rod, which also goes into fuselage 3. Dry fit these pieces together to check the length of the rod then glue them together. It is also a good idea to connect the servo wire to the rudder servo at the same time, running it through to the tail, you can cut the rudder end to size later.
- Page 12 The wheel hubs are printed in PLA and the tyres printed in TPU. You can drill out the holes for wheel axels to whatever size you wish. You can also use suitably sized pre- purchased wheels. In order to prevent rubbing its a good idea top use small washers either side of the wheel.
-
Page 14: Component Placement
C U R A C O M P O N E N T P L A C E M E N T C O W L I N G Unique settings: None F U S E L A G E 1 Increase bottom layer thickness F U S E L A G E 2... - Page 15 F U S E L A G E 3 Unique setting: Supports can be enabled for the wing root trailing edges F U S E L A G E 4 Unique Settings: None F U S E L A G E 5 Unique Settings: None...
- Page 16 F I N 1 Unique Setting: None F I N 2 Unique Settings: None R U D D E R Unique Settings: None...
- Page 17 C A N O P Y Unique Settings: None L & R A F T W I N G T I P Unique Settings: None Can be printed with 0% infill L & R A F T W I N G O U T B O A R D Unique Settings: None...
- Page 18 L & R A F T W I N G I N B O A R D Unique Settings: None L & R A I L E R O N Unique Settings: None L & R W H E E L S P A T Unique Settings: None...
- Page 19 L & R C A N A R D T I P Unique Settings: This part may require printing with supports enabled. L & R C A N A R D O U T B O A R D Unique Settings: None L &...
- Page 20 L & R E L E V A T O R 1 Unique Settings: None Can be printed with 0% infill L & R E L E V A T O R 2 Unique Settings: None Can be printed with 0% infill R U D D E R B O T T O M Print this part from PLA or ABS Unique Settings:...
- Page 21 T A I L W H E E L A R M Printed in PLA or ABS Supports are required to print this part. Infill 30% M O T O R M O U N T B A C K P L A T E Printed in PLA or ABS...
Need help?
Do you have a question about the QUICKIE and is the answer not in the manual?
Questions and answers